

The Secret Ingredient for a DIY Realistic Rust Paint Effect (A cheap and easy faux finish!)
by Robin

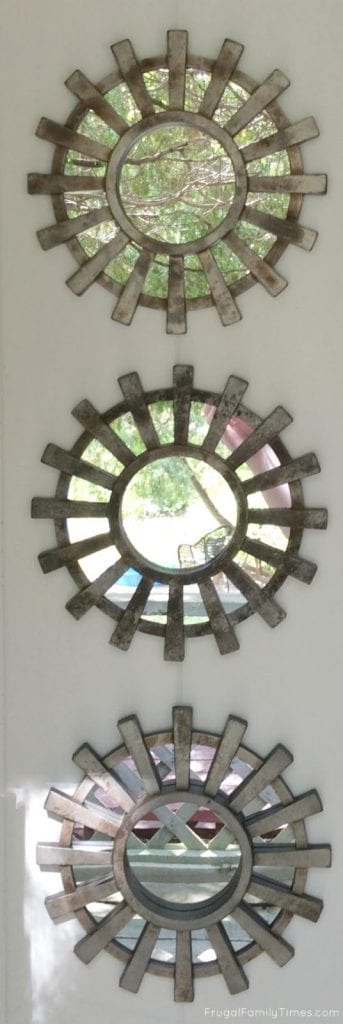
I LOVE this project – It’s got everything I look for in a craft: low effort, low cost, no extra trips to the store and a big payoff – this faux rust paint effect looks amazing!
After I scored these three framed mirrors for $9.99 total – I had absolutely everything at home to do the whole project.
If you’re like me and you’ve had to make 9 trips to 9 stores for a project – and also like me you’ve got hermitty tendencies – that is a score and a half.
My daughter and I knocked this project out in about 30 minutes, too. See – no drawbacks all wins!
I wasn’t looking for a project when I cut through a discount home goods store. I had somewhere to be.
But, on my way out I spied these mirrors with a fun shape and a cheap price. I could see way past their current cheap plastic, black and gold finish:
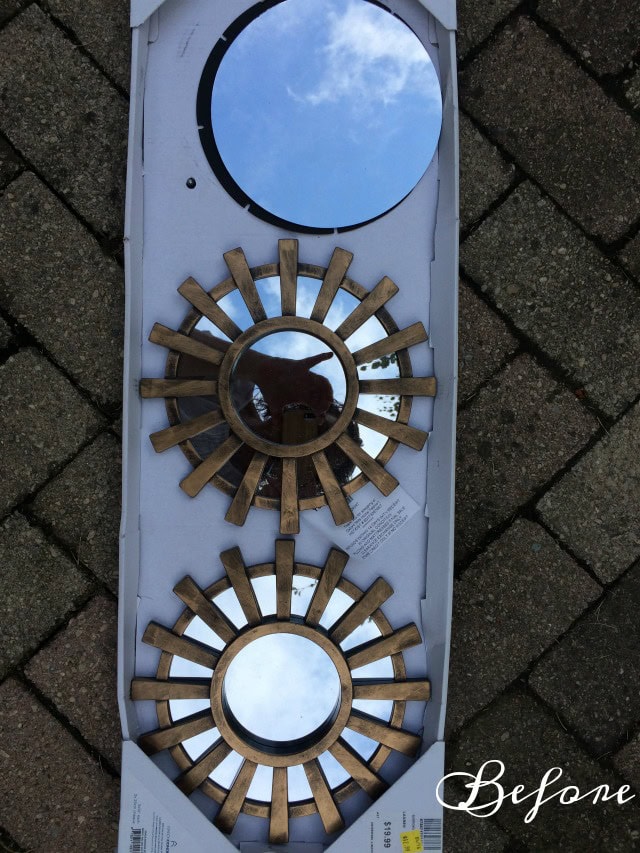
As you can see I started the project and then went – oops! I’m a blogger! I’m supposed to take before shots. If you’ve seen my other projects, this won’t surprise you. Bad blogger! Bad!
What drew me to these frames was there shape – windmills! The space I made them for is our weekend country property surrounded by farms. So perfect – right? (Ed sees gears, not windmills. Nobody’s perfect.)
TIP: If you’re looking for frames to paint be sure to check how they’re put together closely. No screws means you’re screwed. They’re probably glued in. Taking these apart and putting them back together will be torture. These frames had screws. Youppi! (BTW Youppi is French for Yippee – and one of about 10 words I remember from 5 years of school French.)
Last week I was wandering through Dollarama and found these:

(Which to my mind is cheating on the part of the DOLLAR-store – c’mon round numbers at least!)
But, the real point is – frames like these are super easy to find.
So – how did we paint these to look so real? And – as an added bonus – they smell delicious! Any guesses?
DIY Realistic Rust Paint Effect For Metal or Wood or Even Plastic!
The Faux Rust Paint Finish Materials…

1) Oil-rubbed bronze spray paint

2) Nickel spray paint
 and…
and…3) CINNAMON!
How fun is that? Cinnamon! It’s been a few weeks and they still smell sweet. And the rust looks so realistic!

The Faux Rust Paint Finish Steps:
Step 1: Prepare Your Space
Work in a well-ventilated area and cover everything you don’t want messy. Really, outdoors is best if the weather is co-operating.
Step 2: Remove your mirrors from the frames.
Dust them off. You want this first coat of paint to stick really well.
Step 3: Spray your base colour.
This was the Oil-Rubbed Bronze. Let it dry according to the package instructions. Mine was about 30 minutes.

Step 4: Make the Rust Paint Finish!
Get ready – this next step requires you to be fast!
- Spray the Nickel paint. Wait about 5 minutes until it gets tacky, but not dry.
- Sprinkle liberally with Cinnamon. Get it everywhere.
- Using a paper towel, blot the wet paint and cinnamon together.
- When you like how it looks, let it dry.
Optional: I decided to spray a matte clear coat over the frames before putting the mirrors back in. As much as I hate to – I will need to clean these frames when stinker kids get their fingers all over them – and dust. So a clear coat should let the finish stay rusty and awesome, while the mirror gets cleaned.
Step 5: Seriously – that’s it! Put your mirrors back together and hang them up.
Here’s another super easy mirror DIY project: we turned a glass hutch into hidden storage with this simple faux DIY mercury glass mirror how-to!
Want to see more cheap and cheerful decor ideas? This post is part of our series: Mobile Home Makeover. Read more here!

Robin and Ed are a DIY-loving couple with over 25 years of design and build experience. Also, Robin is a Nutritionist and former Registered Dietitian and Ed is an award-winning Business Educator. We share strategies for living a rich life on a DIY budget: creative money-savvy ideas for a stylish home, healthy meals and family fun. Our work has been published in the pages of Do It Yourself, Farmhouse Style and Better Homes & Gardens magazines.




This is a great project for me to do out at the cabin where I love everything rustic. Great post!
Yes! Absolutely perfect finish for a rustic cabin! Thanks for your comment 🙂
This brilliant idea blew my mind. I LOVE IT! I am going around rhe house, inside and out to see what I can spray paint to look this fabulous. Thank you!!!
Hi! Great look! Just one question… you show nickel paint yet link to (and mention) pewter. Which one did you use for the project shown? I really love the result! Thanks
THANK-YOU!! I totally made that error – I've gone back and made corrections to the post. It was indeed Nickel spray paint – though I suspect Pewter would give very similar results. 🙂
This is AWESOME! And exactly what I was looking for to do to some of my frames and a lamp. Thank you thank you!
You're welcome, Jet! Let me know how the project goes. 🙂
That's so sweet, thanks Maria. 🙂
your work is so pretty! I just admire your work. What a wonderful couple.