

3 Easy Ways to Make Copper Patina (Green Verdigris with Household Ingredients!)


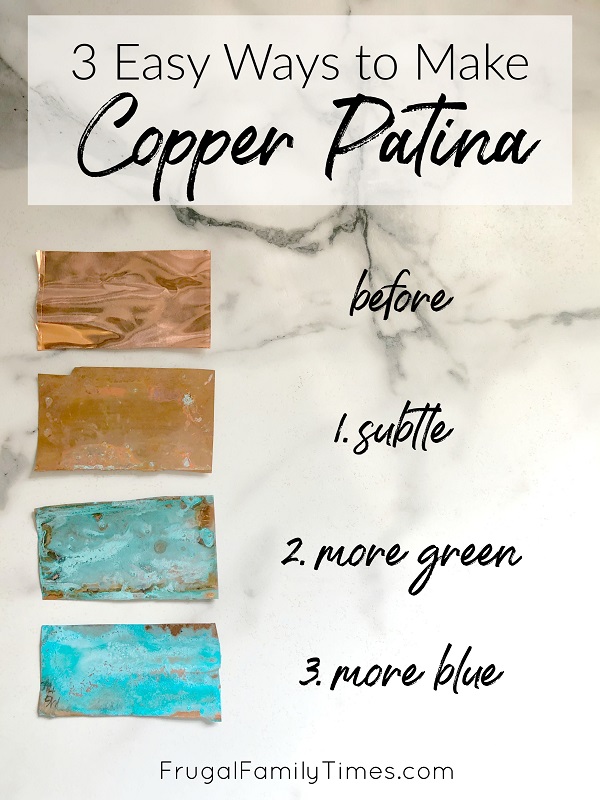
In this post, I’m sharing 3 ways to make copper patina – subtle, green and blue. And would you believe that you’ve probably got all the ingredients in your home already? Kitchen chemistry is so much fun!
by Robin
Last week we shared our big, fun ideas for the ugliest room in our house. Our old basement laundry room is being transformed into our new cozy, industrial underground pub and hobby room.
It’s a room that I’m really excited about because it’s a space we can have so much fun in!
It will be fun to play in when we’re done, but also we’re having a blast creating some really interesting DIY projects to make it come to life. (You can check out our whole vision for our basement bar and craft room here.)
The first area of the room we’re tackling is the staircase.
Last week you saw the BEFORE: our stairs in their great-grandma chic glory. Right now they’re covered in yellowing sheet vinyl top to bottom, with some very functional glued on vinyl nosing.
When our basement bathroom was being photographed last year for Better Homes and Gardens magazine the photographer’s assistant nailed it: “Wow! I feel like I’m going down my grandparent’s actual basement stairs here.” I’m sure it was one of his more impressive shoots. (And I laughed to cover my embarrassment.)
We’re finally ready for our stair makeover – and this is project #1. Our vision is stained wood treads and eye-catching risers. These will be copper stair risers!
And not fresh, shiny new copper. They’re going to be old-world aged copper with the green verdigris patina that I love.
3 Easy Verdigris Copper Patina Recipes
The first part of my job was to figure out how to patina copper sheets. I needed to experiment to find the perfect copper patina chemical formula.
We bought enough of these copper sheets to cover our stair risers. They’re a great size, perfect thickness for our idea and cut really easily!
I decided to experiment with the off-cut bits to get the patina just right without wasting anything. I did three experiments with stuff I already had at home (or borrowed from my friend Judy because our shed was full of demo stuff for the dump.)
1. Subtle Copper Patina Recipe

Here’s what I did:
1) Made a solution with the following ratio:
- 3 Tablespoons White Vinegar (5%) (45 mL)
- 1 teaspoon table salt (5 mL)
2) Stirred very well until the salt dissolved completely.
3) Let the copper soak for 30 minutes.
4) Removed the copper and let it dry.
** A word of caution! Use disposable equipment that you don’t mind ruining.

(I think I heard salt and vinegar and thought: chips! Not sodium acetate and hydrogen chloride solution. Don’t DIY hungry, folks.)
I learned from this mistake and used plastic tools from this point on.
2. How to turn copper green

Here’s what I did:
1) Made a solution with the following 3:1 ratio:
- 3 Tablespoons Water (45 mL)
- 1 Tablespoon Miracle Grow plant food (15mL)
2) Stirred very well until the Miracle Grow dissolved completely.
3) Let the copper soak for 30 minutes.
4) Removed the copper and let it dry. The colour will develop gradually while it dries.
3. Blue Patina on Copper
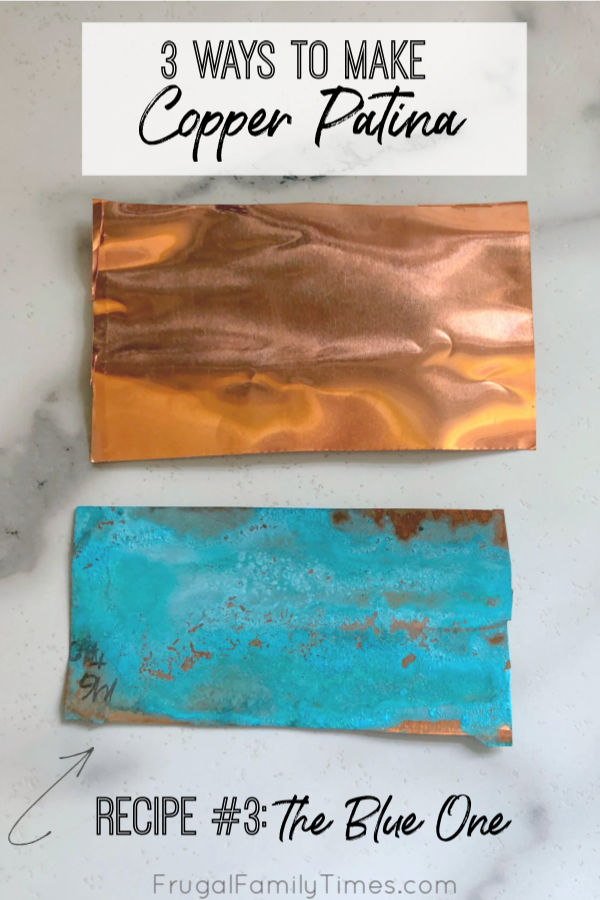
More dramatic than #1 and more blue than #2
Here’s what I did:
1) Made a solution with the following 3:1 ratio:
- 3 Tablespoons Red Wine Vinegar (45 mL)
- 1 Tablespoon Miracle Grow plant food (15mL)
2) Stirred very well until the Miracle Grow dissolved completely.
3) Let the copper soak for 30 minutes.
4) Removed the copper and let it dry. The colour will develop gradually while it dries.

If you want to learn even more ways to make copper patina – and every single thing there is to know about copper – check out this site.
I didn’t show a few more recipes that they discuss above, like one with boiled eggs and a couple with ammonia. (I am weirdly odour sensitive – and avoid using scented products for fear of triggering headaches or migraines – so I chose the least stinky options.) The egg one seemed way too involved for me to want to even try.
So far my plan for our copper stair risers is to do a mixture of the finishes.
I’m going to do recipe #1 to dull the shiny copper – for this I’ll soak the pieces. Then I’m going to use the other two finishes in certain areas of each riser. I’m going to try:
- pooling the solution in large sections,
- using droppers to create random patterns, and
- spritz some areas with a misting bottle.
Each copper sheet has two sides – so I’ll have double the choice of riser for the final stair makeover. Room for error gives me much more confidence to play!
I’m excited and nervous about how this will all turn out. The sweet spot for really interesting creative projects, no?
Update: Here’s our completed DIY Copper Stair Risers project!
You can find all of our beautiful – and budget – Craft and DIY ideas here!

Robin and Ed are a DIY-loving couple with over 25 years of design and build experience. Also, Robin is a Nutritionist and former Registered Dietitian and Ed is an award-winning Business Educator. We share strategies for living a rich life on a DIY budget: creative money-savvy ideas for a stylish home, healthy meals and family fun. Our work has been published in the pages of Do It Yourself, Farmhouse Style and Better Homes & Gardens magazines.



I have a copper roof over one of my bedroom windows approximately 8′ x 15′ one area more exposed to the Florida elements has a nice green vertebrae color the other side is a dirty brown mostly due to a large tree protecting it from the elements. I am planning on power washing any dirt residue then apply the 3 parts water & 1 part Miracle grow by spray (a very wet coat). Do you feel I have a chance of turning the already aged brown copper Green?
Hi Alan! We can’t really predict how this will work for you. I suspect there may be a protective coating on your roof. Let us know how it works out! 🙂
Incredible tips and straightforward. This will be exceptionally helpful for me when I get an opportunity to begin my blog.
Happy to be helpful!
Instant blue/green patina created as follows. 50% muriatic acid from hardware store (its used for etching concrete). 50% ammonia. Mix the two together and paint the copper with a brush. It turns blue immediately.
Hi, I happen to have a small container of Miracle-Gro Shake ‘n Feed for Tomato, Fruit & Vegetables. I see from the picture you have Miracle-Gro Ultra Bloom plant food. Do you think it matters? I’m so excited to try this.
That should work, Sara! 🙂
@Sara,
I only had Miracid on hand. I tried using on Roman era bronze statue piece that I found in Turkey many years ago. It was a beautiful green when I found it. My dad thought he was doing something nice and cleaned it. I really, really missed the patina. Just found this fix/advice today and gave it a try – with the Miracid. The green is back! 🙏
Thanks so much for the tip!!
It’s so cool! I live in Poland and we don’t have this Miracle Grow… can you tell me its composition? Maybe I can find a replacement available in our market. How did you “crumple” those copper sheets? Looks so beautifully!
Hi Joanna! I’m glad you like our project! 🙂 I think you could substitute 20-20-20 fertiziler for the Miracle Gro – but I would do a small test piece first to be sure. I can’t speak to how effective this is without trying it myself.
We didn’t have a particular crumple technique – it just sort of happened when we adhered the copper sheets to the risers. 🙂
Wow! I am excited to try this on some hammered copper bracelets I made. Blues and greens are my go-to for colors. Thanks for sharing these recipes!
Robin
You’re so welcome, Robin! Thanks for your comment! 🙂
Hi,
I have a brass pot for plants, about 16 inches tall and 14 inches in diameter (across). I would like to add the bluer patina to it. Your process calls for soaking the item in the red wine vinegar and Miracle Grow solution for 30 minutes. Can the solution be sprayed on? It would probably dry in less than 30 minutes. Would I just keep spraying it on until the color is achieved? Waiting for it to dry would add additional time. Do you have any suggestions?
Hi Vicky, I’m sorry I can be of help with this one – I’m not sure how brass can be given a blue patina. I’ve only done it with blue… 🙂
How long does this last. I bought a bracelet that they made look like patina and it’s now coming off, so I’m seeing the copper bracelet underneath.
If not long, all good since this sounds pretty simple to do. Thanks for the recipe!
I couldn’t really speak to how long this lasts on jewellery. Jewellery gets banged around a lot more, and comes in contact with skin, which likely affects how the finish does. We’ve had our stair risers in place for about 2 years and they are holding up just fine.
Hi-
I tried your 1 part Miracle Gro to 3 parts water method to get a green patina, and I let my small piece of copper sit in the solution for 30 mins and then took it out and I dried it off with a paper towel and now about 20 mins later it still doesn’t really have a patina at all. Should I have just let it dry on its own? Also I wonder if I didn’t let the Miracle Gro dissolve completely before putting it in.
I suspect maybe your copper piece has some sort of protective finish on it? But, yes, dissolving the miracle grow well should make a difference. 🙂
I’m about to use duly copper effects paint and I really wanted a blue patina instead of green. I may try this in a small test sample and see how it works. Wish me luck lol
How’d it go? 🙂
Do you need to rinse or neutralize the copper after it comes out of the solution?
We just let it dry, Cait. 🙂
I was impressed with the wear to your fork. It makes it look like a family heirloom.
That’s a very positive way to look at it, John! 🙂
Just saw your DIY process for making copper patina stair riser covers. Very impressed with the look, and what a dramatic improvement. When carpet was removed from my stairs it was apparent the treads needed to be replaced and the risers needed some attention, so wish me luck in trying your idea. Thanks so much for sharing.
Hi, Donna! I’m so curious – did you try out idea? I’d love to see it. 🙂
Hi just curious did you spray the copper after it dried with clear coat or anything to keep the patina from coming off? Thanks for the helpful guide!
Hi Kelly! For the samples here I didn’t spray anything on them – so far the patina hasn’t come off – but they don’t get much wear and tear. For the copper stair risers we made we did spray them – you can see it all here: https://www.frugalfamilytimes.com/2020/07/how-to-make-copper-stair-risers-diy-makeover.html