

How to Make Copper Stair Risers (DIY Stair Makeover)


This Project was Featured in Farmhouse Style Magazine!

Intro by Robin – Steps by Ed
The latest room we’re working on in our basement makeover is what we’re calling our “Cozy, Industrial Underground Basement Pub & Hobby Room” (You can read about all the design inspiration here.)
This DIY Copper Stair Risers project is a key element. They balance modern and classic styling and they’re so fascinating to look at. Would you believe it isn’t that difficult to add copper to stairs?
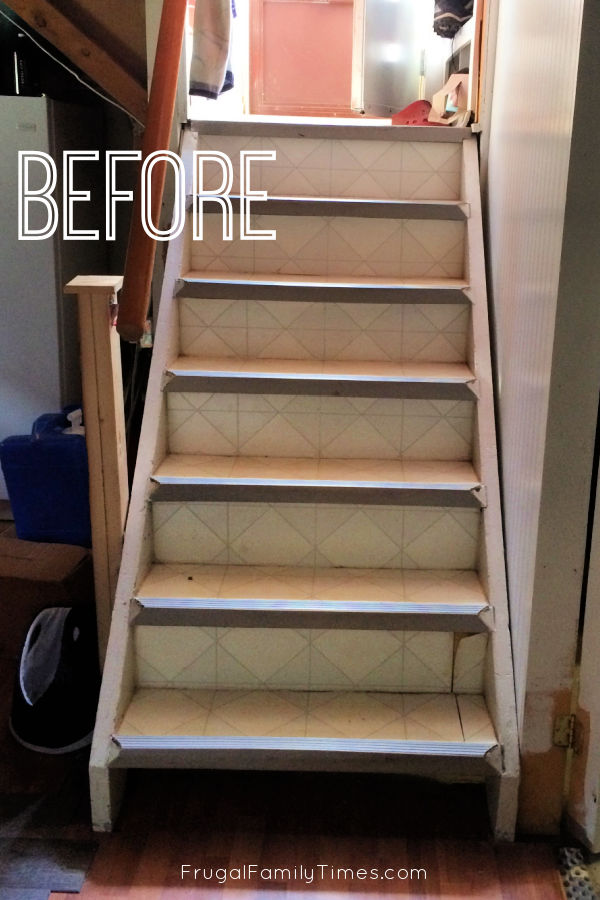
We’ve continued with replacing the two-decade-old vinyl that covered these stairs to wood treads, just like in the top section of these stairs. (We show you how to install wood treads here.)
But, If you already have stair treads you love, you can totally skip those steps and then this project is very easy! The only tool you’ll need then is a pair of scissors.
I had this project envisioned for years but wasn’t sure how to execute it. At a metal fabricator shop, I learned about a copper spray that’s actually copper – you know, the element, not just the colour of copper. I thought this was going to be the way – until I thought more about safety. Aerosol microscopic metal in breathable droplets…hmmm…there must be a safer and less toxic way!
And there is! This copper material fit the bill perfectly. And the price isn’t that unreasonable – given the artistic interest it gives the room. I think of this project as a 3′ X 8′ piece of art.
I ordered one sheet and cut pieces from it to experiment with how to turn copper green. I came up with three copper patina recipes and ended up choosing the simplest one. I’m so happy I did – I think it turned out beautifully.
But, if you’d like even more drama – all three methods could be done. That could be really cool.
The path for this project was paved and here’s how you too can create copper stair risers…
DIY Copper Stair Risers Materials List:
- copper metal sheets 0.1x200x1000mm – like these (These are the exact ones we used.)
- double-sided carpet/vinyl tape (We used this one.)
- Patina solution – salt and vinegar
- Container long enough to soak riser pieces without folding (We used an under-bed storage container like this one.)
- spray clear coat in satin
- scissors or tin snips
- new stair treads- cut to size, finished and sealed
- You can find our full tutorials here: Staining Stair Treads and Installing/DIY Stair Treads
How To Make Patina Copper Stair Risers – and Install Them
Step 1: Cut Copper to Size

We just needed to cut it to length – which we did by carefully measuring and marking, then cutting with scissors. Yes – the copper we used was thin enough that scissors could cut it.
If you use thicker material, you may need to use tin snips.
Step 2: Prepare Copper Patina Solution

You’ll see that it still produces a pretty obvious aged-copper look when it is all said and done.
Because we needed to cover a large amount of copper – we ended up using a gallon of vinegar (4L) with two cups (500mL) of salt.
Step 3: Soak Copper in Patina Solution

We let them soak for an hour, gently moving them around to ensure complete exposure to the salt and vinegar.
We did this in pairs so the maximum surface area was exposed.
We let them soak for one hour.
Step 4: Let Copper Stair Risers Pieces Dry

IMPORTANT NOTE: our paper towel had a circle pattern with dots embossed on it. This pattern transferred to the copper as it changed colour. Robin ended up loving it! But if you don’t want any patterns like that – choose a completely smooth surface for drying.
The patina comes from the interaction between the metal, the solution and air, so you will notice the colours develop and deepen as time passes.

You can be strategic about that if you want bolder green areas.

You can see the original paper towel pattern in the bottom of the photo. Consider yourself warned! 🙂
Step 5: Clear Coat to Protect Copper Stair Risers’ Finish

You’ll want to pick your favourite sides and lay the panels out as flat as possible when applying the clear coat.
Follow the application instructions on the can with respect to temperature and ventilation.
The next thing you’ll want to do is choose the placement of your copper on the stair risers. Robin was VERY particular about this and took her
Step 6: Prepare Stairs

Our stairs needed the old vinyl floor and rubber nosing removed (that awesome beige-brown colour is remaining contact cement). I also cut off the front end of the treads, as this needs to be gone for the oak tread application.
Do all your prep now, because you won’t be able to mess with anything later without potentially damaging the copper risers or their patina finish.
Step 7: Install Copper Stair Risers

I think it is designed for sticking military-grade carpet to battleship floors or something. It is VERY sticky.
Any scissors you use to cut it will get very gummed up.

Stick one side to the riser, but don’t peel off the cover on the second side (yet).

Press the copper into place. We found that starting at one side and rolling it across worked best – press evenly as you go.
Step 8: Install Wood Treads

Basically cut your new, stained, finished oak tread to size, put some construction adhesive on the old tread, fit the new piece over it and screw to secure from underneath.
Stand back and admire your new copper stair risers!


So here again is our inspiration photo. Our intention was never to copy it exactly – the inspiration stair risers are brass – and we’ve made verdigris COPPER stair risers – but the feel of them is what we were aiming for.

source: unknown!
(I can only find a pin for this gorgeous staircase. If you know the original source – please let me know so I can credit their amazing work properly.)

In-person, with normal lighting, they look a bit more subtle.

See how the very bottom step doesn’t have a riser? Curious why we’d do something so weird? It’s actually how our cat gets into the storage room next door to access her kitty litter – and there’s also our new hidden storage under the stairs there too!
We’ve got more DIY projects from our Stair Makeover, check them out here…

Robin and Ed are a DIY-loving couple with over 25 years of design and build experience. Also, Robin is a Nutritionist and former Registered Dietitian and Ed is an award-winning Business Educator. We share strategies for living a rich life on a DIY budget: creative money-savvy ideas for a stylish home, healthy meals and family fun. Our work has been published in the pages of Do It Yourself, Farmhouse Style and Better Homes & Gardens magazines.




I was so excited to use your “subtle” process to age my copper pieces for a project. I have a problem getting the salt to dissolve in the vinegar. It will NOT dissolve. I have tried stirring, whisking, boiling, letting it sit overnight…you name it. How did you get yours to dissolve? I would very much appreciate any advice you have. Thank you so much.
Hi Darcee! I have no idea what’s happening to you! We had no trouble with dissolving. So strange! And you’re using regular vinegar and table salt? Could it be coarse salt you’re using? Have you tried a small sample of copper in the mixture you’re getting – maybe it will still be effective despite the salt grains remaining?
Very creative with the copper stairs and thanks for the recipes!
You’re so welcome, Stef! 🙂
Great job! I came across your inspiration stairs, also, and fell in love. They were by Rupert Bevan Ltd. (UK)
This is incredible! Thank you for sharing. I’m adding a patina to a copper table. I just stripped the lacquer… so I was looking for the next step to add some blue to it. I can’t wait to try miracle gro and red wine!
Awesome, Catherine! Let me know how it goes!
What a fantastic idea, I’m very scared to try and do this sort of thing myself but I’m gonna try something.
My stairs have carpet and it’s Guk!
You can certainly tell it’s 25 years ago since they carpeted my stairs.
I’m not going to pay some heaps of $$$ when I’m sure I could do something myself.
Checking out ideas yours has been the best so far I love it!
The thought of what is under my carpeted stairs sends shivers up and down my spine.
I hope I can remember how to get back to your ideas, I’m pretty hopeless with the knowing how to get back to the technology side of things.
Again thanks for sharing this amazing idea!!
My head is spinning out of control with ideas now lol🤔
Kind Regards
DR Harris
Thanks for your charming comment, Deidre! Happy we’ve inspired you. 🙂
Thank you so much for the very detailed instructions! I have to say it took me awhile to figure out the best patina method but since I’ve done it once this project is actually a relatively easy way to make a huge difference!
I’m so glad you found it helpful! If you do the project be sure to come back and show us! 🙂
Beautiful stairway! BTW, the stairway that inspired you is by Rupert Bevan Ltd. (It is actually patinated brass) Would love to know how it was done too!
Oh my gosh!! Your stairs look so elegant now. Yes, they did look like grandma stairs before, but I had a warm and fuzzy feeling seeing the before picture. LOL But yes, the after photos are very striking. The hard work was certainly worth it!!! So fun to have something so unique and beautiful.
Thanks so much for your thoughtful comment, Robbie! Definitely an upgrade from the grandma stairs. We love them!
Rupert Bevan Ltd is the designer of that beautiful inspirational staircase you mentioned. I saw it on Elle Decor “27 Stylish Staircase Decorating Ideas”. About to attempt myself!
Thanks for the lead, Virginia! I’ll go hunting and see if I can find the original source. Good luck with your project – are you doing copper? The original is brass. 🙂
You are the first to answer EVERY person’s comment. Kudos
We try, Joanne! 🙂 Sometimes it takes us awhile – but we try. 😉
These are beautiful! I love the patina of weathered copper. Very informative and thorough instructions as well. Thanks for sharing!
Thanks for your kind comment, Mindy! 🙂
Wow, love it!!!
Happy to hear that! 🙂
I love these! I’m curious about your measurements on the risers. I have a large staircase each one of my risers are about 6.25” high 42” long. I’ve got 16 steps. How big was each roll you purchased? Again great job!
Thanks so much, Heather! The exact product we used came in sheets and each one was enough to do one tread. The measurements were 200mm by 1000mm – or 7.87 inches by 39.37 inches. Not wide enough for you! In our testing phase we purchased it in a 20 ft roll – this might be a better choice for you: https://amzn.to/3ktS87M It’s a very slightly thinner product, but would still work well! 🙂
This was the first post of yours I read and it was awesome!!! I love just about anything copper. Great job and thanks for the tutorial.
Glad you like it, Stephanie! Thanks so much for taking the time to comment – we really appreciate it! 🙂