DIY: How to Add a Bathroom in the Basement Without Breaking Concrete!

by Ed
This fall we put a bathroom in the basement without breaking concrete – and it turned out beautifully. (Better Homes and Gardens magazine agrees – they featured our project in their February 2019 issue!)
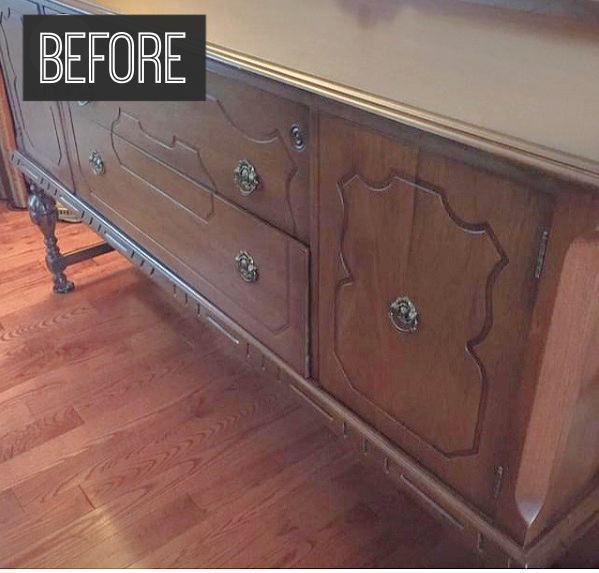
The before and after below is pretty compelling – our new basement bathroom used to be a closet!

We installed a Sanicompact macerating toilet from Saniflo Canada in our basement bathroom. We talked about all the reasons we chose it here.
From a practical standpoint, the best parts were that it allowed us to add a sink and toilet without breaking up the concrete floor and without using the space a conventional toilet would have taken.
In a room this small – every inch counts!
But how hard was it to install this new bathroom in the basement?
Well, I’m here this time to walk you through it with lots of photos (we took over 180!) and some tips that I learned from our install.
Saniflo Canada provided not only the Sanicompact toilet but also the technical support whenever I had a question. Between my experiences and their insight, I hope this tutorial will help you in deciding if you can install one and help you in the process.

So I wrote this post to help you add a bathroom without breaking concrete at all. I learned A LOT. Below I share my tips and tutorial on how to install a Saniflo macerating toilet system.

How to Add a Basement Bathroom Without Breaking Concrete
To begin with, some insight into the skills you’ll need:
Skill Inventory:
- Waste/drain plumbing – likely both PVC and ABS – depending on what your house has for a main stack.
- Supply plumbing – copper/pex depending on what your house has – Sharkbite fittings if you are like me and want a shortcut.
- Electrical – Either adding a new, dedicated breaker and run for the toilet (or adding it to an existing run).
- Framing, drywall, finish carpentry, painting etc.
Give that list a read over. I had done small bits of all those steps before undertaking this project. I also watched some YouTube videos for some things and read some too. I learned a lot before and during this install.
If anything sounds intimidating or totally new to you, you might want to get a pro to install. I would suggest still reading the rest of this tutorial because I’ll try and talk you through location choice and some other things that will help when talking to a pro. Also, if a pro does your install, Saniflo Canada will give you a bonus year on your warranty, so that’s a good deal too.
Having delivered all my caveats, this project is still very DIY-able and if you have those skills, or know someone who does, you can get a powder room anywhere in your house for under $1500.
Basement Bathroom Materials list:
- Saniflo Sanicompact. Be sure to compare prices (and use an online coupon!):
- 1″ PVC pipe – schedule 40 pressure rated – as long a run as you’ll need to go from your toilet location to main plumbing stack in your house.
- 1″ PVC fittings to make all the twists and turns you’ll need to get there. Avoid using 90-degree elbows – instead, use 2 x 45-degree fittings to make all turns gradual for the pressure flush.
- 1/2″ copper or pex for the supply line and sink connection (assuming you’re connecting a sink in with your Saniflo system).
- 1-1/4″ ABS pipe and fittings (to connect sink trap, and for joining up to your main waste stack connection.
- 1″ PVC shutoff ball valve
- 1-1/2″ to 1-1/4 or 1″ flexible coupling for joining the European PVC sized pipe to North American ABS pipe (if that’s what you have – I’ll show you my solution below)
- ABS and PVC cement/primer
- Wiring (as needed) to add a GFI outlet to plug the Saniflo in to.
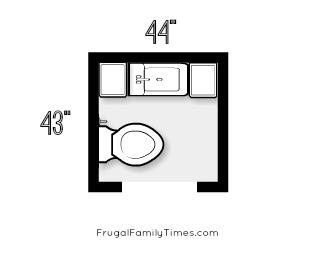
How do you make this list more specific? Choose the location of your Saniflo toilet and start measuring!
For me, this meant getting Robin to decide where she wanted it in the tiny (4’x4′!) closet we were converting.
I then opened up the ceiling and tore down some drywall and checked where studs and joists were, made a quick plan and started measuring
Ultimately, we choose a spot where the waste drain pipe could run straight up to the joists, then parallel to one till it reached an area where we could drop it down and access the main stack.
This will be crucial for DIY-ing, but it is also useful if you are having a pro install your Saniflo Canada Sanicompact.
Lining things up a bit to make it easier to hit a drain stack will mean less disruption/construction (and usually less cost). That said, all the supply and drain plumbing is small and can be made to fit in most areas.

And yes, that is an electronic keyboard stand the sink is sitting on to temporarily visualize the space…
I found that locating 1″ PVC was a challenge. My solution was to find it online and fill a shopping cart at Home Hardware’s website with all the fittings I thought I might need. Order extras of everything! You can always return what you don’t need and you never know what might be the perfect fit for something.
Step 1: Prepare the Saniflo Sanicompact for installation.
Attach all the fittings you’ll need so that any measurements you take will be accurate.
The Sanicompact ships by default with the sink connection sealed. You’ll need to cut the cap and attach the drain connector if you plan on adding a sink (like we did).

The bottom image shows all four connections (Water supply, GFI electrical, Sink gray water drain and black water drain) you’ll need to plan for in your framing and utility prep.
Step 2: With an idea of a final location, begin by framing out a spot for an opening behind the Saniflo Sanicompact.
If you have a wall that allows you to work from behind (ie cut a hole in from a closet or storage room to help make connections) that is amazing. I didn’t have that.
Consequently, I opted to leave a larger hole so I could squeeze my hands in to make the final plumbing connections.
We then tried to hide as much of the hole as possible with trim. Robin wishes it were smaller… Saniflo’s connections are all fairly flexible, so you do have a bit of room to move things around.

Here is the basic idea of where the toilet will go.
I gave myself lots of room to make the connections but still ended up cutting some framing out.
I drew out on the back of the drywall where my other drains would connect. The GFI outlet is located in the bottom left corner.
Take a good look, as somehow it avoided getting in any other photos.
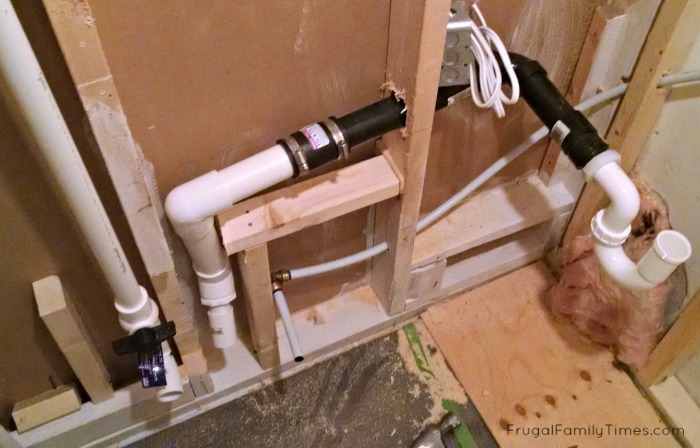
Step 3: Rough in your GFI wiring/outlet, and 1/2″ water supply lines.

We put both a GFI next to the toilet and next to the sink.
BTW – that mass of insulation? A cold air return duct we had to work into the design.
Step 4: Rough cut and fit your 1″ PVC waste water drain.
Include a shutoff ball valve at a low point, as close to the toilet unit as possible.
Why? Well, if you ever need to take your toilet out for servicing, you’ll appreciate being able to close off the waste pipe in the wall and minimize how much black water is left when you disconnect everything.

I used my chop saw to make some 1″ PVC ‘LEGO’ bits – 1″x 1″ pieces to help make all the twists and turns needed.
Step 5: When you have the PVC rough-fit all the way to your drain stack, decide how you’ll cut-in to the ABS main.
Be sure to include the recommended downward slope of 1/4″ per foot between the toilet and the stack.
Cut into the ABS and begin assembling.
I used an ABS whye and a three-foot length of ABS that I then joined with a coupling to a PVC fitting.
PVC and ABS don’t glue well together (or at all), so be sure you have a similar solution if your plumbing has a lot of ABS.

This is my test fit.


The PVC on the right is toilet drain going up from the back of the Sanicompact and then slopping downwards. In the background on the left, you can see where it lines up with the ABS-main-stack connection.
The coupling is not in place yet.

Step 6: Assemble the PVC from the toilet to the ABS connection.
PVC requires primer and cement – both of which can be messy and stain. Consider yourself warned.
This pipe will be under pressure when the toilet flushes and pumps out waste, so don’t “cut any corners”. Literally – cut all the pipe as square and neatly as possible for clean connections.
No Pictures – sorry – but the PVC primer/cement is a time-sensitive operation and there are lots of online tutorials out there if this step is new to you.
Step 7: Assemble the sink drain trap connection from sink to the toilet.
Again, I had to connect ABS and PVC and again I used a coupling.
This is not under pressure and just gravity drains from the sink to the Sanicompact unit to be flushed.
You’ll also notice that I had to remove some of the toilet framing that I alluded to above.
Step 8: Finalize and check everything. Put up drywall.

Step 9: Connect toilet fittings, GFI outlet, and water supply.
Test fit everything in place.
Connect toilet using supplied hose clamps and a 7mm driver head. I tried using a screwdriver and couldn’t get it tight enough (it leaked!).
A quick call to Saniflo Canada customer service let me know that a 7mm socket is the best way to go. After that – no leaks, no problems.
Check all your connections once again – make sure your drain ball valve is open, turn the water on, plug in and try a flush!

Do not push the ABS too far into the flexible Saniflo coupling – you want it to ‘funnel’ the wastewater in and pushing it in too far can impede that.

I likely left too much space in the wallboard, but there is a lot of tightening to do and not much room otherwise.
This is the point where it would be great to have a back panel to access to the connections.
Step 10: If things are good, you can mark the floor and drill in the mounting brackets.
Connect the seat. Pat yourself on the back. Maybe take it on its maiden voyage? You deserve the honour!

Done!

I did this – it wasn’t here before and now it is.
All the details…
- We devised our own DIY alternative to ridiculously expensive wallpaper – and we’ve shared how we did it here.
- We took an IKEA sink and made our own floating wood vanity from $30 in supplies – it makes this small room seem so much bigger. (And you know we love IKEA hacks.)
- We did a reclaimed wood stain finish on our vanity – with things from around the house – for pennies!
- We installed tongue and groove ceiling planks.
- And we’ll share about how we did all the finishing touches on our Classic, Modern, Natural Powder Room::
- the gorgeous faucet
- board and batten wainscotting (which we have done before with beautiful results)
- simple to install crown moulding
- the beautiful lighting and more!

Robin and Ed are a DIY-loving couple with over 25 years of design and build experience. Also, Robin is a Nutritionist and former Registered Dietitian and Ed is an award-winning Business Educator. We share strategies for living a rich life on a DIY budget: creative money-savvy ideas for a stylish home, healthy meals and family fun. Our work has been published in the pages of Do It Yourself, Farmhouse Style and Better Homes & Gardens magazines.


What problems, if any, have you encountered? Back up, flow problems and how often have they reoccurred?
We have never had a single problem! And it’s very regularly abused by teenagers. 🙂
Need help! For the water supply connection, did you cut 1/8 of tip off? So the connector could to connect to 3/8 valve. How did you do that connection, what method, parts etc?
Hi! I found a Shark fitting with a shut-off valve and I think my Sanicompact already had a 3/8 fitting to connect to. I checked the instructions and it sounds like it's possible to have a metric end and you can cut it back to the 3/8 connection size- I just didn't have to do that with ours. Hope this helps.
Why did you need to connect PVC to ABS for the sink drain? Why not just all PVC?
Thanks,
-Kevin
Good question- I was piecing a lot of the connections together with material I could find in local hardware stores and I couldn't find exactly what I needed to make the Ikea PVC trap connect with the Saniflow PVC drain. I'm sure if I'd been more patient in sourcing stuff (or knowledgable) I would've found everything, but as it stood, using ABS as my bridge material fixed my connection issue. I'm sure licensed plumbers everywhere are face palming, but it's worked well for us.
How much did everything cost
All in it was less than $2000. That included the cost of the $$$ faucet splurge and all the finishes.
Question: bolts ended up busting the bottom of toilet when putting into concrete… do you think construction adhesive on bottom of toilet is enough?! Plumber thinks toilet may have come damaged. I'm trying to salvage my situation. Doesn't affect the holding of water or function .
Tough one. If this is a Saniflo, contacting the customer service number might give you some ideas. I had a good experience when calling about how much to tighten the drain fittings. However, if the ship has really sailed on replacing, I'd consider a repair to the toilet base using fiberglass or "Bondo" in behind to reinforce the broken pieces. You're right – you don't need much to hold it in place. Sorry to hear about the issue and good luck!