


We may earn a commission on purchases made after clicking links on this page.
Here’s how we made a DIY faux brick wall – using brick veneer panels. We figured out how to make brick paneling look real – including the tricky bit: how to hide seams in brick paneling.
Intro by Robin
Steps by Ed
What a transformation our guest room has had! Below is a Before shot, clearly. An adequate space for guests to sleep – but completely uninspiring. I think it’s fair to say it had no character. This project with faux bricks helped change that!


It wouldn’t be going too far to say it’s more like a “character vacuum” – somehow this bland box sucks character from other spaces and people to make people instantly feel less interesting and life feel less vivid.
OK, yes, that was going a bit far.
The room has come a long long way. And one of our goals, along with making our guests feel welcome and comfortable, was to add layers of texture and interest to this supremely boring space. We’ve achieved a lot through some of our previous projects:
- our Billy bookcase built-in with bookcase lighting,
- our $150 wood panelled plywood ceiling,
- faux windows that created more balance and
- vertical shiplap in the loveliest shade of green.
This latest project adds even more texture. I’ve long loved the interest and historic feel old brick give to spaces. I’m fond of painted brick – though I’ve never gotten up the nerve to paint real brick. I always have images of needing to strip the paint later – and I’ve stripped many layers of paint off things and it’s AWFUL.
But cheap brick panelling – that’s my comfort zone – I could paint that all day! We found these sheets of textured brick panels at Home Depot, affordable and the texture is really good. I’m not a fan of the colour – they tried – but it’s not perfect.


How to Make a DIY Faux Bricks Look Real
What you need:
- faux brick brick paneling 4×8
- nailer (we have an older model of this one) UPDATE: we bought this cordless nailer and LOVE it!
- brad nails
- construction adhesive (we used this one)
- drywall compound
- scraper
- primer (this one’s our favourite)
- paint (we used Soft Focus by Behr in eggshell)


How to hang faux brick paneling :
1) As always, begin with a plan.


We used cut-off pieces from the bookcase backing to cover a duct box. At this point, it was an experiment, but the planning rules still hold:
Look at the sections you are using and line up the bricks like they would be on a real wall section.
This means ‘half’ bricks are ends and should meet ‘full’ bricks on any outside corners.
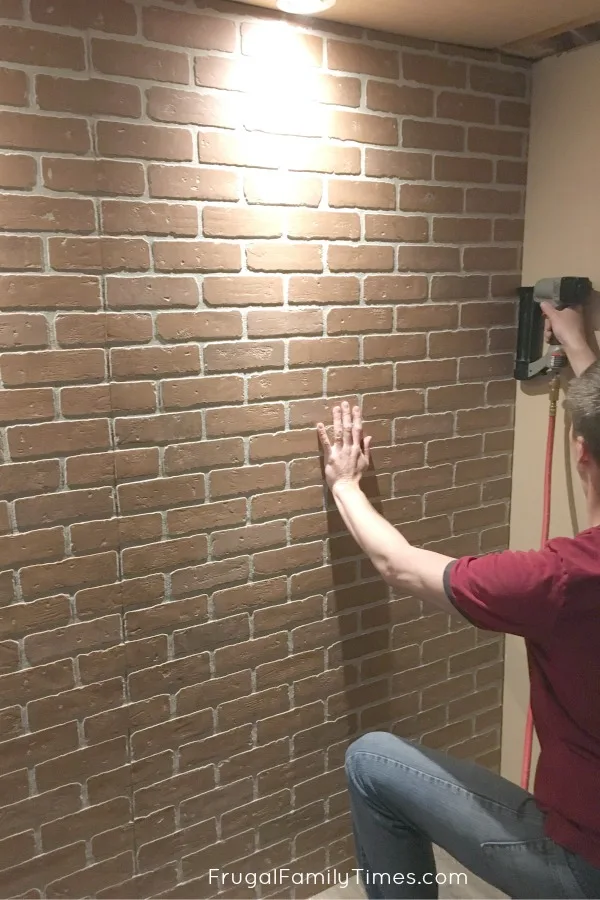
2) Prime, glue and nail up the panel.


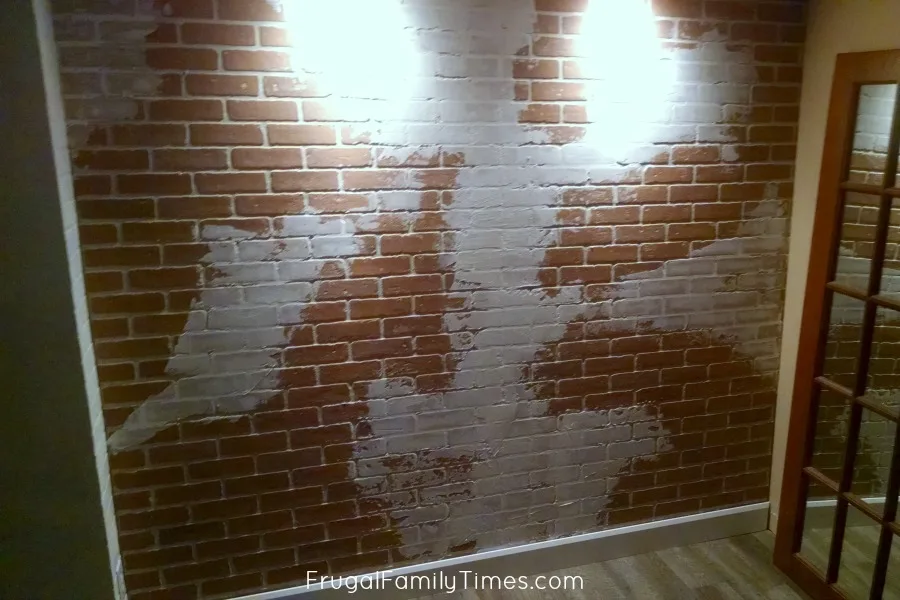
We covered everything with lots of drywall compound to create a partially plastered wall look (Or a look like the guy doing it was partially plastered. 😜)
3) Now hide the seams and nails with drywall compound.


A light sanding knocks off any points, scratchy bits and you can put on your favourite paint colour.
4) Install The big wall.


Again, look at the last row of bricks and make sure your new section will line up appropriately.
THIS IS ESSENTIAL – miss this step and your wall will look decidedly phony.
Glue and nail it up.
5) The final piece – measure and cut carefully.


We cut the last sheet so two factory square edges were landing together in the middle and double checked before we cut off the top or bottom
(I almost cut the wrong part – which would have meant buying a whole new sheet. Thankfully, Robin said, “Are you SURE?”- I wasn’t… I really wasn’t sure.)
Measure twice, cut once.
6) Glue & nail – with a helper holding if possible

Look carefully along the left third of the above photo and you can see the seam – just barely. We didn’t prime these pieces so you can see how one might be tempted to think the seam wouldn’t show up after painting -it totally will!
Don’t skip the next step!
7) How to hide seams in brick paneling:

(Yeah, I liked that joke so much, I used it again, so what?).
Robin’s preferred version is that the wall should look like a backdrop for a “Fresh Prince of Bel Air” themed photo shoot.
Whichever version you choose, don’t skimp on the compound up that middle seam, then drag it out in various random directions to look like an old wall.
When complete, you can use your sculpting skills to make the seam bricks look connected or simply obscure everything. It’s art!
8) Lightly sand, prime, finish paint and you’re done!
What a difference!

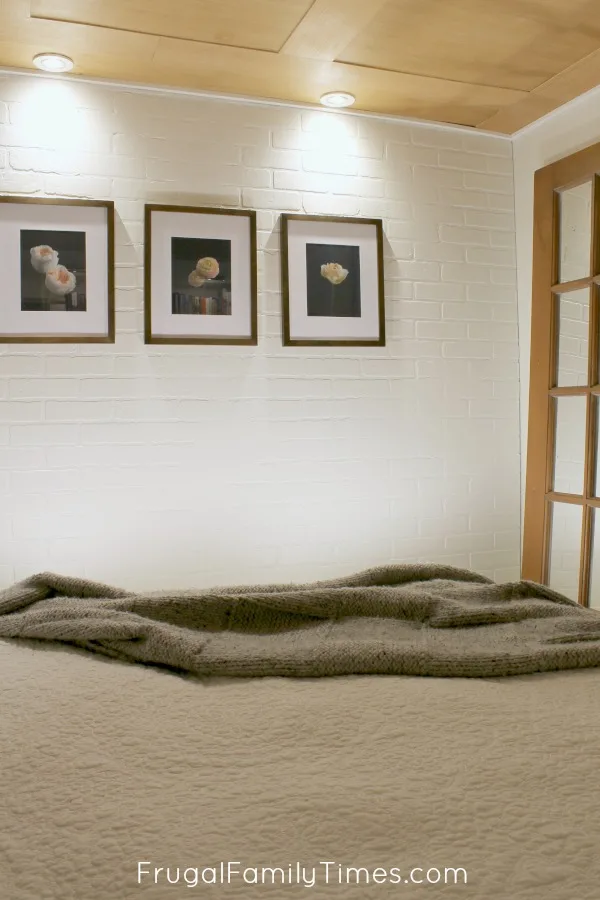
And here’s a similar angle Before:


Decor sources:
- Throw Pillow Fabric (I made the simple pillow using this tutorial.)
- Sheets (So soft and pretty – and a great price.)
- Coverlet and Shams (Yeah – I almost didn’t buy it when I saw who the “designer” was. Ha! But the quality is wonderful.)
- Lamps (similar outside Canada)
- Faux boxwood topiary (similar) vase is thrifted
- Panelling paint (green): Milk Thistle Behr
- Trim paint: Soft Focus Behr
- Photography: Moody Blooms for Mental Health by Michelle Peek
- Walnut Frames with 8×10 Mat. Ours aren’t available online, but these frames are very similar and affordable.


Other projects in our Basement Guest Room-Library:
- How we made this Antique Singer Sewing Machine Table
- IKEA hack Billy bookcase built-in – with painted brick backing and easy-wired bookcase lighting
- Natural Wood Panelled-look Plywood Ceiling
- How we made our small, high basement window look bigger and fabulous
- Green Vertical Shiplap Panelled Wall treatment – which cost us almost nothing


They’re beautiful and they have a wonderful story.
We figured out How to build a faux fireplace that looks real and used a similar faux brick technique. We modified our technique to a German schmear brick look – check it out here.
This is one of dozens of projects we’ve created in our Budget Basement Makeover and one of many projects in our cozy Guest Room-Library.


Robin and Ed are a DIY-loving couple with over 25 years of design and build experience. Also, Robin is a Nutritionist and former Registered Dietitian and Ed is an award-winning Business Educator. We share strategies for living a rich life on a DIY budget: creative money-savvy ideas for a stylish home, healthy meals and family fun. Our work has been published in the pages of Do It Yourself, Farmhouse Style and Better Homes & Gardens magazines.
Alina
Friday 17th of September 2021
This is really helpful, thanks! This is the first blog I've seen where someone does a corner, and it's such a relief to see that it will work!
For the corner, how did you arrange the two panels coming together? Did you put them so they just barely touched (which would leave a v shaped gap in the corner to fill) or did you overlap the ends so that there was no v shaped corner to fill? Hopefully that makes sense!
frugalfamilytimes
Wednesday 22nd of September 2021
Good question Alina - totally get what you're asking. We've done this a couple of ways now too, so I can give you both options. In this original post, we focused on lining up the bricks in a way that looked real and overlapped one panel on the other at the edge. We then used the drywall compound schmear to hide this overlap. Option #2: in order to expose more of the corners in our media room wall, we actually ran the brick panel sections through our table saw with the blade angled at 45 degrees. We then had a mitered corner where the brick edges fit together (mostly) and we didn't have to use as much schmear to hide things. Hope this helps!
Simone
Saturday 26th of September 2020
Your faux brick wall inspired me and i'm doing that in our guest bathroom and on into the guest bedroom! Thanks for the blow by blow on the how to!
Can't wait to get started!
frugalfamilytimes
Monday 28th of September 2020
That's so cool, Simone! Best of luck with your project - let us know if you've got questions. :)
Unknown
Sunday 30th of September 2018
I've used faux brick on many projects as a home flipper. It's one of my favorite wall coverings! Y'all did a beautiful job. It looks great! When I butt the panels next to each other, I can never quite get the seems to completely disappear. It is a little more work, but if you cut out the half bricks with a jig saw on each panel, and finger joint the panels together, you can use caulk to "re-mortar" the finger joint seam, and the seams vanish. One key to this, is knowing that the panels are oriented with a "top" and "bottom". In order to finger joint two full panels together, each panel has to alternate "top" and "bottom".
Also, as an option, you can use your joint compound thinly on the whole wall. When it dries, use a sandpaper and a wet towel to "clean" the bricks randomly, and you can get a really cool old world brick feel. A little polycrylic will seal it and your done.
Thanks for the great post and the great write up!
frugalfamilytimes
Thursday 13th of February 2020
No trouble with yellowing at all! I'd suggest using a good primer over your finish to stop the yellow from coming through. What was the roll-on texture that you used?
Unknown
Sunday 9th of February 2020
Have any trouble with yellowing? I used a putty knife and roll-on wall texture and once it dried it was yellow, especially in the grout lines. Scared to proceed with painting at this point as I wanted some brick to peek through so I didn't want to thick coat.
frugalfamilytimes
Sunday 30th of September 2018
Those are great tips! I’m not sure we have the patience for the jigsaw one - good on ya for making that work! :)
Unknown
Thursday 12th of July 2018
I love it but don't want to paint over it. How can I make it look real without painting over it. I don't want the nails or seams to show.
Unknown
Saturday 30th of June 2018
I think I'll try the faux brick. I love it!
frugalfamilytimes
Saturday 30th of June 2018
That's great! Be sure to come back and let us know how it turns out. :)