

How to Fix a Rusty Outdoor Fireplace – an Easy & Cheap way!
by Ed
Our Chimenea (or Outdoor Fireplace or fire-pit-thing or whatever they are called in your area) is pretty great. It has allowed me to enjoy all the essentials of the campfire – wiener roasts, marshmallow s’mores and drinking – without having to sleep on the ground.
But it has been getting pretty sad looking lately – the Chimney in particular. It had become quite the rusty outdoor fireplace.

We thought it was going to be a write-off.
I mean, the actual cast-iron body of the chimenea was in good shape, but we figured getting the chimney redone would be a custom job from somewhere and cost as much as a whole new set-up.
On the off-chance the hardware store could salvage the whole thing, I took a trip. I challenged myself to source parts and build a new one as cheaply as possible.
It was actually pretty easy, once I made a few mistakes, I bought a few wrong parts (later returned for refunds) and made myself bleed (just once, no stitches required).
Here’s how to fix a rusty outdoor fireplace:

This project:
This project is a testament to roaming around the hardware store and looking for something you can make work. This strategy has paid off for us many, many times.
It all started with finding a chimney topper. We had no idea these things existed. Once we saw it, we knew we could do this project.
I bought a 6″ chimney topper (not stovepipe black, so I had to score some high-heat paint too).
I gathered 2 sections of 6″ diameter stovepipe to make up the length I needed (total cost, about $12).
Materials cost: $30-35.
The real problem was a mesh screen for the topper.
This is to prevent small sparks from drifting out and burning your yard down. The only one I saw with a screen was $50 for the topper alone! There had to be a solution – time for scavenger hunting…
Steps for Hardware Store Scavenger hunt:
- Don’t get discouraged if you can’t find it online
In composing this post, I tried to link to all the parts I found in-store through national hardware store chain websites. Their websites did not have the parts I bought from them.
Seasonal stuff, or odd-ball things (like wood-stove chimney toppers) sometimes don’t make it online.
Don’t be angry at these stores for not posting their full catalogs online; it allows you the freedom/excuse to roam around the store blissfully open to the abundance that surrounds you, looking for inspiration.
2. Just because Home Depot doesn’t have it, doesn’t mean it doesn’t exist.
Home Depot carries mainstream stuff, for mainstream applications for the masses.
This is great for most projects, but for backyard Chimney pipe and Mansfield Toilet repairs (another story for another time), they have left me cold.
TSC, Home Hardware and even Canadian Tire can help you out with your oddball projects.
3. Buy extra bits and return what you don’t need.
If you don’t give yourself some options, you may end up unable to complete your project or taking extra trips anyhow.
I went to 3 different locations for this project and ended up returning parts to 2 of them (when I had to go there anyways for different reasons – frugal sometimes means multitasking trips!)
What I found:
I wanted a cheap piece of metal mesh that I could cut to size and that could withstand heat. I found the following: a Disposable Grill Topper

It cost me under $5, and should give me at least 4 replacement mesh toppers over the next few years (it was the first part to get ruined on the old chimney).
Here is what I did with it:
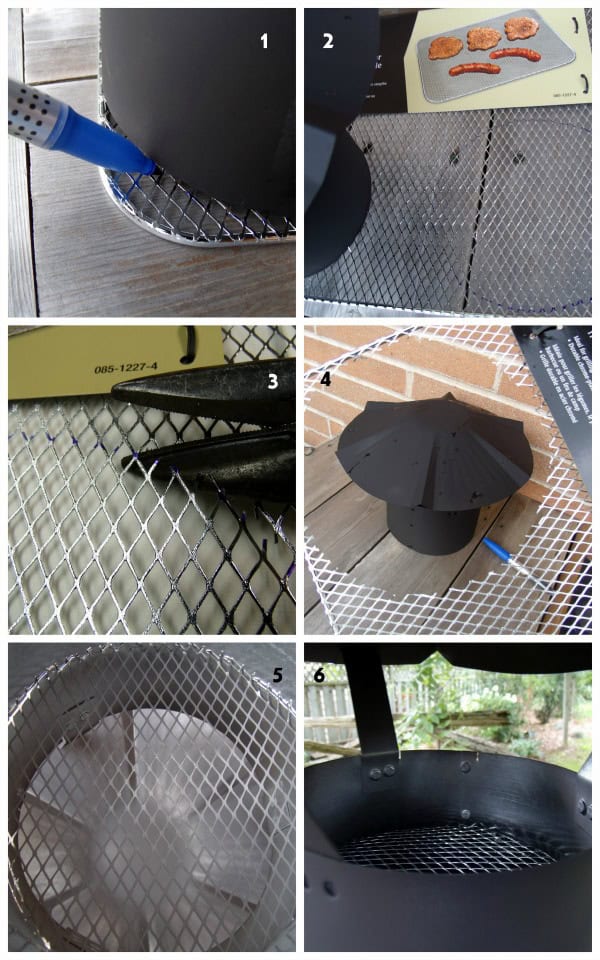
Then I assembled it all.
I placed the wire screen over the top pipe section, bent the overhang down in a couple of spots to hold it in place and slid the topper over it.
It all fit together quite easily; that’s how this stovepipe is designed.
The bottom section needed a couple of small notches cut for the damper to fit; tin snips and gloves are your friends on this project.
The fireplace body got a quick wire brushing.
Lastly, I gave it all a coat of High Heat black paint.

Let it all cure for a day (exact times will be on your paint can).

Then fire it up (as appropriate to your local fire safety bylaws), pour yourself a drink and enjoy your not-so-hard work.
We learned how to fight the good fight against rust on our old vehicle too – you can find all the details here: DIY Rust Repair: How to Cover Up Rust on a Car

Robin and Ed are a DIY-loving couple with over 25 years of design and build experience. Also, Robin is a Nutritionist and former Registered Dietitian and Ed is an award-winning Business Educator. We share strategies for living a rich life on a DIY budget: creative money-savvy ideas for a stylish home, healthy meals and family fun. Our work has been published in the pages of Do It Yourself, Farmhouse Style and Better Homes & Gardens magazines.


Good article…
Should you worry about the inner paint situation (rusting etc) ??
Thanks