

How to Make a DIY Bubble Fountain Garden Water Feature (in an afternoon & on a budget!)


by Ed
We’ve been looking to add a garden water feature to our yard for well over a year now.
We’ve kicked a few ideas around in that time. I liked ponds, for example. Robin pointed out that we have a dog who would spend all his time in said pond and we would never have a dry pet again.
I felt this was a good point.
We settled on a standalone bubble fountain water feature. We decided to build it ourselves because:
a) we like building things ourselves and
b) most store-bought water features look exactly like store-bought water features and cost a lot more than the individual parts that go into them. It’s a poorly kept secret that we’re a bit frugal.
We started planning.
Concept 1 – A Water Wall.
Sounds amazing right? It was going to be made with some glass shower doors we found at a Re-Store.
That plan was rejected after basically a year of thinking on it because I still couldn’t come up with a practical way to support the glass and have water run down it and have it not look hideous.
Concept 2 is what this post is about: A Simple Bubble Fountain Made with Pots.
There was a spot in near our deck silently begging for a water feature. It would be much more doable.
How to Make a DIY Bubble Fountain Garden Water Feature
Bubble Fountain Materials:
- 2 pots (one large, one smaller) – any material, but strong enough to hold water and rocks. Ours is glazed terra-cotta. More expensive than plastic, but still cheaper than a ready-made fountain.
- 1 fountain pump
- This one would work very well and gets great reviews.
- It should have enough vertical lift to pump water taller than your stacked pots (you can find this information in the specs of most fountain/pond pump kits)
UPDATE FOR 2023: You can now buy Solar Pumps with enough power and lift for a fountain – this solar pump would do the job and gets good reviews. (Note: solar pumps are much more expensive.)
- 1 plastic pail (I used an old wine kit bucket, but anything you don’t mind drilling holes in will do)
- Automotive fibreglass material (This is what I used.)
- Rocks (Some decorative and some large ones that take up a lot of space and are cheap/free)
- 1 piece of hose that fits the outlet on your fountain pump (most have adapters and can use garden hose, plumbing ‘PEX’ pipe or anything in between that you might already have)
- Garden hose washers or similar waterproof item to fill gaps
NEW! ⇒ If a Video Tutorial is more your style scroll down – we’ve got a video there for you!
Assemble Bubble Fountain as below.
I have added some notes and thoughts in the images as appropriate.
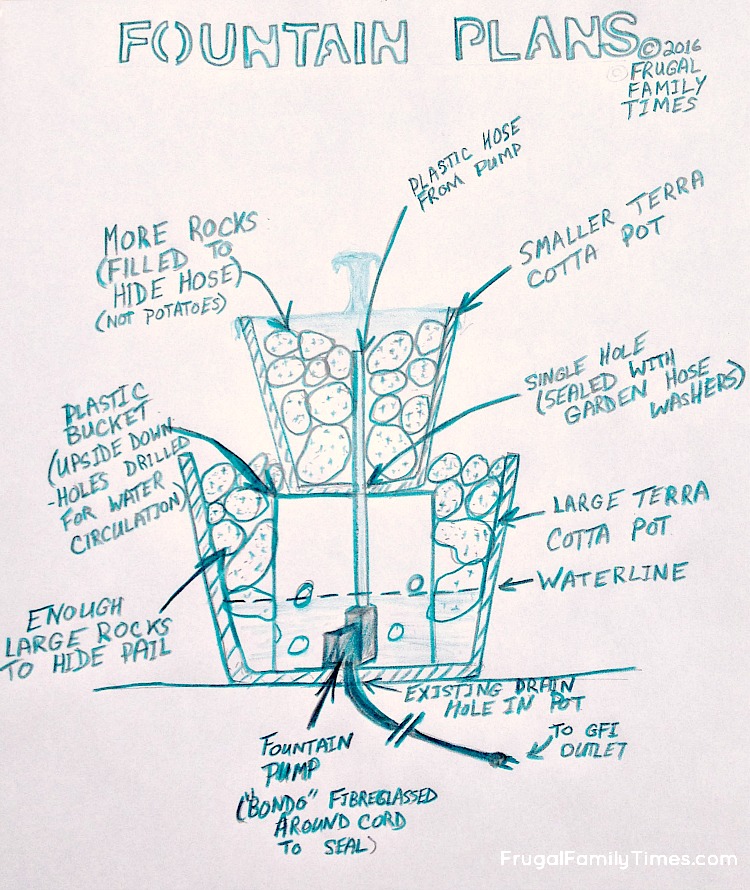
My favourite parts are the swiss cheese pail and the potato rocks…😂
Step 1 – Seal the Pump into the Bottom Pot
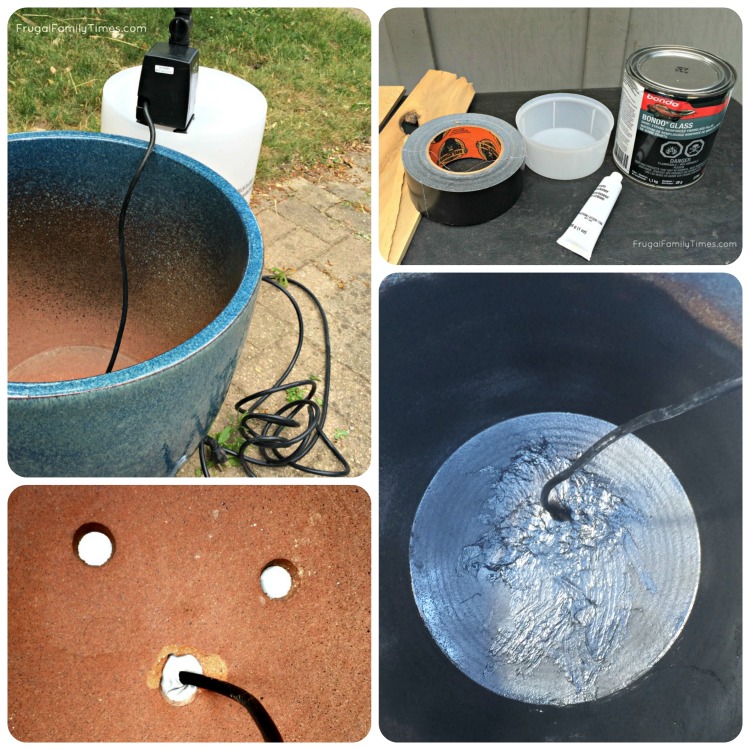
Next, using some heavy duty tape, I created some temporary patches over all the drain holes. These don’t have to hold water – just support the Bondo (automotive fibreglass repair material) in place till it sets.
Finally, I mixed the Bondo and troweled it into all the holes and around the pump wire. I let it cure and then painted the whole bottom of the pot to seal everything up.
Step 2 – Prep the bucket to cover the pump
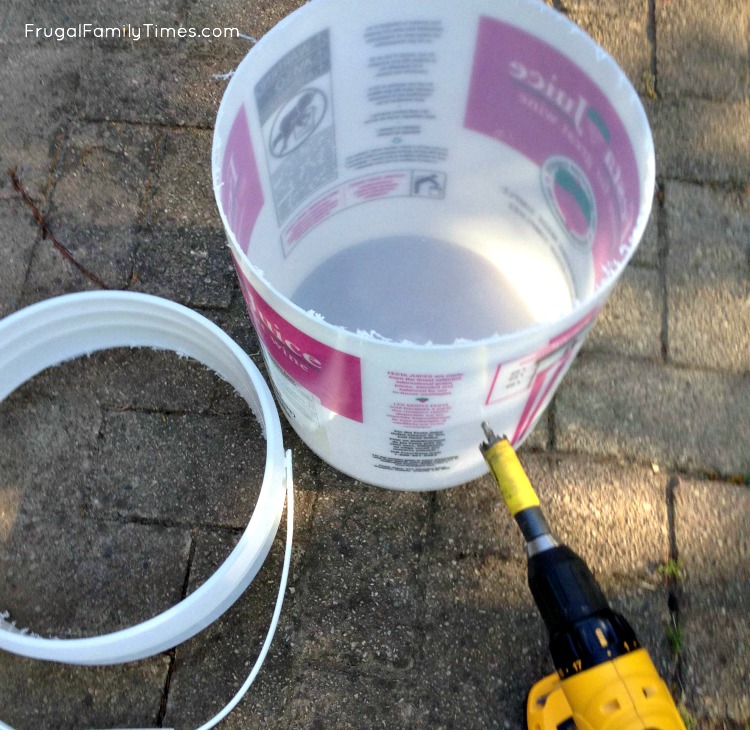
It needs to be shorter than the depth of the large pot, but not much, otherwise the top pot will sit too low. We held the small pot in place and tried a few different heights till we found one that worked.
Cut the pail down and drill a hole in the top for the pump hose to pass through and a few holes in the side so water can get back to the pump after it flows down.
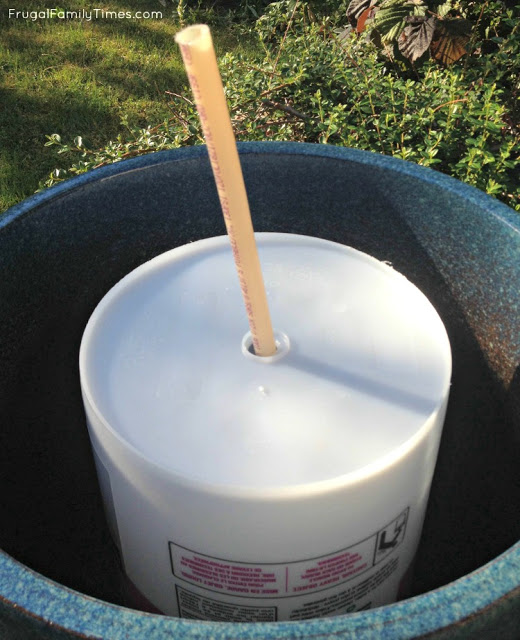
Fill with some water and run the fountain to see if you’ll need to adjust the stream volume. It is easier to do now than later when you have the whole thing stacked with heavy rocks.
Step 3 – Assemble in layers and try some test runs.
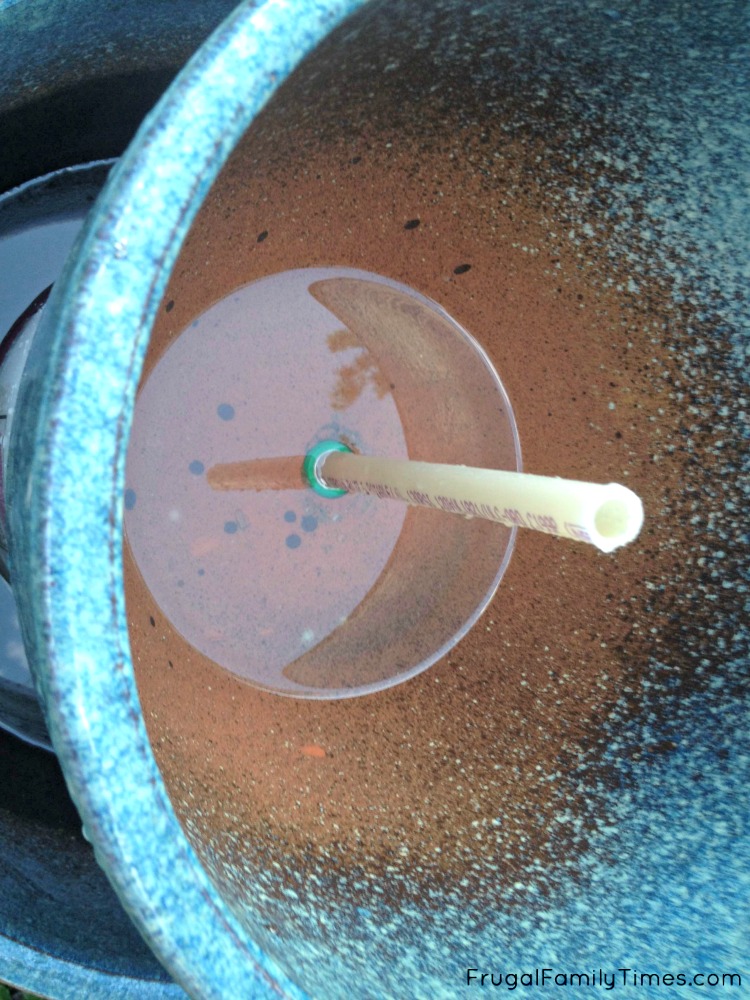
If you want a ‘waterfall’ effect (like we did), be sure and seal the hole at the bottom. It doesn’t need to be a perfect fit, you just need to have the water flow out through the drain slower than it flows in through the fountain pump, thus creating an overflow cascade down the sides and into the larger pot.
I added a garden hose washer and put some water in the bottom of the pot to see if it stayed in.
Step 4 – Start filling with River Rocks and keep testing.
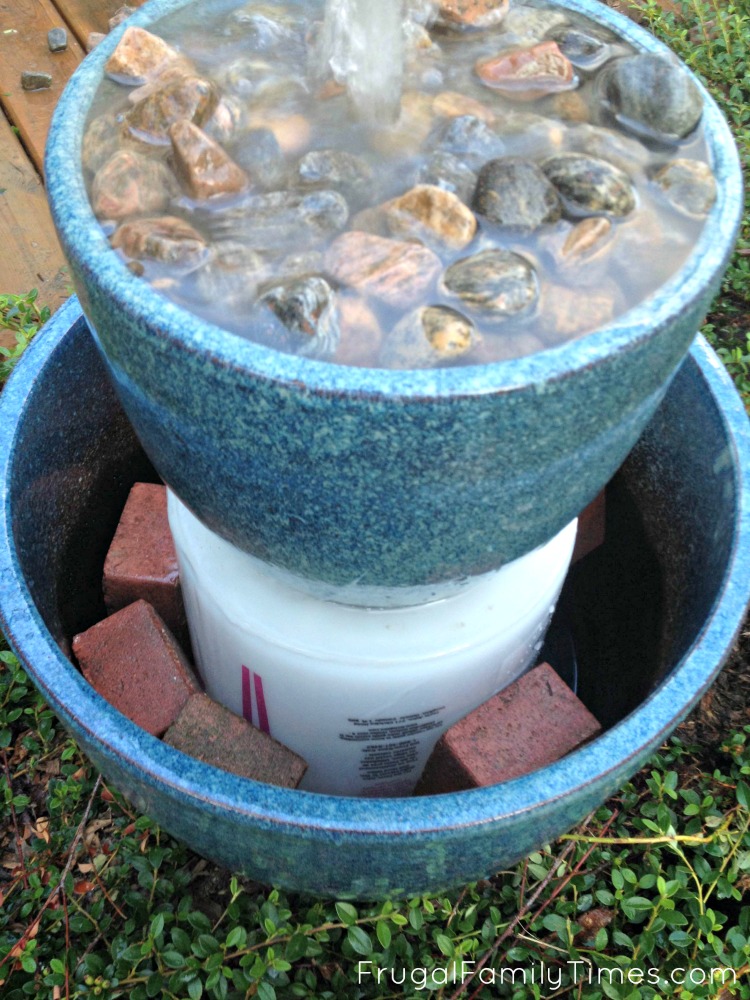
We ended up taking ours apart a couple of times to get the right effect/volume of fountain spray and overflow. You’ll have to look at this thing for the rest of the summer (and hopefully a few more years), so get it right.
We used some old bricks as filler in the bottom pot. Don’t worry, none of that ugly stuff will be visible. Carefully layer in everything finishing with a top layer of whatever stone you want to actually see, and you’re done!
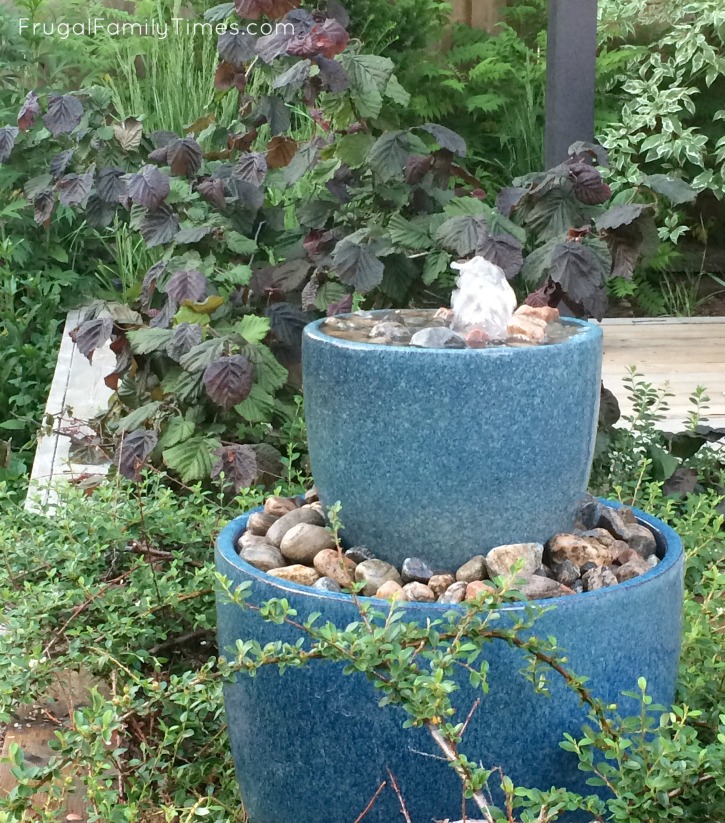
The only thing left to do now is pouring yourself a glass of wine and relax next to your new fountain.
NEW! Here’s a Video of the bubble fountain project:
If you’re into simple, affordable DIY’s, you’ve come to the right place! Here’s a link to many more.
Including our roundup of 20+ DIY Backyard Projects for a Beautiful Outdoor Space (on a Budget!), like our DIY wood stump end table with super cool legs (and it’s secretly super cheap!)

Robin and Ed are a DIY-loving couple with over 25 years of design and build experience. Also, Robin is a Nutritionist and former Registered Dietitian and Ed is an award-winning Business Educator. We share strategies for living a rich life on a DIY budget: creative money-savvy ideas for a stylish home, healthy meals and family fun. Our work has been published in the pages of Do It Yourself, Farmhouse Style and Better Homes & Gardens magazines.



Love this and I’m wondering if there is a soothing water sound with this type of fountain?
It has a beautiful, soothing burbling sound, Cathy! We love it! 🙂
I began making bird fountains last year and this looks like they would love it!! Good perching.
I did have to clean out every few weeks and that looks a bit laborious with that many rocks. Do you get birds/bees and do you refresh your water?
Hi Jen! We don’t need to clean ours! With the fountain circulating it keeps the water clear. Plus we add fresh water in periodically due to evaporation (and our dogs drinking from it). We have harsh winters where we live, so we disassemble the fountain and store it every year. We wipe it down in spring and that’s it. 🙂
Love your ideas!!
Thanks so much, Jill!
Love this! My son and I are going to tackle this project together. Where is the video link?
Hi Sherri – I’m so sorry – the settings for the video were a bit messed up – you should be able to find it at the bottom of the post now! Let me know how your project goes! 🙂 Robin
This is exactly what I’ve been looking for, for my tiny courtyard garden! All the shop-bought ones look, as you said, like shop-bought, and none of them gave the subtle, almost silent, water flow I wanted.
I’m going to have a look around the rest of your projects, hoping that you’ve made a firepit!
Thanks so much, Hazel! We love the sound it makes – so soothing. Sorry – we don’t have a firepit project. 🙁
I can’t wait to do this ,I have everything ,it to hot in AZ to do this now ,but at 77 I love gardening and something like this ,,plan semple .all I need is deferent pump . do you have a book ? I can buy ?
Hi Julia – sorry we don’t have a book – but the tutorial above is very thorough and should help you make one of your own! 🙂
How does the pot sit flat on the ground if the pump cord is coming out from the bottom. My pmpp cord is fairly thick?
Great question; we have ours in a garden, where it sits in soft earth and mulch, so we just kind of twist it around till it sinks down and rests level.
If we sat it on a deck or patio, I would be tempted to get those feet you can put under Terra cotta pots or use some brick pavers to create space under it. Hope this helps.
Here’s a thought. If you didn’t want the electric cord to go out through the bottom so that you could place the bottom pot flat on a surface and the cord wouldn’t get in the way. Why not drill a hole just big enough for the cord to go through close to the bottom but on the side of the bottom pot. If you use a terracotta pot then soak the area you’re going to put the cord through with water. You could get a cloth and get it soaking wet and place it on the spot and use some tape to hole the cloth in place. Then once the terracotta pot is soft in that spot then use a drill and you’ll still need to be careful but drill the hole there in the soft stuff and insert the cord through there. Then to keep the hole from leaking patch it with silicone or with the bondo. Once dry you won’t have to worry about it being toppsy turvy when sitting on your porch or whatever. But make sure you soak the terracotta really good. If you can put a wet cloth on both the inside and outside it’ll help soak it right through and faster than trying to do it from one side.
Love this. It is beautiful and looks awesome. Love the instructions also. Very impressive. Thanks for sharing,
Thanks so much – so glad your like it all! 🙂
There is a blank space where the video should be. I can't wait to start this but yes, videos are my thing. Thanks@
Sorry about that! It should be fixed now – enjoy! 🙂
Are mosquitos a problem or a draw?
We haven't noticed any problems. 🙂
Eureka! We've been mulling a water feature in our yard too! Sharing this with hubby!
Super idea. I love that you can mix it up using different coloured pots.
Yes! And shapes and sizes and number of pots, too! Thanks for the comment! 🙂
Nice stuff.
I really loved the idea of this bubble fountain. It will even look great when it will rain. Amazing idea with a great creative design. Looking for more of these ideas from you.Thanks a lot.
To answer your questions in reverse order – we covered about half the bottom with Bondo and only because there were three drain holes that needed filling and they took up that much space.
We painted with an exterior black spray paint that I had laying around (nothing special) just to seal the Bondo and the terra cotta.
I sometimes think about repainting the whole inside of both pots for additional water protection, but we are going on 4 summers of use now and have had no problems.
You said you painted the the bottom after the bondo cured. What did you paint it with? Did you cover the entire bottom with bondo?
Great idea I want to try to make one too. I have been searching for a fountain and never found one I love, so I will build my own.
I would like to invite you to share this post with myself and a couple other bloggers in a garden tour post next month. Please say you will.
Happy gardening,
Kippi #kippiathome
Hello Robin!
Love your fountain. In process of doing mine! My question is what size and kind of tubing did you use to attach to your pump and how did you attach it to the pump so it wouldn’t come off?
Thank you for a great project!
Alisha
Good question. We ended up using some PEX plumbing leftovers (PEX is the plastic pipe system that is pretty common in home construction nowadays). We had some kicking around and it is the perfect mix of flexible but still being rigid enough to stand. It had the added bonus of fitting nicely on our pump outflow too.
I would suggest checking the pump you have and buying hose that fits snugly. You could also add a hose clamp if needed. If the hose isn't rigid, you can use the rocks in the fountain to hold it pointing up.
Good question! I just used a regular bit, but was very careful using it. I did get a small bit of uneven chipping, but really, the hole is going to get Bondo-d/ fibreglassed, so that can hide a lot of sins.
Did you need a special drill bit to make the pot's drain hole larger, to fit the plug through in Step 1? I think this might be the summer we make a fountain!
love it and it is so pretty. Might give it a try this Spring.
Glad you like it, Gail! Be sure to come back and show us if you make one. 🙂
do you have any issues with clogging since you didn't use a filter?
Not even once, Kyle. 🙂
I see you live in a cold winter climate. How does the fountain do in the winter months? I had one at my last house that I would disassemble every November and reassemble in March. I didn't have all the permanent bondo sealing things, though. I'd like to do another that is less work!
Great question! We do the same as you did. We disassemble it late fall and reassemble it in late spring. It works great! The bondo is no issue at all to do this. 🙂 after disassembling we stored it in our shed – if you brought it all indoors you could avoid taking it all apart though.
Trying to work it all thru in my head first. When you temp tape the large pot, bondo from the inside to fill drain holes and wire, right? Then "paint the whol bottom to seal." Also with bondo? Tape off of course. Small pot – to seal hose before placing the rubber washer, is that also bondo? How do you take apart and reassemble when testing? Sealed hose is not affected? Finished fountain is just what I want too! Love your colors.
Hi. I'll try and answer everything as well as I can.
The only part that is Bondo sealed is the wire-hole filling step. The paint covering the inside is just some black spray paint to seal the Bondo and the exposed Terra cotta.
And the hose washer seal of the top pot just slides over the hose and fits into the drain in the pot – no Bondo needed. That way it can come apart as needed. It does not need to be a perfect seal- only needs to prevent water draining out faster than the pump pumps it in. You could use kitchen and bath silicon too, but that would prevent experimenting and make things pretty permanent. Hope this helps! Thanks for the question and best of luck building your own.
Great work! The fountain is very beautiful. I really love your blog with the ways to make life easier and so interesting. Keep it up!
Glad you like it, Deborah!