How to Grout Peel and Stick Tiles: a cheap and easy floor update – $50 and one afternoon of work!
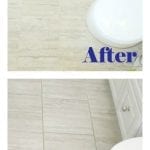
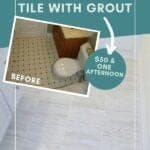


Can you grout peel and stick tiles? Yes! Our new, beautiful bathroom floor is Groutable Peel and Stick Vinyl Tiles.
No Really. It is.
You CAN grout vinyl tile – and our tutorial will help you figure it all out.
Here’s how we did it…
How to Grout Peel and Stick Tiles: A Complete Install Tutorial for Vinyl Tiles
First off, this floor wasn’t even part of our original bathroom renovation plans. It actually started with a sink, then wallpaper and will finish with a medicine cabinet makeover.
We did this floor because of the Renovation Snowball: after the other stuff was done, the old floor looked more terrible than ever.
It started around 10 pm on a Saturday with us tearing up the old vinyl floor. Around midnight, as we were hauling the toilet off its anchor bolts and lowering it gingerly into the bathtub, I uttered G.O.B.’s famous words, “I’ve made a huge mistake…”.
Reasons to Choose Groutable Peel and Stick Tiles:
- No subfloor required. If we did real tile, we would have the time and expense added for a beefed up subfloor.
- Way cheaper. Our $50 in supplies did the whole room
- Easy. A beginner DIYer can do this – the cuts are simple (no wet tile saw required) and if you mess up a tile – you’re only down $1.50 or so.
- Quick. We did this whole job in an afternoon: no wait time for drying adhesives before grouting.
- These tiles look remarkably realistic. Not real, but pretty darn close.
Are they actually durable? Will they last? Check out this post where we share how the peel and stick tile have held up after 4 years of use.
All set? Let’s get started! Here’s how to install peel and stick tile and then how to grout vinyl tile…

Stuff you’ll need:
- Ugly old floor.
- Groutable Peel-and-Stick Tile
- Ours is Travertine Grey from Ceramica (make sure they say groutable, as plain peel-and-stick are too thin). Be sure to get enough to cover the room plus 15% for waste. We needed about 20 square feet and got by with 22 tiles.
- Grout, in the colour of your choice. Our colour is Alabaster. We bought premixed just to reduce the margin of error. Did I mention we had never tiled a floor before?
- 1/8 inch Tile Spacers. We didn’t use them very often, but they did provide some guidance.
- Grout float and sponge.
- Utility knife, straight edge and surface to cut tile on.
- Optional: an electric jigsaw. If you have some funny cuts this will save the day. We used ours around the toilet and door trim.
NEW! ⇒ If a Video Tutorial is more your style – scroll to the bottom – we’ve got a video there for you!
Step 1: Take up the old floor.

I slashed with a utility knife, scraped with a scraper and sanded with a palm sander.

Most Important – the surface was flat.
Step 2: Move the toilet.
I know you don’t want to. We didn’t either. But it’s easier than you think and makes the whole job better and simpler.
Moving the toilet helped with the wallpaper and painting behind the tank and it made tiling very easy around the toilet base.
We aren’t going to do a toilet removal tutorial, but here is the need-to-know: we had never done it before and hate plumbing. We followed these steps.
You should also get anything else out of the way that will cause tile-headaches.
Step 3: Get Peelin’ and Stickin’

When the floor is ready and obstacles out of the way, start peeling and sticking!
The groutable peel and stick tile actually gives a good margin for error (as the grout fills in the spaces between), but if you have a large area to do, you may want to get out a pencil and straight edge and run a few quick guide lines for each row.
As it was for us, Robin just lined it up with the wall and worked across.
We used a staggered, brick style layout. Robin was very careful to have the marble grain go in the same direction. This gave our tiny bathroom the appearance of width.

We did all the big tiles that didn’t need fancy cuts first.
These tiles are very easy to cut; basically, score a line with a utility knife and snap ’em. It is very similar to cutting drywall – so if you can do that, you can do this.

Tough cuts we did at the end, with measuring, sketching the funny curves and angles and then cutting with a jigsaw.
I can’t imagine how hard some of these cuts would have been if this was actual marble. I would have ruined more dollars in marble than this whole room cost to do with fake-tile.

Step 4: How to Grout Vinyl Tile
When things are all tiled, you can begin grouting instantly, as the peel-and-stick don’t need overnight to set up. We got the kids to jump around on them a bit to make sure they were stuck alright and then I got the grout stuff together.

I had never grouted before either, prior to this. I figured it couldn’t be as easy as the instructions on the package, but again I was pleasantly surprised.
Take the float, scoop up a softball size blob of grout and start working it into the grooves. I alternated a pressing, swirling motion to move the grout around with 45-degree angle edge drags of the float to remove the excess.
Be sure to work extra grout into corners, around toilet flanges or anywhere else you have an odd gap. It really covers a lot of mistakes.
I worked in sections, doing half the space with the float and grout and then using sponge and water to clean up the excess. I had a lot of excess.
Step 5: Are you Sponge-worthy?
When workin’ the sponge, have a full bucket of water handy and rinse regularly.
Be sure to get all the grout off the baseboards, bathtub, door, children or anything else your sloppy grout application has covered. This is your only chance to get those areas spotless, however, your goal isn’t to get the tiles themselves totally clean.
Get the big chunks, but expect a bit of grout haze on the tiles themselves.
Don’t scrub them now, as you will end up taking grout out of the joints, which I’m pretty sure was the point of this when we started (although I actually lost track during renovation-delirium that sets in at about this point).

4 hours later, you can get the sponge out again and give the tiles a final clean-up.
You shouldn’t use the room for at least 24 hours, so use some sort of Mission Impossible style apparatus to hang from the ceiling and clean the grout haze off the tile.
Seriously, I don’t understand why companies put confusing instructions like this on the packaging. I ended up kneeling on two tiles and reaching as far as I could, then moving a bit and getting the rest. If the room had been large, I likely would have left the whole thing until the next day to clean up.
Step 6: Put Your Toilet Back.
The only cost to removing your toilet is one of these Wax Bowl Rings. About $2.

Carefully remove the old wax ring. It doesn’t need to be perfect but do your best.
Again, we followed this tutorial: here. (We trusted this tutorial implicitly, mostly because someone involved in Road to Avonlea wouldn’t dare lead us astray.)

Step 7: Stand back and admire your handy work.

And be sure to tell everyone how much it cost you to do – it will: Blow. Their. Minds.
When we started out on this project, I had serious reservations about how good Peel-and-Stick tile could look. Basically, they are synonymous with crappy, half-assed, make-do renovations that 20-somethings do before they know any better. I really thought ours was going to look like a crappy, half-assed, make-do reno that 30-somethings do, even though they do know better.
We absolutely love it.
Cost Breakdown:
- Peel & Stick Vinyl Tiles = $ 34
- Grout = $11
- Misc. supplies = $5
Total Cost = $50!
NEW! Here’s a Video Tutorial of the project:
We’ve got an update! How well do they last, you ask?

Check out this post where we share how ours have held up after 4 years of use.
Any questions? Leave them in the comments below and we’ll help you out.
Check out more of our Frugal Bathroom Reno:
1) How to Install Paintable Beadboard Wallpaper

2) Saving Money: Mixing Vintage and Discount Hardware

3) Builder Basic to Beautiful: Medicine Cabinet Makeover

4) Bathroom Vanity Makeover

We’re no strangers to installing affordable flooring. Check out our other DIY flooring posts here:
- Luxury Vinyl Tile Installation
- The BEST Faux Marble Checkerboard Floor Tile ~ and DIY Tips for Easy Install in a Day!
- A dramatic laminate floor makeover

Robin and Ed are a DIY-loving couple with over 25 years of design and build experience. Also, Robin is a Nutritionist and former Registered Dietitian and Ed is an award-winning Business Educator. We share strategies for living a rich life on a DIY budget: creative money-savvy ideas for a stylish home, healthy meals and family fun. Our work has been published in the pages of Do It Yourself, Farmhouse Style and Better Homes & Gardens magazines.


I can't see the link to the video! Would you mind sharing the link again?
How long did it take you to do this start to finish? hours?
The whole project was one weekend's worth of work (allowing for dry times on grout, etc). Took out toilet and ripped up old floor Friday night. Tile and grout (2-3 hours) Saturday (early). Sealing grout and reinstall toilet on Sunday after everything had a chance to set up. Peel and Stick tile is very fast to do – the combination of being easy to cut and easy to glue down makes it quick.
My husband and I are new DIYers. My husband grew up in a family where they paid to have everything done professionally, so he's freaking out a bit. Any help and advice is greatly appreciated!!
Our peel and stick groutable tiles claim they can be laid right on top of sheet vinyl. Do you still recommend pulling up the old sheet vinyl, or could we skip this step to save time (and mess)?
I really love the look of grouted tiles, but I've never had grout before, and I'm a bit intimidated on how to keep it clean. These tiles are going in our laundry room/mudroom. We have a rug down right when you enter from the garage, but the littles tend to step off the rug before taking off their shoes. Should we skip grouting the tiles, or are they easy to clean? Like I said, I'd prefer to grout them, but only if I can keep them clean without tons of extra work. 🙂
Thank you so much!
Hi! Great questions. As far as laying the tiles over vinyl – it wouldn’t be my first choice, sometimes vinyl isn’t adhered well in spots – I’d worry that your new tiles wouldn’t sit flat.
As far as grout – these tiles looks so much better with grout it’s definitely worth the extra bit of work.
Way to go trying a new project! This is a great one for DIY newbies! Best of luck. 🙂
Looks great! What did you use for the transition piece?
Hi Chelle and Wes! We simply used the typical metal transition trim I think it’s called a seam binder. 🙂
We are trying to decide whether to use peel and stick vinyl tiles or groutable tiles? Is the finished look worth the extra step/work of grouting?
Really this is fantastic and nicely good job.thanks for effective and valuable post sharing.Your site is great!! You have helped me finally make my decision to purchase vinyl peel and stick groutable tile.That looks amazing. I just did my bathroom too and actually had the exact same sheet vinyl as you did before. Thanks.
Thanks, Barba! Hope install goes smoothly for you. 🙂
Good work on this post! I really like the way you delivered your qualitative facts and how you made this fascinating and effortless to realize. Thank you!!
see here
i like it very much
Hi. We are extremely happy with the results. This tile is in the kitchen, and the tile and grout clean up very nicely. We have had no buckling, cracking, or any other wear issues so far.
As far as applying over linoleum, that is what we did. After I removed the old peel and stick tile (heat gun to release the adhesive), I used TEC Universal Skimcoat and Patch (either Home Depot or Lowe's – I forget…). This created a smooth concrete-looking surface. The new tiles just lay on top of it. I used a fan to help it dry quicker – you can tell when it is dry, the color changes significantly. As far as sanding, I did not sand, I used a paint scraper and blade to remove any sharp pieces of linoleum (don't worry, the path will fill in any missing pieces). I also used a staple gun to lay down any linoleum that curled up on the edges (so far that has worked – I used a lot of staples).
Good Luck.
Thanks a lot for the reply! When i first looked at your pictures it looked like there was plywood under the peel and stick but now that I look closer I can sort of tell that it is linoleum. The dots are spaced too evenly to be knots in wood 🙂 I just bought my house and had a water leak. The previous owner had laminate click-lock. It got damaged and I cannot find it anywhere to buy more. Vinyl click lock is 2-3x more expensive than the groutable tiles. Thanks again for the info. This is a great post!
How does it look now? did any of the grout start to crack? is any of the vinyl buckling? I'm about to do this to my house. I might try doing it over the linoleum first by sanding and smoothing it over with a floor filler. I'm not super sure it'll work…
This is my life saving tip. A good life-hack advice for me.
Thank you for your post. I will apply your method right away.
Did you grout along the tub or just caulk that space?
I have one question on cutting these tiles (We purchase Ceramica as well). You mention using a utility knife to score the top and then snap it open. However, it took about 5 or 6 passes with the knife to score it deep enough before I could snap it. I would be afraid that if I miss with the subsequent knife cuts, then the cut would be ragged. How much force did you use to score the tile? Thanks!
Hi Al. We used a fair bit of force. Could it be your knife is a bit dull? A very sharp knife is really helpful. Best of luck!
Thanks. Yes, it was taking quite a bit of force. Maybe the knife is not as sharp as a brand new one. However, the best solution is to use an electric oscillating tool with the round blade. It has been very easy to follow a straight line that way, or to follow complex cuts. The cutter ends up with some raised material, but the utility knife just scrapes off this material for a smooth finish.
BTW. I also tried a regular tile cutter, since these tiles have similar top level finish. But these tiles are too thin and the cutter would not reach, and would not score properly either.
Thanks so much for the post. I'm so doing this as soon as I'm done with rotater cuff surgery and feeling better. My bathroom floors are horrible and your's look amazing. I'm all in for $50!! Thanks for the detailed photos and post.
You're so welcome, Tricia! Best of luck. 🙂
May have sent this already, but can these be installed over concrete?
From my limited reading and general understanding, the big problem you might have in this application is moisture. The tile themselves are fine, but the adhesive backing on a damp concrete floor doesn't play well.
If you know your concrete is damp or suspicious that you may have an issue in the future, laying a Dricore or other barrier/air circulation type floor first would be smart.
Having said all that, if your floor is dry and trustworthy, Vinyl is one of the most popular options for doing basements. You may just want to skip the peel-and-stick version and go right to the "Click", plank style floor.
Hope this helps and thanks for reading,
Going to try this……Old floor is coming up and I Love what you did!……I'm just not moving the toilet…..Wish me Luck!
Good luck!!
Looks fantastic! Your blog has sold me on these tiles!! Are you sure the tiles you used are the Grey Pearl? I've been scoping this product out at Home Depot and judging by your photos it looks more like the Roman Travertine Grey…
I thought I was the only one who thought the same! The Pearl Grey actually has a shiny, almost light pinkish/purple look to it. At least in person it looks that way. The one from this blog definitely looks like the Travertine Grey. Anyone else can confirm? I love the way it loos in your bathroom, but I'd hate to order the wrong one, Great blog! Love it!
And for anyone who's a little nervous about removing the toilet, we just laid a large sheet of paper and cut around the toilet till I made a nice template. Then I placed the paper over the tile and cut the shape accordingly. We then sealed (and covered up) any imperfections from the cut by using white silicone caulk. No one would know the difference.
I think you're all right – It is Travertine Grey! I'll fix the link. I hope we didn't lead anyone astray with our sloppy linking there. Thanks! 🙂
Did you use the 12" x 24" tiles?
How are they holding up so far? Have you noticed any cracks in the grouts?
They are 12X12 tiles, Xavier and they are holding up great! No cracks in the grout – a good subfloor makes all the difference.
Your vinyl tile with grout looks great! I was wondering if you used vinyl tile grout or just regular tile grout. Do they differ anyway?
We used regular grout. I'm not sure how they're different, but it's held up great!
That looks amazing. I just did my bathroom too and actually had the exact same sheet vinyl as you did before. Found this post looking for grout sealer (did you seal?). I still can't figure out what grout sealer to buy.
What is the name of those tile and where can I find them. They look beautiful..
Trafficmaster Ceramica – Home Depot – I'm not the blogger but just used the same ones. So easy!
I used these same tiles in my bathroom and now my grout is cracking. Any ideas why this is happening? It has been a year since our install and I did not remove the baseboards but butted the tiles against the wall. I filled in any imperfections with grout and now feel that was a mistake as I'm reading walls should have silicone to make sure things can expand and contract without cracking the grout.
Man you guys are a good looking couple……. good job on the floor
We have the exact same problem. I was actually scraping with a straight edge dull razor and it was working until I put 3 slices in 3 different vinyl tiles and decided to stop using that procedure. This is so frustrating. People have wrote suggesting 1/4 cup ammonia to 1 gallon of water or using Windex. I haven't tried it yet. I'm going to try both of these suggestions tonight. I'll let you know if it works on not.
We just installed the TrafficMaster Ceramica Exodus on our kitchen floor. We waited almost 24 hours to re-wipe the grout haze off the vinyl, however, it's not coming off. I called the manufacturer. The woman suggested we strip the tiles with Allure Single-Step cleaner. We did and it still has a grout haze. Apparently, this product doesn't work. How long did you wait to re-wipe the tiles after you grouted? And did you find it difficult to remove the haze? Any suggestions would be greatly appreciated.
The floor looks great! Is that the TrafficMaster Ceramica Pearl Grey? How does it look now?
That's the ones – and they still look as good today as they did when we installed them. 🙂
Update fm Pat in Florida: My groutable tile job turned out great. It was approx. 176 sq. ft. Just finished grouting and I have a slight bit of grout haze when the light hits it just right. I will call Halstead to ask if I can use a haze cleaner on this ceramica. The hardest part for me was the cutting. I killed my utility knife blades so I switched to a sabre saw. That made things go much faster and so much easier on my arthritic hands. Glad it is done but very pleased with the results. I hope it holds up. Thanks for the platform.
Thanks for the update, Pat! Didn't read anything about using a saw in the installation instructions. I'm pretty sure you can use shears/snips to cut the tile though. Not sure if that would be too much for the hands or not…but just thought I'd add that for others who may not have other tools available. May be easier than a utility knife…then again…I guess it just depends. Thanks again, Pat!
Anyone know why you can't grout any peel & stick vinyl tile. Is it just the beveled edges that differentiate groutable from non-groutable vinyl tiles? The thickness of both types look to be the same. We used groutable vinyl tile in our master bath and it looks great, but now we can't find the right color groutable vinyl tile for another bathroom. I'm thinking about using regular (Armstrong) peel & stick vinyl tile to see how it works out. Any warnings in advance?? Jerry in SC.
I'm not sure it would work well, Jerry. The tiles made for grouting are quite a bit thicker and allow some depth between the tiles for the grout. Regular peel and stick would t have this space and it could mean thin grout that would chip and break easily. The grout able tiles are a bit more expensive – but having to rip the floor out and do it over would be so much more costly!
Maybe try it out with a few tiles on a piece of plywood first?
Your site is great!! You have helped me finally make my decision to purchase vinyl peel and stick groutable tile. I can't even count the trips to Home Depot and Lowes and the endless research on the www. I stumbled on to your site and It was the exact confirmation I needed to push me to my decision. I am currently ripping up a 200 sq. ft. kitchen of two layers of flooring. #1 is vinyl sheeting put down in the early '80's and the other is a layer of peel and stick put down in 2000. I am almost finished with the demo and really needed to get off the dime and decide. Well you two cinched it for me. I can't thank you enough. I will let you know how it all works out. I will make one more trip to HD and purchase all that I need and I have noted all hints and tips from your sight and will use them all. Thank you again. Pat in Florida
Hi, did you have to use tile spacers? If not, how'd you keep them spaced just rite?
Yup, we did – they are visible in this image from our install above:
http://2.bp.blogspot.com/-_WuAdQfl-u8/T_IPMr5u85I/AAAAAAAAA6Y/XISMbgxhhTs/s1600/Bathroom_Floor_Cut_Tiles.JPG
Tough to see due to mediocre lighting, but there.
I'm no expert, but I think a level surface is pretty crucial, but the floor we were covering was not too bad. Also, the peel-and-stick tile are vinyl, so there is a bit more margin for error than with actual ceramic tile.
Thanks for the question and good luck.
We are thinking about using the Cermica Gray tile for our kitchen. I thought you had to lay either luan or skimcoat. Does the tile say you do not?
I've laid grouted vinyl tile in multiple rooms now–love it so much more than carpet!! But my question is, what product do you use to clean the tile? my most recent product (from Menards) says not to clean with soap and water! I'm in the midst of grouting it (huge room), and I'm worried about getting the haze up when done.
I'm a year and a half removed from doing this project, but I'm 99% sure I just used warm water and the trusty sponge to clean the initial grout haze off. Since then, we've been cleaning with normal floor cleaning products when needed and the grout seems to have stayed in place (even around the tub, where soapy kids splash).
I have heard that some grout does need a seal of some sort (I think the type that is used in showers where it frequently gets very wet/soapy may be one like this). Maybe that is what you have. I'll try and find our old grout container and see what we used.
Thanks for the question.
I think when comparing with other flooring sticking the tiles is different some of them where use instant adhesive to stick immediately and other used slow adhesive.
I want to use PEEL and STICK tiles to repair cat damaged cat tree. 80 Years old and have never used a utility knife. Is There a video so I can see how to meausure and pressure requires to score an cut tiles??
Sorry I missed this, Crazy Cat Lady! What is the problem with your cat tree? I'm not sure this is the right product to fix something like that. I'd like to help though!
We also used the ceramica tile in cool grey in the bathroom with 1/4 inch spacers and used grey simple grout. We used a leveling patch compound first because there was some unevenness to the floor after removing the old vinyl tiles. Looks beautiful and much warmer than real ceramic. Great Product! Very pleased!
Agreed!
We just did our laundry room with press and stick groutable tile and it looks great. I'll admit I was skeptical when we started but it turned out fantastic. We would have done ceramic but I didn't want to deal with demo'ing the floor, installing a new subfloor and hardy backer and cutting door bottoms.
Awesome. And you're right about all the extra steps that go into installing real ceramic. For the price/time investment, the peel and stick is tough to beat. Thanks for the comment,
I am about to lay the self stick vinyl tiles in my kitchen. I purchased the Ceramica Groutable tiles from Home Depot. I do see that yes these tiles are thicker than your basic self stick tiles and yes they do have the beveled edge that makes them groutable. As recomended in the instructions I will be using the 1/8" spacers. My concern is the (depth) of the grout. While they are thicker they still are not as thick as ceramic tiles. It will be a rather thin layer of grout 1/8" wide. So how well does this thin layer of grout hold up ?
I'm not sure if ours were exactly the same as the ones you describe, but we got them at Home Depot and they are definitely not as thick as conventional ceramic tiles. Nonetheless, the grout seems to be holding up well (we are one year in now on our peel-and-stick grouting experiment).
Admittedly, a kitchen will be a higher traffic room than a bathroom, but I don't see why it wouldn't work there too. Good luck and thanks for the question.
Hello…
I put these peel and stick tiles in my kitchen and powder room 2 years ago and used the grout. My grout has held up just fine and those are two high-traffic areas of my home. I did seal the grout as well. I am currently putting the tiles down in my master bathroom and plan to grout those as well. 🙂
Thanks for sharing that – having just put them down one year ago we can't speak to the longevity of the tiles – especially in a high traffic area like a kitchen. Great info! 🙂
Great job. Did you have to remove the old flooring or can you just go over the existing tiles?
Apparently you can put the new tiles over old ones, but that wouldn't be my first choice. If the old flooring is loose, or heaven forbid, there's a problem under it (mold or rot?) you are in trouble. We pulled ours up to be safe.
This looks amazing. Did you have to seal the grout?
We always read that it's recommended to seal the grout. We always mean to do it. But, as of today, we haven't quite gotten to it.
Thank you Robin!!!
Did you remove your baseboards before applying the tiles?
Nope. We left a small gap next to the baseboard and then filled it with grout. Not sure if that's the "correct" thing to do, but it worked and it was easier. No regrets there, Claudia. 🙂
Not taking off the baseboards is ok, but you should never grout the seams where tiles butt up against the walls or the tub. These joints should always be caulked to allow for flex and expansion which the rigid grout can't handle without cracking. It will look fine at first, but the grout is eventually going to crack along those joints.
That sounds about right. We haven't seen that show up on ours yet, but I can definitely imagine it happening. Thanks for the tip and we'll be sure and caulk those areas when they start to show age.
Thanks for reading and posting.
That looks great. I also just did my bathroom with peel and stick (no grout) after 16 years. love it. does not look cheap. I only wished I had removed toilet. Didn't know how til I watched your clip. Now I can go back and redo that. Cathy
Its a bit of a pain to remove the toilet, but way less hassle than we thought. 🙂
I am using a similar product – I have excess adhesive along edges – how do I clean that and my hands?
I wish I could help; the tile we used were peel-and-stick (like big stickers you place on the floor).
If you're talking about grout – it should clean up with water and a tile sponge. We didn't have to mess around with tile adhesive – and wish you all the best with yours.
I had some tiles that had excess adhesive after I laid them and I just used some rubbing alcohol.
I called the manufacturer and they told me that this brand's adhesive will clean up with TSP (Trisodium Phosphate) – available at Home Depot.
How is it holding up so far?
We've had them installed for 6 months now, and they are still perfect, David. Not a single complaint. We have had a few friends see them and decide to put them in their own homes.
So you just put them down on bare plywood flooring… without the Waterproof underboard required for ceramic? ��
Just another question ~ if I slightly sanded my pre-existing linoleum floor then installed these tiles, wouldn't this save a lot of work?
Can I ask the name of the tiles you used and where you got them? I think they'd be perfect for my kitchen. Looks beautiful!
Hi Kara! We got them from Home Depot. They are from Traffic Master, specifically Ceramica Pearl Grey. Visitors are pretty amazed with how they look (and they are actually warmer and less slippery than real marble would be.)
Wait! We made a mistake – they are actually Travertine Grey! Thanks to readers to pointing out our confusion. So sorry!
I love it!! Fabulous job.
Thanks, Jean. We're really pleased with it.
WOW! The floor looks wonderful! An amazing transformation on a budget, I love it! The new floor really compliments the room well. Have a wonderful weekend!
Thanks, Jessica! We love it, too. 🙂
Looks amazing! Looks fabulous in the bathroom, but how do you think the tiles would look in a larger space such as a kitchen or laundry room? I'm thinking about using a groutable peel and stick in my kitchen but don't want it to look fake.
Cara
Looks amazing! Looks fabulous in the bathroom, but how do you think the tiles would look in a larger space such as a kitchen or laundry room? I'm thinking about using a groutable peel and stick in my kitchen but don't want it to look fake.
Cara
Hi Cara! I think they could look pretty good in a larger space. It really depends on the style chosen. A few designs were odd and would be a bit obviously fake over a large area. We actually have plans to do my mom's kitchen and hall with some groutable peel and stick. ~ Robin