
We may earn a commission on purchases made after clicking links on this page.


by Ed
A few months ago we shared the luxury vinyl plank pros and cons that we considered before choosing this flooring for our main floor.
This is the third time we’ve used this affordable and versatile flooring: we’ve installed luxury vinyl tile in:
- the bathroom of our Mobile Home Makeover and
- throughout our Basement Makeover.
It is easy to work with, comes in a variety of realistic-looking options and provides a tough, durable floor when complete. That, my friends, is what we in the DIY game call a triple threat.
After three installs I’ve gained lots of skills in luxury vinyl plank installation. I’ve got cutting vinyl plank flooring down to a bit of a science: some of the cuts are simple, but some are tricky and in this post, I’ll walk you through it.
I’ve also got advice for that ever-important preparation phase. This flooring is pretty forgiving of the floor underneath; we’ve put it right over old vinyl and damaged hardwood. But great preparation leads to more professional looking installation. And that’s what this post is all about: tips and tools for luxury vinyl plank installation that is easier and better looking.

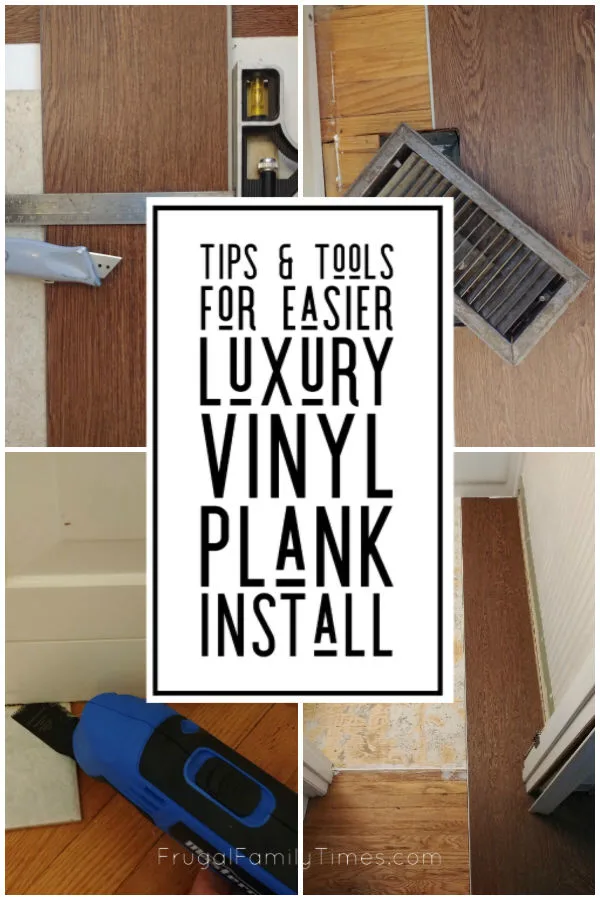
- First off – What tools do you need to install LVP?
- Vinyl Plank Flooring Tools:
- Tips for Luxury Vinyl Plank Installation:
- 1. Carefully remove all your baseboards
- 2) Prepare built-ins and other immovable objects to slide LVP underneath
- 3) Prepare your Subfloor: Tips for Installing Luxury Vinyl on uneven floor surfaces.
- 4) How to: Luxury Vinyl Tile Installation
- 4) Tips for Cutting Vinyl Plank Flooring
- 5) How to Cut Around Openings with Luxury Vinyl Planks
- So, How long does it take to install vinyl plank flooring?
- We've got so many beautiful budget-friendly projects – Check them out here.
First off – What tools do you need to install LVP?
Vinyl Plank Flooring Tools:
- floor leveling compound
- Sharp construction knife with extra blades – swap frequently to keep a clean cut
- Construction square
- Ceramic tile remenant or other thick, solid cutting surface
- Pry bar
- Solid block for tapping plank
- Electric Multi-tool for trimming around and under millwork
- Jigsaw for making any challenging cuts
Not required, but will make things easier: Electric Nailer for reinstalling baseboards after


Tips for Luxury Vinyl Plank Installation:
1. Carefully remove all your baseboards
I know- you can just lay flooring up to them and add a piece of trim to hid the gap, but it honestly doesn’t take long and your work will look more professional as a result.


2)Find a pry point and
3) using a screwdriver or
4)pry bar work your way in.
Remove the nails with pliers.


It’s FLOORING TIME!
2) Prepare built-ins and other immovable objects to slide LVP underneath
Well, it’s almost Flooring Time. Look around and see if there are any areas with difficult trim/millwork remaining.
We had a couple corner cupboards that -with a little trimming – would allow for flooring to go right under them and avoid some lousy angle cuts.


This made room for the Luxury Vinyl Tile planks to slide in.
You may find this helpful around door jambs and other finicky pieces.
When this part was done, we started laying flooring through the first half of the house. If your floor is uniform throughout, or you’re just doing a room, scroll down to the the Install Section below.
If your floor is uneven or has less-than-smooth areas, sorry – you still have a couple more steps to do before the fun. Keep Reading.
3) Prepare your Subfloor: Tips for Installing Luxury Vinyl on uneven floor surfaces.


Our hardwood was a mess, so small (1/8″ or less) gaps got filled with caulk that we then troweled level. This was mostly just to keep the breakage in the old floor from further deteriorating.


Anyhow, using scrapers, flat-headed screwdrivers and gloves to protect my hands, it got done.


You don’t need to have a perfectly clear floor to lay LVP onto.
In this case, all the old peel and stick tile are gone, but some of their adhesive and paper backings has remained.
If it feels reasonably smooth, the Luxury Vinyl tile can lay right over it and hide a lot of sins.


The answer is to lay down sheeting to take up the gap. We found OSB in the right thickness and – while it isn’t the perfect material – we sealed it with primer in any area that moisture could leak through and make it swell.


While you’re at it, screw it down every 6-8 inches along the floor joists and the drive ring nails through till it looks like it has nice, evenly spaced polka dots.
Your new floor is not going to squeak – not on your watch!


We had small dips to make up where our living room joined the old floor. Use a long level to check for unevenness and mark how far you need to feather out the transition if any is present.
Get some floor leveling compound, mix and apply, gradually fading it out to meet the line you drew.
Again – it doesn’t need to be perfect – ours above looks awful – but it will give the LVP an easier transition than a sharp gap.
4) How to: Luxury Vinyl Tile Installation
You’re finally ready to lay some floor!
Carefully read the directions that come with your flooring, but generally, you’ll be tucking a small tongue into a larger tongue that will lock into a groove. The tile will lay flat when you get it right.


2 &3) Then work the long side, again angling it into the groove.
4) Once it is fit all along the seam, tap it gently with your block to make the groove lock together. When the plank lays flat, you are done!
One final note: The tongues, edges and corners of a lone plank are fragile and can chip or snap if you’re not careful. Once installed, however, the planks support each other and they are quite tough and durable. What a great life lesson to teach our kids – and ourselves.
Really? That’s it?
Pretty well. Just keep laying flooring, staggering joints by whatever the manufacturer suggests and avoid installing any glaring pattern repeats next to each other.
Eventually, you will have to make some cuts – both simple and challenging. Here’s how to do that.
4) Tips for Cutting Vinyl Plank Flooring
When you reach the end of a given run, you will probably need to make a cut.


2) Mark the location where you need to cut.
3) Using a metal square, score a line on the plank with a sharp blade. One or two good passes will be enough – you don’t need to cut all the way through.
4) Snap the plank at the score mark – no power tools required, no sawdust to clean up after.
5) How to Cut Around Openings with Luxury Vinyl Planks


1) Mark the two spots where the grate opening will line up on your plank. Draw them out, measuring your actual floor grate and transferring the depth to the plank (i.e. how far into the plank you will need to cut)
2) Cut the side cuts with a jig or table saw. You could also use a hand saw or cut it with a blade if you need to.
3) Line up your straight edge and score between the two saw cuts.
4) Snap the section out of the plank carefully, protecting the rest of the edges.
So, How long does it take to install vinyl plank flooring?
Surprisingly a small room can actually take almost as long a big room if there are a lot of tricky cuts around built-ins, cupboards or floor grates. Most of your install will go very quickly, but the last 5% of any given project will test your skills and possibly make you invent new ones.
We did our whole main floor over the course of about a week – not working at it constantly. We have done a small bathroom in an afternoon. LVP is probably the fastest DIY installed floor out there! Definitely faster than tile or hardwood.
Of all the floors I have done, LVP is my hands-down favourite to DIY. The above Luxury Vinyl Plank Tips and Tricks should cover almost all the install issues you encounter, but if you discover any new ones we’ve overlooked, drop us a message with your LVP hack. Good luck!
We’ve got so many beautiful budget-friendly projects – Check them out here.

Easy DIY Computer Desk Plans to Build a Modern Wood PC Work or Gaming Station


Reveal Time! Our DIY Home Office Music Room (from a Playroom)


Cheap & Easy DIY Glass Whiteboard for Dry Erase


Easy Reese Oreo Bats Cookie Recipe for Cute Halloween Fun
This DIY Arbor Solved Our Curb Appeal Problem ~ Here’s How…


sunshine
Thursday 19th of December 2019
Thanks for all your handy tips and tricks and the VERY clear instruction on "how to"! The pictures are also helpful to actually see what you are referring to in the directions.
And of course the final finished 'product'!
Well done!
frugalfamilytimes
Thursday 19th of December 2019
Thanks so much, Sunshine! These long photo filled tutorial posts take AGES to pull together - so happy you find the results helpful! Thank you so much for taking the time to comment. :)