


We may earn a commission on purchases made after clicking links on this page.
Intro by Robin – Steps by Ed
I adore our modern wood DIY floating vanity! It is one of my favourite projects!!!
It’s that sweet spot where we can figure out a way to make something in an affordable way – that’s also super simple – and turns out beautifully. If you know us, you know we’ve shared lots of these in the past.
First some background.
This fall we took a closet in our basement – with no rough-in or any plumbing – and with the magic of DIY, we turned it into a basement bathroom.
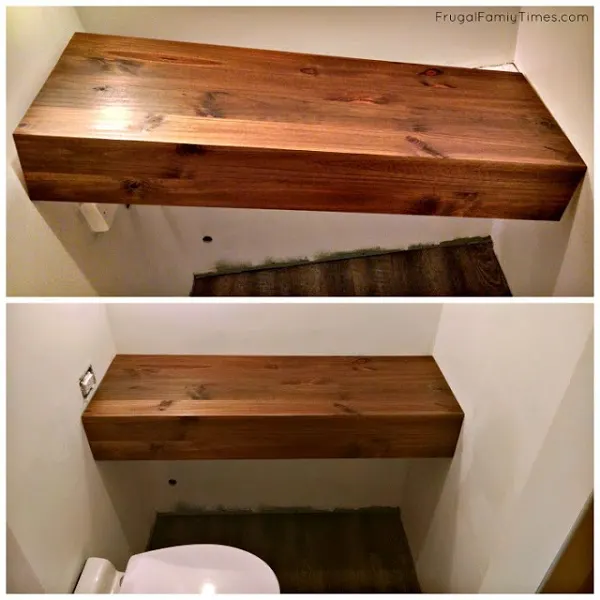
This before and after is pretty dramatic:

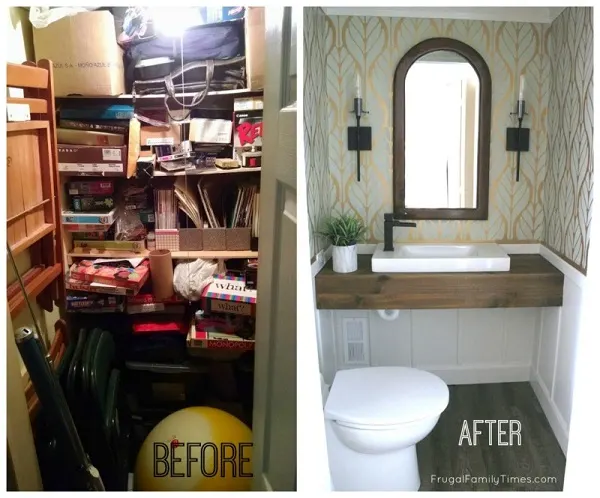
There was a mountain of challenges. One was the tiny size of the space.
It’s a mere 44″ x 43″.
And – to make the install extra fun for Ed – I had very particular ideas of how I wanted the room laid out.
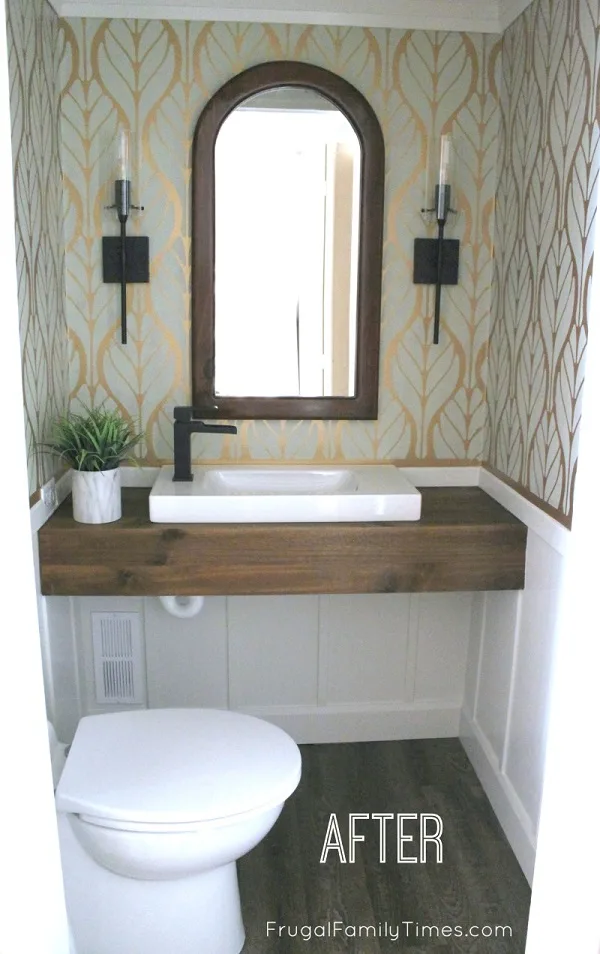
My vision was to give it a dramatic feel as you open the door – I wanted the beautiful sparkle of lights and a tall dramatic mirror – not a toilet – facing you.
It wasn’t the easiest layout for his part of the job.
Finding the affordable and narrow Hagaviken sink from IKEA paved the way to the design I desired.
Originally we purchased the matching vanity for the sink – but I also demanded a spacious feel – even as we paid for it I wasn’t convinced it was right: a vanity with legs to the floor would make the room feel congested.
Every inch is sacred. So we returned it.
(An IKEA tip: be sure to sign up for the free IKEA Family program – it doubles the window for you to return stuff for real money – from 45 days to 90 days. We didn’t do this – but we still got store credit – so not tragic.)
My solution: a DIY floating wood vanity.
My first vision was of a reclaimed beam – until I scoured a couple of reclaimed materials shops. The depth I needed – about 16″ – just wasn’t easy to find.
Plus, the gouges and bumps in reclaimed boards didn’t seem like the easiest thing to keep clean. And it is a bathroom after all – cleanliness kinda matters.
Then, in one of the shops light bulbs floated over my head. I saw this display…

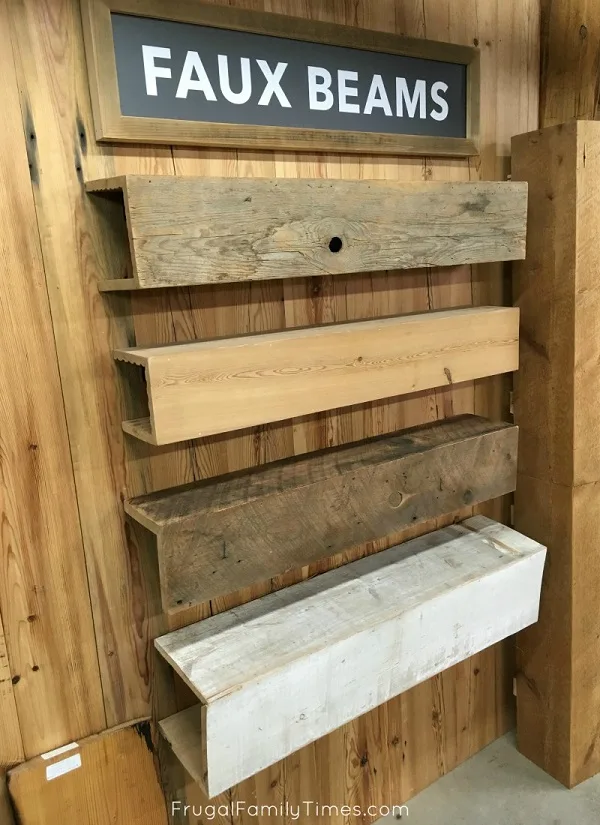
The second from the bottom was calling to me.
I chatted with the manager to see what the cost would be for them to make the size I was looking for. I tried to be classy and not let my jaw drop or gasp when he said: $400-600!
So instead, I figured out how we could make our own wood floating bathroom vanity – that looks reclaimed – on a tight budget: just $30!


How to Build a Wood DIY Floating Vanity
For Less than $30 (an IKEA Hack!)
What you need to build a modern wood DIY floating vanity:
- 1 – 16″x96″ Whitewood panel
- 2″x2″ or 2″x4″ lengths to secure to walls and support the vanity
- Table saw or circular saw that can be set to rip at a 45-degree angle.
- Magnetic feather board
- A plumbing drain and water supply rough in that are as high as possible without interfering with the vanity height
- We did this ourselves as we were doing the whole room from scratch. It isn’t a big deal if yours is already roughed in – it just means some of the plumbing might show more.
- Wood glue & screws
- The supplies for the finish of your choice (Ours was a DIY finish – from things around the house – that cost us pennies! All the details here..)
- Ikea Hagaviken Sink
- Delta Ara Faucet (which Delta generously gave us to use.)


Look it over thoroughly for wood filler and pick a side with the least amount of it your face surfaces. Filler doesn`t take finish as well.
How Do You Make a Floating Vanity? The Steps:
The Hagaviken Sink is nearly 14″ deep. So we decided that we wanted a vanity that was only a little bit deeper – hence the 16 (actually 15-3/4) whitewood.
Our bathroom is also only 44 inches wide. So the 96″ board means we can cut it in two and use half for the top of the vanity and the other half (ripped down slightly) for the apron.
If your sink/bathroom dimensions are different, then you might need more or less whitewood.
Step 1: Cut the Whitewood to width for your Vanity/Room
Ours became two 44″ halves. You’ll want to wait to cut the depth for when you’ve got the mitre just right.
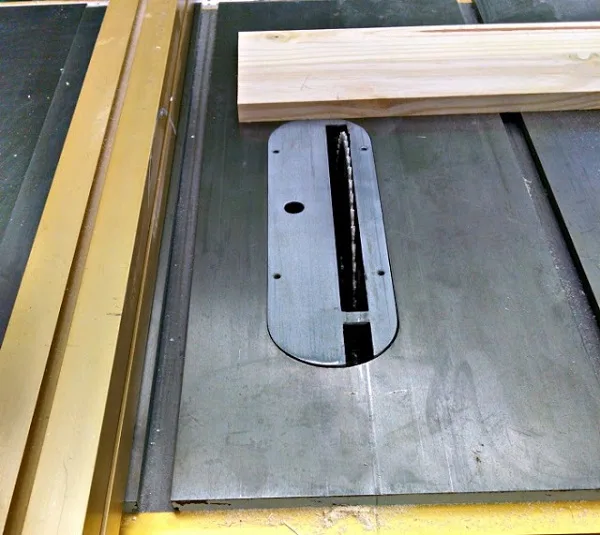
Step 2: Mitre the lengths to 45 degrees
We then mitred the long edges by tilting the table saw blade to 45 degrees.
This can be done with a circular saw too, but you’ll want a guide on it to make sure you keep it straight.
For the table saw, two people made sure the board passed through straight.
- We can’t say enough about using a feather board like the one below. It has magnetic dials that allow you to position it perfectly and it can save you a lot of trouble. It gives just the right pressure to keep your cut straight and true.


Step 3: Cut the Boards to the final size you want AFTER you get a good mitre

We made our finish counter depth 15″ and the front face board 6-1/4″
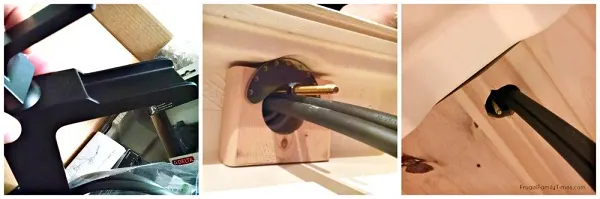
Step 4: Join the two boards!
Support the joint with a 2″x2″ from behind and glue, predrill and then screw through it into the two boards.
Don’t be cheap with the wood glue – you want this to stick and you can use a damp cloth to wipe off the excess.Get the mitre as tight as possible. You don’t have the luxury of wood filler to hide your sins, as it will be revealed by your finish (unless you plan to paint the vanity – then your mistakes will be hidden).
Take your time and be sure to wipe up any glue that squeezes out immediately too – yes, it’s worth mentioning this twice.
Step 5: Sand and Finish
Our antiquing process merits a separate post – it’s so cool – it cost just pennies and used stuff from around the house. Read all about it here!


We made the reclaimed wood stain for pennies – here’s how you can too!
Step 6: Install floating wood vanity
How do you secure a floating vanity? Here are the details…


The 2″x4″ that supports the sink lands just above the drain and pipes. Yup -things are tight.

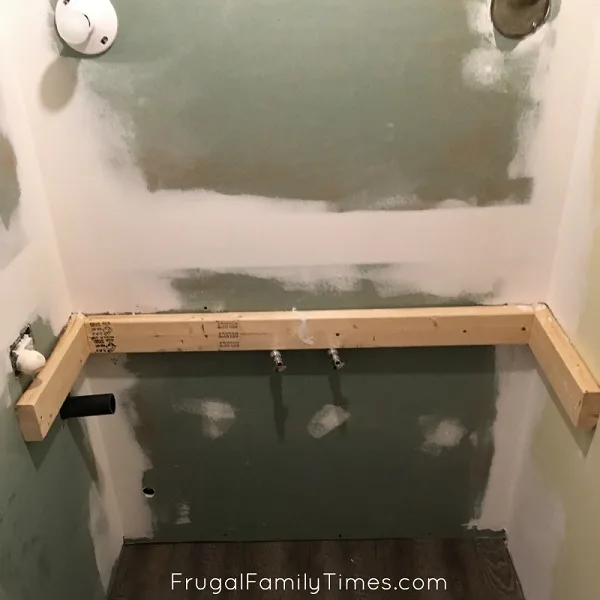
We drilled into studs to give it lots of support.

I ended up busting my drywall a bit to make it work. There was no other way to do it. The small bit of patching I had to do was less of a pain than assembling the mitre in place and doing all the finishing.
Step 7: Cut a hole for the Sink


This made it easy to trace, drill and cut-out a hole for the sink to drop into. We kept it towards the back and trimmed extra bits here and there to make it fit.
Remember, cutting the hole a little too small is much easier to fix than cutting it too big, so measure and cut carefully.
Step 8: Install the Faucet
Delta provided us with this dream faucet.
We like that it looks a bit like an old-time water pump and it is so solid and well made, it feels like the perfect final touch on this project.
And the waterfall – both soothing and dramatic. Perfection.

The sink was very tall where the faucet needed mounting, I had to mount the faucet directly to the sink (versus the usual mounting with the counter directly touching below).
I added a piece of wood to spread out the force of the mounting bracket. This is likely overkill, but kids/teenagers will be bashing this room around for years to come, so, yeah,
Step 9: Connect the plumbing!


There is a lot of hate online for this connection, but I honestly haven’t had any issues. It is likely because I wasn’t trying to hide it behind vanity drawers (what it is designed for). Anyhow, no big deal.
The Delta faucet connections provided lots of extra water supply hose, so I VERY carefully measured and cut the lines so that they would be short enough to hide nicely. As you can see, when standing and looking into the room, the plumbing is basically invisible. We love it.

All the Basement Bathroom Room projects are here…
- We’ve got a detailed tutorial with the steps and tips on how to install a bathroom in a basement without breaking concrete.
- We devised our own DIY alternative to ridiculously expensive wallpaper – and we’ve shared how we did it here.
- We did a reclaimed wood stain finish on our vanity – with things from around the house – for pennies!
- We installed tongue and groove ceiling planks.
- all the finishing touches on our Classic, Modern, Natural Powder Room:
- the gorgeous faucet
- board and batten wainscotting (which we have done before with beautiful results)
- simple to install crown moulding
- the beautiful lighting and more!
The next room we tackled was our Basement Guest Room/Library – it’s a dramatic one too!


More of our Closet to Powder Room DIY Projects…


Robin and Ed are a DIY-loving couple with over 25 years of design and build experience. Also, Robin is a Nutritionist and former Registered Dietitian and Ed is an award-winning Business Educator. We share strategies for living a rich life on a DIY budget: creative money-savvy ideas for a stylish home, healthy meals and family fun. Our work has been published in the pages of Do It Yourself, Farmhouse Style and Better Homes & Gardens magazines.
Tracie
Monday 20th of September 2021
Can I get some more information in combining the 2 45 degree angle boards? I do not understand how to scree them together. I get using the glue on the joints but the extra 2x4 and the screws I am not processing. Any additional instructions would be so appreciated.
frugalfamilytimes
Wednesday 22nd of September 2021
Great question, Tracie. We were more diligent about photographing our faux beam project and the principle of joining the two 45 degree angles is the same. With the floating vanity, the only difference is that I ran a 2"x2" strip along the back of the joint and then pre-drilled and screwed into the vanity top and apron from behind so that you wouldn't see any of the ugly. Hope that helps!
Jon
Tuesday 3rd of December 2019
What is the height of the countertop from the floor?
frugalfamilytimes
Saturday 7th of December 2019
It's 31", Jon.
Courtenay@Creek Line House
Saturday 23rd of December 2017
This is so brilliant! We have a tiny bathroom too that we need to renovated and I'm definitely going to think about doing something like this now!
frugalfamilytimes
Saturday 23rd of December 2017
Thanks, Courtenay! It feels more spacious in there than I even imagined. Be sure to let us know if you do something like this! :)
Unknown
Monday 27th of November 2017
Did you put in a shutoff water valve?
Ed from Frugal Family Times
Tuesday 28th of November 2017
Yes - The hot and cold (and the toilet) each have a Shark shutoff connection. Too many experiences replacing builder-basic faucets over the years have meant that every time I install a new one, I make sure I plan for future maintenance. Although this one's a Delta, so it'll likely go forever...