


We may earn a commission on purchases made after clicking links on this page.
Intro by Robin
Steps by Ed
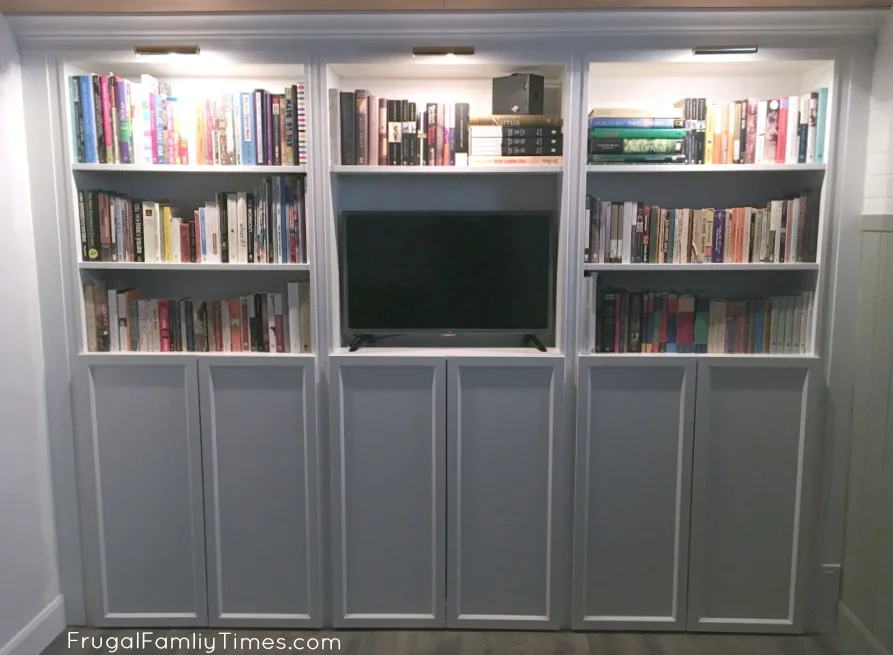
When we built our IKEA hacked wall to wall bookshelves, we knew we wanted to add bookcase lighting. We love the mood that bookshelf lighting brings – warm light that highlights our books and our built-in bookshelves. 😍 The lighting adds so much character and ambiance to the room.
And the room needed as much help as possible! Have you seen the before? It was an empty peachy-beige (Peige?) box. In a basement no less. There was nothing attractive about this space.

The other challenge that our bookcase lighting solves is, well…lighting.
This room had 7 potlights from when we first built the room 14 years ago. It was WAY too much light for this small space. And they were in weird spots.
The potlights could only be placed in the ceiling where there was no joist or ductwork running through. There was no way to line up the bookcase and the potlights in a balanced way.
So we scrapped all but two potlights in the room (which you can see in our faux brick wall post). Picture lights over the bookcase were the perfect solution!
Now, we’re no electricians. Ed’s done some wiring – but we wanted to make the installation of these lights as simple as possible. For our sake – and yours! Simple DIYs actually get done – and on budget.

What follows are four simple ways to add bookcase lighting to any bookshelf – or anywhere else – without hiring an electrician or complicated wiring.


How to Add Bookcase Lighting to Any Bookshelf
(without an Electrician!)
Bookcase Lighting DIY Method 1: Battery operated picture lights (wireless)
Battery-operated picture lights are a great option for their sheer simplicity. There are some attractive battery-operated picture lights – especially if your aesthetic leans toward modern.


1. This light is gorgeous!
2. This brass one is sleek and modern.
3. This other brass one is classic and pretty.
NEW! (not shown) This one is battery-operated and so sleek – it’s rechargeable and has a dimmer. A great price too!
We didn’t choose this option because we wanted to wire our three library lights to operate together on a dimmer. With this option, each picture light would have its own remote to turn it on and off.
But, if you’re adding just one light – say to a single bookcase – this option is perfect.
The next two bookshelf lighting methods have the most design options. Both of these can use hardwired lights because of the workaround methods below.
Adding Bookshelf Lighting Method 2: SMART outlet
We are intrigued by this option and while smart outlets aren’t super-cheap – they do cost a lot less than an electrician making a house call to wire things up.
Now, this relies on WIFI and usually a smartphone App or a SMART home hub to control the lights, so if you don’t want to always be asking Siri or Alexa to dim the lights, this might not be perfect.
Also, you’ll want to keep the SMART outlet accessible so you can reset it when the WIFI invariably needs a refresh.
You could basically follow the rest of our tutorial below, but instead of needing to hardwire a dimmer switch to an outlet, you could simply plug a SMART outlet into any standard plug and then connect it to your library lights via power-bar.
Adding Bookcase Lighting Method 3: Remote-controlled light bulb or light socket
This requires your lighting to have enough bulb space to fit a SMART bulb and you’ll need as many of these bulbs as you have lights. But if you don’t have a good way to access the SMART plug, the lightbulb option is always going to be accessible, so that’s a win.
In this version, you simply install, plug in and switch on all the library lights you want, then put SMART bulbs in them can again connect to your WIFI/SMART Hub to control the brightness level (or light temperature or music or whatever other stuff your SMART bulbs come with.
This option might be the second easiest (after the battery operated lights), but it could easily be the most costly if you needed to do a lot of lights.
Adding Bookshelf Lighting Method 4: Wire plug to a dimmer (takes entry-level wiring skills)
This is the route we went. It takes some basic electrical skills: we’re talking about being able to add an outlet to an existing circuit and swap a dimmer switch for a regular one. Not super hard, but also not everyone’s cup of tea either.
This method requires lights with plugs, here are some beauties…


2. This one is big and bronze and beautiful.
3. A sleek classic one in brass.
Here’s how we did it…
Materials List:
- Picture Lights
- The one we chose has a plug – this is key for simplicity
- Power bar to connect them to if you are hard wiring to a dimmer circuit, (or SMART outlet with Wifi dimmer control)
- Finished MDF panel – we found 1/8″ fit well
- Framing wood
- to consider: Smart Switch with Dimmer
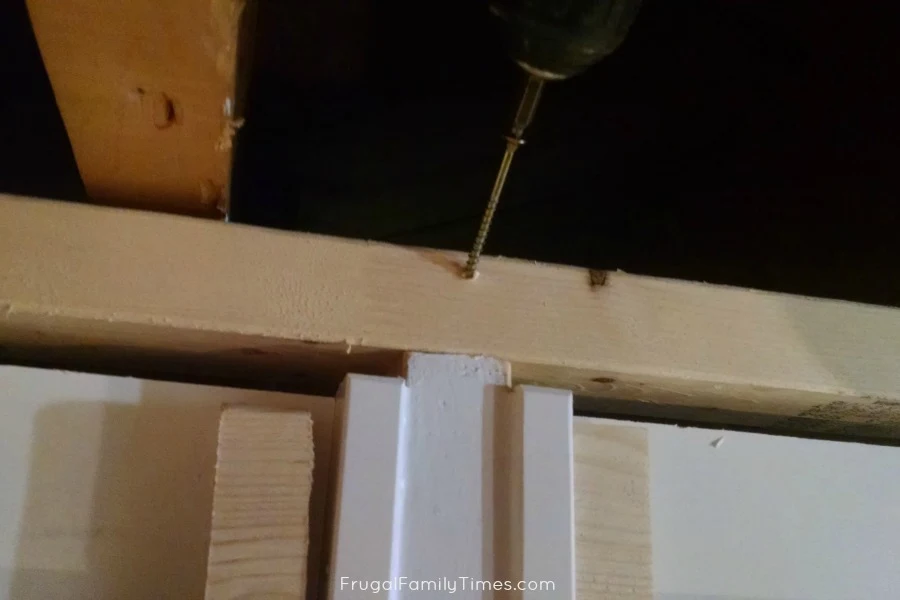
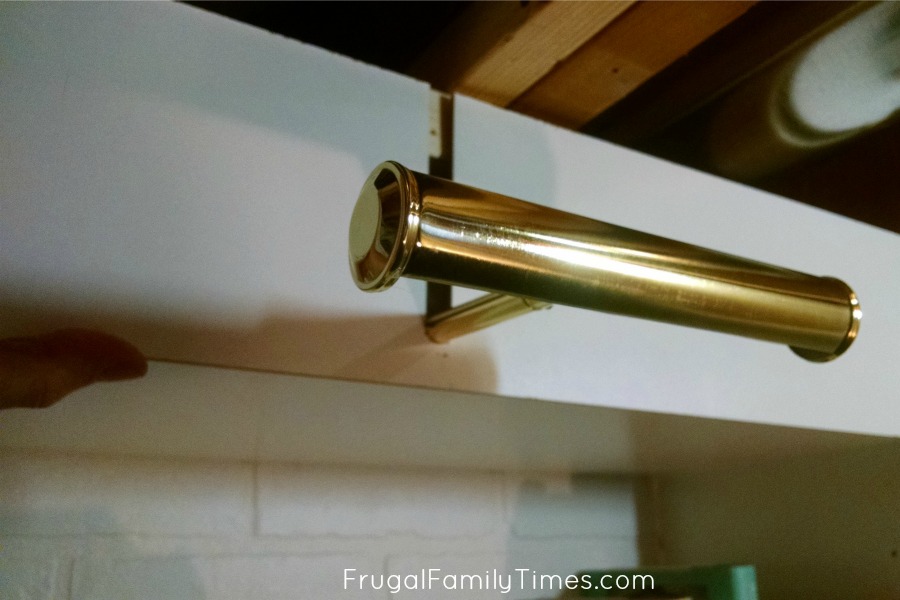
Step 1: Install the Bookcase Lighting in the locations that best suit your room.
- Don’t worry about the ugly mounting bracket and wiring – we’ll be hiding all of that soon.

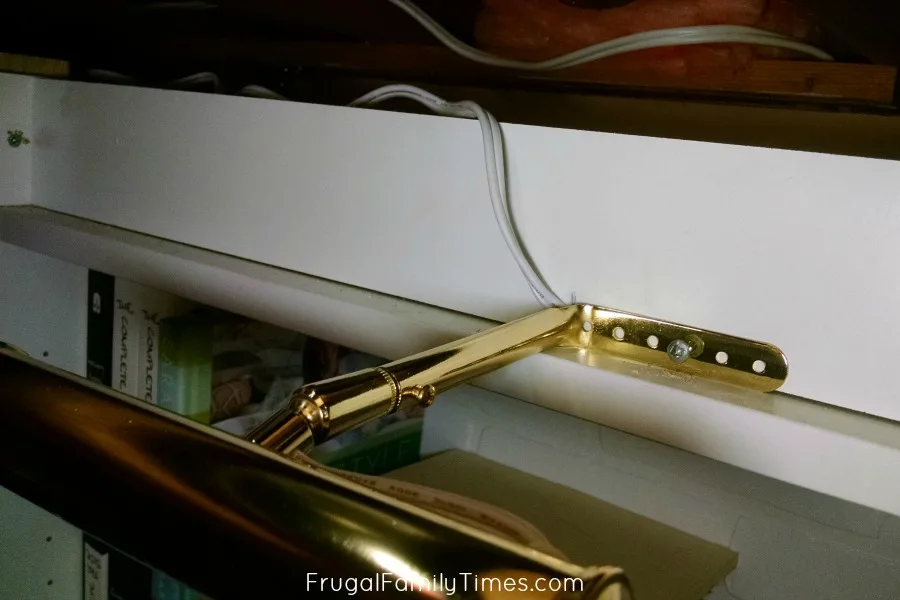

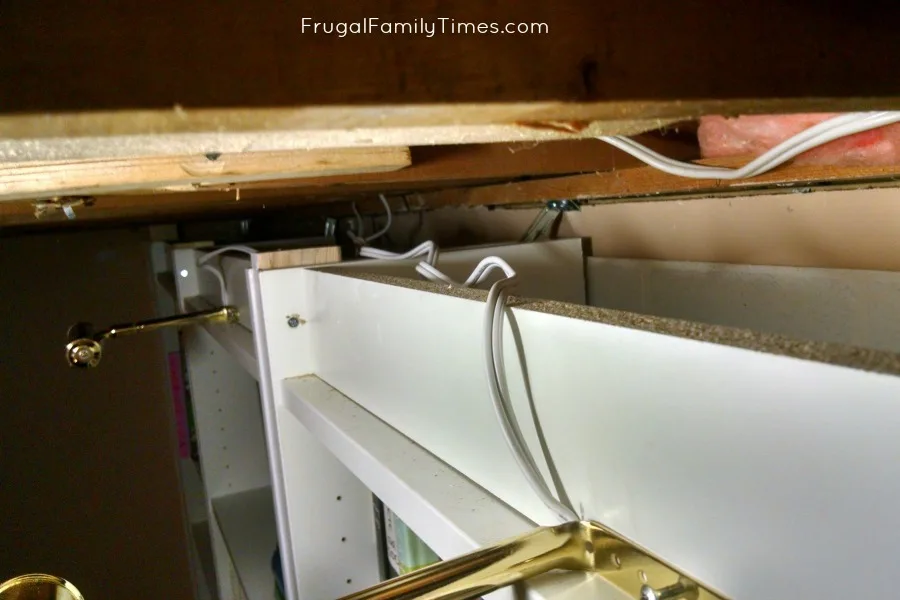
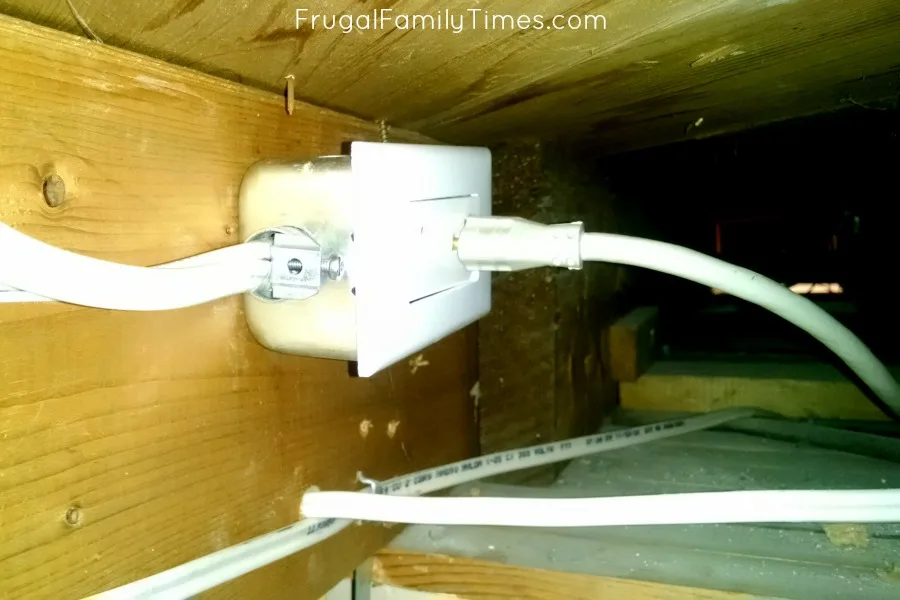
Step 2: Connect your wiring and check that the lights work.
- Consider a Smart Switch with Dimmer function if this looks beyond your skill set.

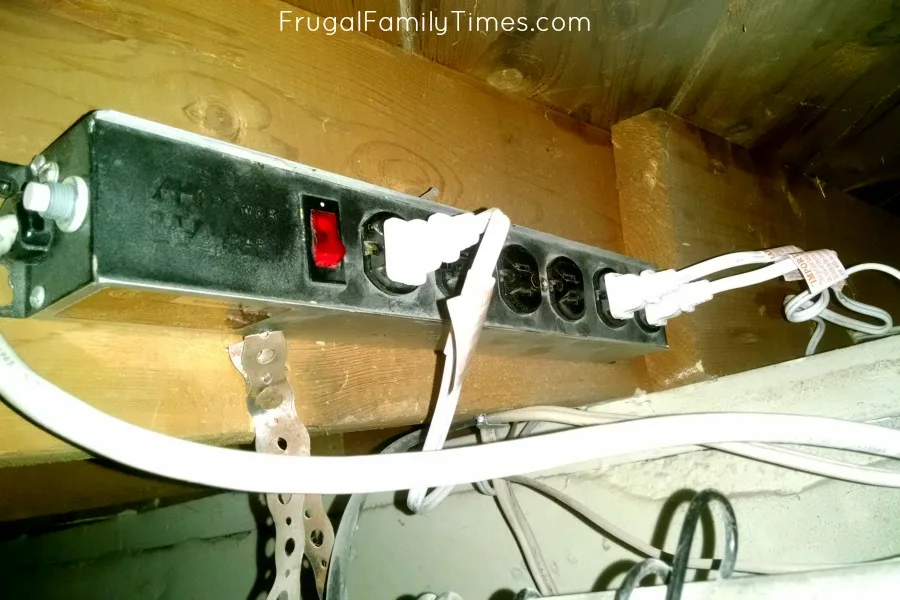
The lights themselves then plug into a power bar.
All of this is accessible from the adjacent room for any future wiring issues.

Once complete, test the lights to make sure the dimmer function work.
The decorative part of install in about to get pretty permanent and you’ll want to troubleshoot the wiring issues now.
Step 3: Add any bracing or additional support for attaching the decorative moulding and trim.


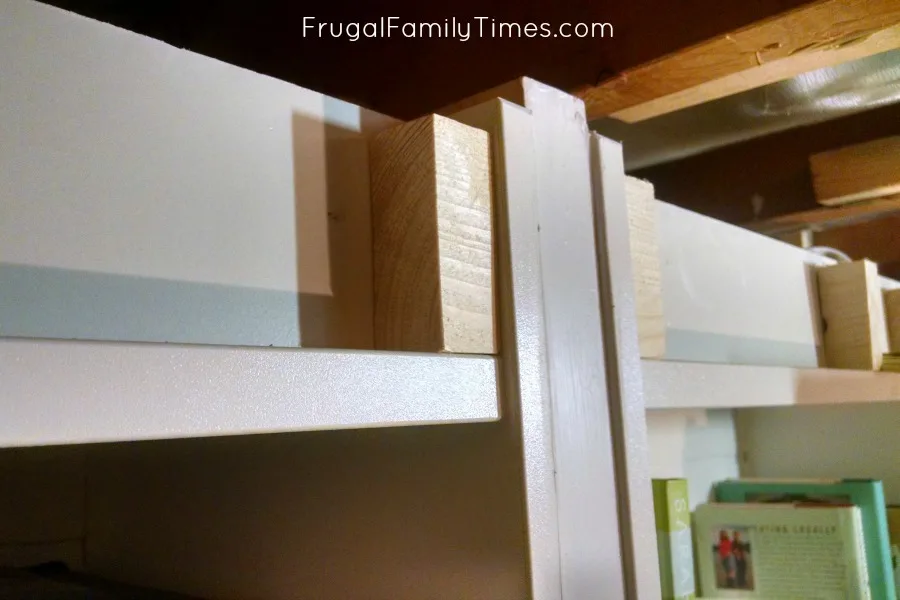
Step 4: Fit and Cut panels of MDF with a groove to hide the wiring and mount.


Then use a saw to cut out the groove.
Test fit carefully as the slot now becomes a weak point in the panel.

Don’t worry about that groove – you’re going to hide it with Crown Mold and Trim.

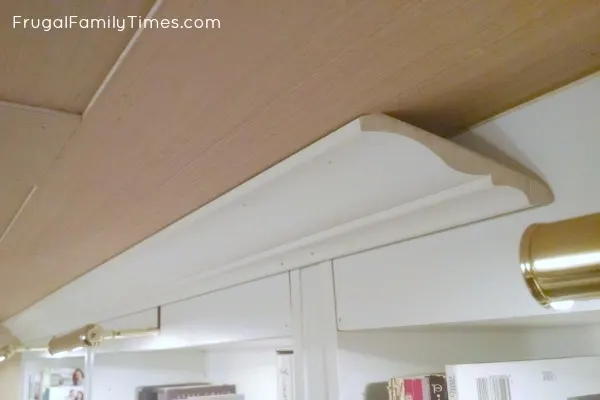
Notice the groove still over the light – we’re hiding that next.


Caulk and paint.

Et Voila! Elegant DIY lighting and Billy bookcase built-in (here’s the how-to for that).
Other projects in our Basement Guest Room-Library:
- How we made our small, high basement window look bigger and fabulous
- How we made this antique Singer sewing machine table
- IKEA hack Billy bookcase built-in – with painted brick backing and easy-wired bookcase lighting
- Our Faux Bricks Wall Treatment
- Natural Wood Panelled-look Plywood Ceiling
- Green Vertical Shiplap Panelled Wall treatment – which cost us almost nothing


Robin and Ed are a DIY-loving couple with over 25 years of design and build experience. Also, Robin is a Nutritionist and former Registered Dietitian and Ed is an award-winning Business Educator. We share strategies for living a rich life on a DIY budget: creative money-savvy ideas for a stylish home, healthy meals and family fun. Our work has been published in the pages of Do It Yourself, Farmhouse Style and Better Homes & Gardens magazines.
Unknown
Thursday 13th of February 2020
I love this post! We have a stained glass piece in our home and installing a light above it like this one will help it stand out and shine! Thank you.
frugalfamilytimes
Friday 14th of February 2020
That sounds gorgeous! It will really sparkle with the light - Thanks for your sharing your idea! :)