


We may earn a commission on purchases made after clicking links on this page.
By Ed
If you’re looking for the best garden hose repair kit – you’ve come to the right place. Some DIYs take a lot of work and some money – not this one! This garden hose repair is quick and cheap and will leave your hose even better than new!
We’d been making do with our garden hose all last summer. It didn’t work great and one end was getting distended and ‘bursty-looking’.
(We tried a free hose that the spring-melt flood left at our river property. There was a reason it was floating downstream – it also sucked.)
Then came the last straw. We came home from buying project materials and heard water spraying in the backyard – the bursty-looking distention had finally burst and was spraying water everywhere.
(Side-note: This is also a good reason to always turn your hose tap off when you’re done the watering, but that’s a different conversation).
It looked like we were doomed to buying a whole new hose. And, worst of all, having to send a hose that was 95% fine to the landfill. We hate that kind of waste!
Then I found this super affordable Garden Hose repair kit.
Given that even a cheap hose costs probably twice that (and that we’ve been having a love affair with Gardena products after using their crack weeding tool on our driveway) we gave it a try. It worked great! Here’s the how-to…
What is the best way to repair a garden hose?
and make it even better!

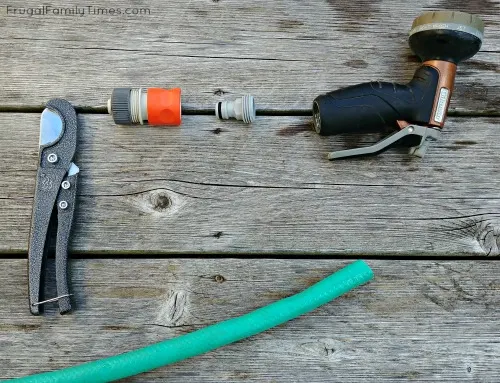
Garden Hose Repair Supplies:
- An old hose where the majority of it is in good shape (ie just broken near an end)
- This heavy duty garden hose repair kit:
- male or female hose repair kit (depending on what end is broken: this one for the tap end or this one for the accessory end)
- Plastic Hose cutting tool (optional, but inexpensive: really handy to have and does a great job)
- Any garden hose spray nozzle
Steps to Repair a Garden Hose:

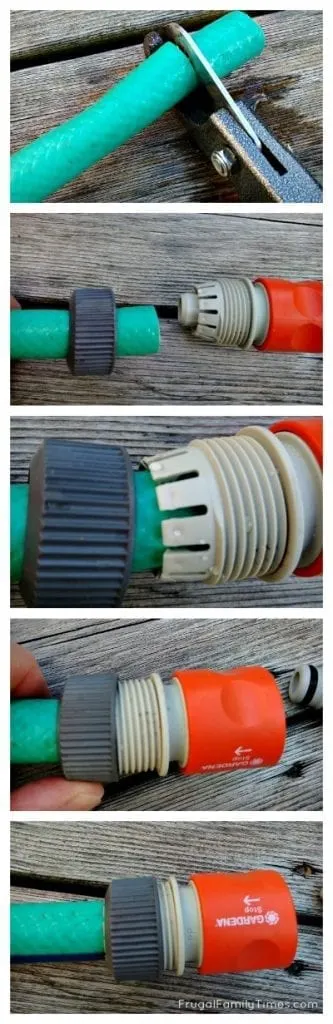
Now you’re ready for your hose repair kit.
Feed the screw band over the hose, insert the quick release repair end and then tighten the screw band up.
I just hand tightened it and it worked fine, but if you notice leaks, try channel-lock pliers to give it a little extra.
Finishing:


This kit also came with a Male Quick-release adaptor – thread it into the hose nozzle and test it out!
That’s it!
This hose repair kit worked really, really well. It took less than 5 minutes to fix and it is better than before as the quick-release end allows the nozzle to swivel 360 degrees and reduces kinks and twists in the hose.
And less than 10 bucks!
If you’ve got other home hassles you’re dealing with, maybe we can help! Check these out:
- Rodent proofing guide: how to get rid of mice
- How to get rid of musty smells


Robin and Ed are a DIY-loving couple with over 25 years of design and build experience. Also, Robin is a Nutritionist and former Registered Dietitian and Ed is an award-winning Business Educator. We share strategies for living a rich life on a DIY budget: creative money-savvy ideas for a stylish home, healthy meals and family fun. Our work has been published in the pages of Do It Yourself, Farmhouse Style and Better Homes & Gardens magazines.
Mary
Wednesday 29th of May 2019
Sheesh! That looked way toooo easy, I may have to google Gardena! Thanks