Easy DIY Wood Shutters ~ How to Make Board and Batten Shutters for under $10 a pair!
Intro by Robin Steps by Ed
How do you make your own shutters on a budget?
It was absolutely required that we figure this out – and we did!
Those cheesy, 70’s “shutters” have baffled us for years. Who did they seem like a good idea to?!?

As far as I can tell, they just draw attention to the fact that they are purposeless, “Hey! Look at me! I’m absolutely pointless!” We finally tackled these ridiculous eyesores and it was even easier and cheaper than we expected.
We present to you our DIY wood shutters. Our decorative shutters are so easy to make and cost less than $10 A PAIR! If you follow our tutorial of how to make shutters – you could have a fresh new look today – they’re just that fast to build.
(Spoiler alert: one of the essential parts of these board & batten shutters the home improvement store will give you FOR FREE.)

Since buying the place, we’ve done dozens of projects to update our riverside mobile home. (You can see all the mobile home makeover projects here.)
Getting all new windows and doors installed was a major investment – and made a huge difference to the aesthetics and our enjoyment of the place: less noise, fewer giant holes in the floor and rim joists, more beauty.
It was finally time to address our decorative window challenge.

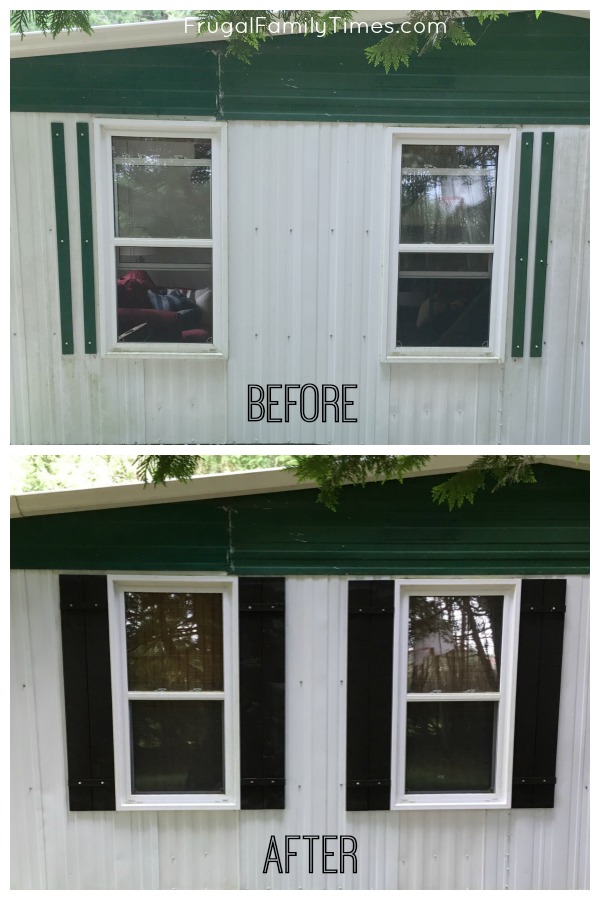
Before: A cross-eyed Anime character?
After: Fresh and handsome – for less than $25 for two pairs!
What kind of wood do you use to make shutters?
After using fence boards for our farmhouse shed makeover I knew this material would work well. So many benefits:
- Affordable – just a few dollars and you can make two shutters
- Easy to find – they’re available everywhere
- Weatherproof – fence boards are designed for outdoor use – so no worries about warping due to rain/snow. We planned to paint our shutters – so pressure treated was the best choice. If leaving them natural you may want to pay a bit more for cedar.
- Great size – the boards are a perfect depth for decorative shutters

My challenge was what to use for the battens across the boards. I wanted a material that wasn’t as deep as the fence boards – but that’s the thinnest pressure-treated stock you can buy!
So we did the thing we do when we’re stuck on a project – roamed around Home Depot until we found an answer.
We found our shutter battens – the size was perfect – and the best part? They were FREE!

This is the sticking or spacers between pressure treated boards. Perfect size and material! We went to two different home improvement stores and the staff were happy to give them to us.
(Most cast-off lumber yard wood can be burned – but not pressure treated like this – so it goes in the garbage! Re-purposing for the win!)
So, with materials in hand, we set about building and installing all-new shutters for the whole mobile home. 12 pairs! It took us two afternoons to do the whole job. It would have taken less if we didn’t need to wait for the paint to dry.
And look at what a difference they made:

DIY Wood Shutters: How to Make Board and Batten Shutters Cheap!
How to Steps by Ed
DIY Wood Shutters Materials:
- Fence Boards – see chart above for sizes
- Strapping/sticking from between fence boards at the lumber store
- Saw – we used our mitre saw but a circ saw would work too (a guide would help)
- Nailer and 1″ galvanized brad nails
- Drill, bit and screws to secure shutters to your home
- Paint, if desired (we used Off-Broadway by Behr to co-ordinate with our shed makeover)
How to make DIY shutters:

(If your window is wider it will look best with 3 or more boards – see the chart up near the start of the post.)

Cut two straps for your shutters from the strips you got for free!
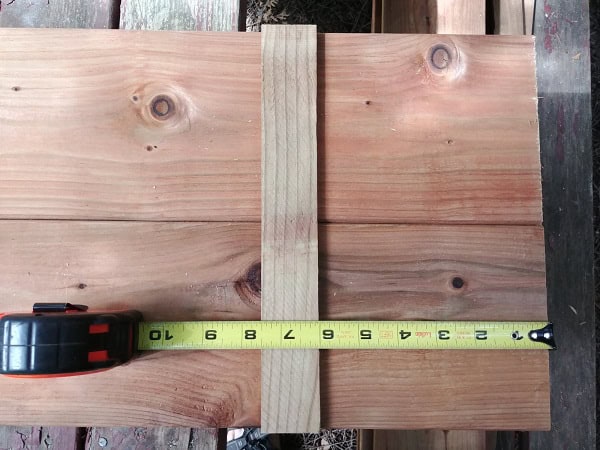
On shorter shutters, we put a strap 3″ from the top and bottom.
On taller shutters like the one pictured here, we positioned the strapping at 6″ from the top and bottom.
The electric nailer, with 1″ galvanized brad nails are what you need to secure everything.

Here’s what they look like installed before painting.
Not a bad look! If you want a natural look you could also use cedar fence boards for this project (the cost will be higher though).
If you intend to paint them – learn from us and don’t install them first!
We installed a few and then, a week later took them down to paint. It was CHALLENGING to find the right shutter and line up the holes in the building to reinstall.
")
How to Install these DIY Wood Shutters:
Step 1: Prep the walls
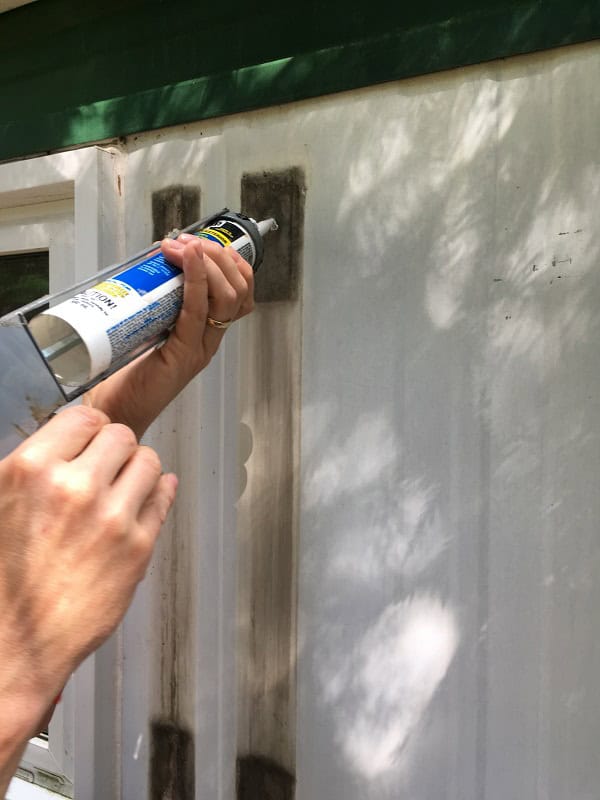
Sweep off the debris and fill any holes behind where the old shutters were.
(Always err on the side of keeping water out of anything – water is the nemesis of buildings.)
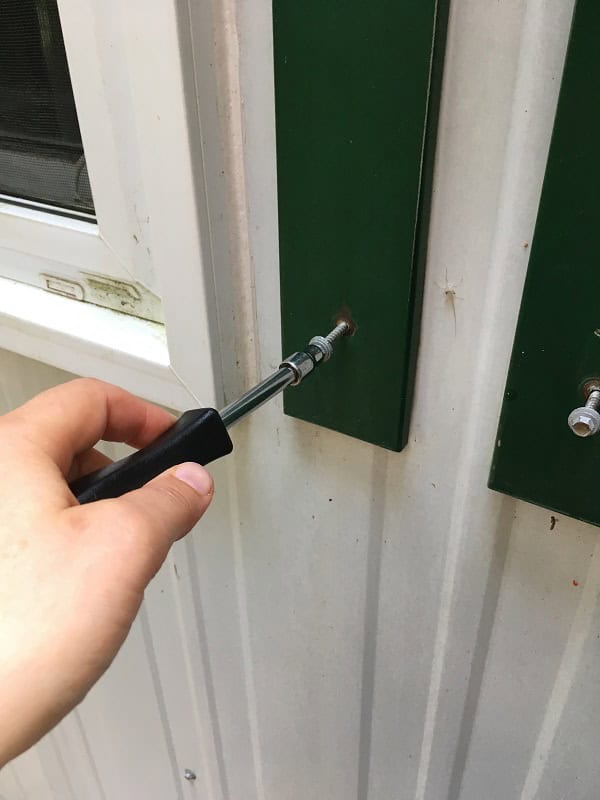
Step 2: Predrill the holes.
This is where it helps to have an extra set of hands. Till you get the first screw set, you’ll want to have the shutter held in place securely. while you drill – keep the holes lined up! for wood or siding, you can use either wood or roofing screws. If your home is brick or stone, you’ll need
Tapcon-style anchors. We put 4 screws per shutter.
Step 3: Attach with screws.
Secure your shutters in place. We would drill two holes per shutter and secure them both with screws. We found that you didn’t need a helper then to do the remaining holes. Maybe you have more skills than we do and can do all of them in one shot. You do you.
Step 4: Paint over the screw heads.
When all the shutters are secured, touch up each screw with some paint.


Shutters!
Deck Extension and railings!
Hot tub and DIY deck for hot tub!
(this photo shows the new doors, windows and gutters though)
And the DIY Arbor that Solved Our Curb Appeal Problem
And you can find all of our Outdoor Projects here.
And here: Our 12+ DIY Mobile Home Exterior Makeover Projects Increased it’s Value ~ Why and How We Did Them

Robin and Ed are a DIY-loving couple with over 25 years of design and build experience. Also, Robin is a Nutritionist and former Registered Dietitian and Ed is an award-winning Business Educator. We share strategies for living a rich life on a DIY budget: creative money-savvy ideas for a stylish home, healthy meals and family fun. Our work has been published in the pages of Do It Yourself, Farmhouse Style and Better Homes & Gardens magazines.


This is just the tutorial I have been looking for. We have had faux louvered shutters since we bought this house in 1990, but I have been getting the bug to change them to something different!
Great, Maureen! These couldn't possibly be easier or cheaper to make. Good luck! 🙂
I love this site. I live in a 1971 mobile and hubby not handy so alot of work I need to do myself. now mind you, I know how to use a b/d screw driver with not much torque do I want to say? now you know the extent of my handiness….
so i hope to learn from your site. so thank you for sharing your wonderful site. it's like a goldmine.
Oh you're so sweet, Laura! Our mobile home's are a similar vintage – you can really have fun with them. In fact, I like these older one's better than the new ones. The new ones have so much cardboard and plastic instead of real materials! I hope you keep joining us – and maybe get inspired to try a few of the simpler projects! Women can DIY, too! 🙂