This DIY Arbor Solved Our Curb Appeal Problem ~ Here’s How…

Looking to add some curb appeal? We built this simple DIY Arbor in about a day! Here you can learn how to build an arbor over a window that’s affordable with pressure-treated lumber and simple DIY tools. Keep reading for our easy-to-build, DIY cheap arbor tutorial with all the tips, materials and step-by-step guide.
Intro by Robin & Steps by Ed
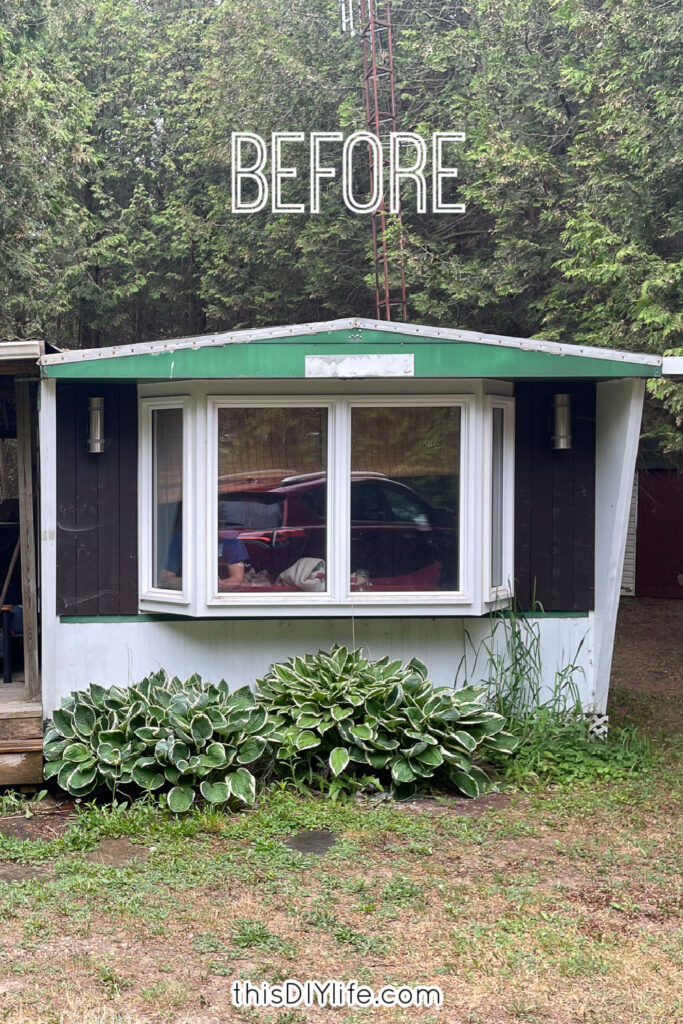
How do you improve the curb appeal of an almost 50 year old mobile home with a truly tragic front end? Quite frankly, I was stumped. And in the 8 years we owned the place I’ve been struggling to come up with anything at all that might help update it.
Ed would often find me in the driveway glaring at the thing – willing it to just speak up and tell me what would work! Well, folks, the day finally came. A DIY Arbor to the rescue!

source
It worked out really well – and was a relatively simple and cheap DIY build.
It took us two afternoons – start to finish. (Including a mad dash to the only hardware store open on Sundays in the area – which robbed us of an hour and a half.)
We’ve been working on projects at our Mobile Home Makeover since the moment we bought it. (Maybe even before? We bought the new hickory laminate flooring before we even closed. You’re not supposed to do that, right? Well, it worked out in the end.)
If you’re new here, you may be wondering why in the world did we buy a decrepit mobile home? It doesn’t sound, you know, smart? (Here’s the backstory.)
Well, it’s on a two acre property with a lovely river running through it and a peaceful little forest – both of which our young kids would play in for hours (especially after we built a treehouse). It has an adorable log cabin bunkie, which we fixed up as a cute guest room. It has a romantic bridge over the river that is the perfect spot to gaze at the Milky Way, which we can’t see in the city.
The only wart on this beautiful place was this mobile home, as you can see here, and it got worse before it got better.
But Ed and I’s favourite thing to do together (ahem) is designing and executing DIY projects! And this one was both challenging and inspiring. Could we make this tragic mobile home something as beautiful as the property it’s on? We were up for the challenge!
So far, we’ve done the following to the exterior of the place, Our Mobile Home Makeover projects…(All of our Mobile Home Exterior Projects can be found here!)
- Improved the Deck:
- Updated all the doors and windows
- Made the windows look better with easy DIY Wood Shutters: How to Make Board and Batten Shutters for under $10 a pair!
- Added gutters and downspouts
- Updated the shed with the kooky doors: Simple, DIY Old Shed Makeover on a Budget
So many upgrades! But the curb appeal had me at a loss.
And it’s important! It would be tough to look past the worn and peeling manufacturer sticker, the dated colour scheme, the decidedly unappealing trim and excessive bolts.
One day we hope to sell the place for a profit. The first thing you see matters! Enter today’s project: a DIY Arbor over the window! Here’s how we made it on a budget and in a few hours…
DIY Arbor FAQs…
What can I make an arbor out of?
Pressure-treated lumber or cedar are great choices, due to durability and affordability, but any lumber rated for outdoor exposure can work.
How do you make a freestanding arbor?
Smaller arbors can be built directly on the ground – we had a small, cedar arch that we kept in place with large pressure-treated stakes that we drove into the ground and then screwed the arbour to for stability.
Larger freestanding arbors should be treated like building a deck, in that you will probably want to either anchor the vertical posts underground in concrete or pour concrete piers and bolt the posts to them. While this is time-consuming and more costly, you will get an arbor that will last for years and be safe and secure for all who enjoy it. You will also get the added benefit of being able to use the piers to build a deck under your new arbour if you so choose.
How to build a custom arbor?
Typically start with pictures of arbors you admire and measure the space you want to build yours in. Scale is very important, so if you are building yours larger than the inspiration pictures you’ve collected, you will need to use larger dimensional lumber and keep in mind any curves, angles or other decorative flourishes will need to scale up too. See what we did here as an example.
What is the best lumber for an arbor?
Pressure-treated lumber or cedar both make great choices, due to their price and outdoor weather resistance.
Size/scale of your arbour is an important consideration too, so be sure to choose lumber that is both large enough to support all of your design and visually big enough to look ‘right’.
For this project we ended up using all pressure treated, and went with 2″x4″s as the top layer on our arbour, as the the other material we tried (2″x2″ and 2″x3″) looked too small.

DIY Trellis Arbor
Materials
- 2 – 2″ x 4″ x 8′ pressure-treated for the support corbels
- 2 – 2″ x 12″ x 12′ pressure-treated for the long horizontal face lengths
- 3 – 2″ x 4″ x 8′ pressure-treated boards for the short, top horizontal layer
- Deck flashing tape
- Special 6″ & 8″ construction (timber) screws
- If we had planned ahead we would have bought this bulk pack of timber screws – so much cheaper than anything we could find locally!
- exterior silicone
- assorted other smaller construction screws – be sure all hardware is rated for P-T contact.
- Pressure Treated Wood End Sealer
Our Easy to Build DIY Arbor – How to…
1. Start by building the support structure corbels.

Use a stud finder and locate places to secure both the vertical and horizontal parts of the corbel.
NOTE: You can also see that we used deck building flashing tape, as our siding is old, 1970’s aluminum and we didn’t want to take any chances with the metals in the aluminum having corrosive interaction with the pressure-treated lumber.
2. Cut and secure the horizontal member to your corbel.

If you are doing this on a home or garage, you will probably have right angles to work with. Still, if you are adding curves or angles to the ends of your structure, cut them now.
Anchor with at least two construction timber screwsm or bolts, long enough to go through the 4″ x 4″ and into your structure’s framing.
3. Add the vertical piece to the corbel

*Note: Mobile home oldness – the bent section in the siding pictured above was there before we built this arbour and was not, in fact, caused by the arbour.
**Note 2: Mobile home oldness – the horizontal piece from step 2 above is actually attached flush to the roof overhang and is level, despite what this photo seems to show.
***Note 3: Sometimes you need to use a too-small ladder because a nest full of baby birds is built on your large one and you can’t bear to move them. 😂
4. Add the 45-degree angle support piece.

On this mobile home, it was a manual “hold it up, adjust it a bit for appearance, draw a line, cut with a mitre saw at a bizarre, never used setting ” angle.
(Note: In this photo, we also have the 2″x12″s balanced on the top of the corbel just to get a sense of what looks visually correct for spacing. This is not the point to actually attach them.)
5. Secure in place.


6. Repeat everything on the other side.

7. Add the Horizontal Beams.

Mark their locations on the top of the horizontal beams.
They are heavy so try and do this with the minimum number of lifting and lowering!

The angle is just cosmetic to make it look less like stock materials. If we could have we would have done a more generous angle – but the budget would not allow us to custom order materials just for a bit “extra”.
8. If applicable, Protect your Aluminum Siding.

We gapped out this board away from actually touching the siding, but we wanted to be super-cautious will all of this stuff. It was a real belt and suspenders approach, we acknowledge and you could maybe skip this if you wanted.
9. Fill any Holes to Keep Water Out

10. Predrill New Holes at Support Points.

11. Attach Back Horizontal Beam to Structure.


12. Attach Top Trellis Pieces

We cut the first one short (because the roof sticks up in the centre) and secured it in the middle with simple deck screws angle-drilled on each 2″ x 12″.
We then cut full-length ones…

Once the middle and end trellis boards were on, we measured the remaining gaps and cut and secured enough boards to space out at an equal distance (for us, about 14″) all the way across.
13. Secure Foremost Horizontal Beam from the Underside

This was easier to do after all the trellis boards were in place, as they held it vertically and at the correct distance. All we had to do was predrill…


Well, almost. Any fresh cuts in the pressure-treated wood should get end sealer on them to protect them for the future.

Get caught up with our Mobile Home Makeover series projects here.

Robin and Ed are a DIY-loving couple with over 25 years of design and build experience. Also, Robin is a Nutritionist and former Registered Dietitian and Ed is an award-winning Business Educator. We share strategies for living a rich life on a DIY budget: creative money-savvy ideas for a stylish home, healthy meals and family fun. Our work has been published in the pages of Do It Yourself, Farmhouse Style and Better Homes & Gardens magazines.


Do you have a head on picture of your arbor? A picture that is not at an angle to see what impact it had on the front of the house and the roof line… I’m remodeling a 1971 single wide currently and am struggling with the pitch on the roof over the windows.
The pitch of the roof is hidden by our arbour! There’s maybe about 3 inches sticking up above it, but no human is tall enough to see that. 🙂
Thanks for the update. I hadn’t seen anything from you in a while and am glad to see you are back.
Thanks, Jan! We’re happy to be back! 🙂