We may earn a commission on purchases made after clicking links on this page.
by Robin
When you install new floors it can be such a gamechanger. It sure was for our main floor! We went from mismatched, worn out, broken flooring to a cohesive look we love.
But what do you do about the stairs that no longer match your new floors?
This is a dilemma – one that has a few different options to consider – some are better than others. How do you make your old steps match your new flooring? That’s what we’re diving into today.
There are a few solutions to this problem – and we considered them all!
And for your benefit – if you’re finding a similar problem in your home – we’re going to run through some options and show you what we settled on – and it looks so good!
You might remember last fall, we got a great deal on our new main floor flooring. We weighed the luxury vinyl plank pros and cons and decided it was the perfect floor for our taste and lifestyle. The specific one we chose is really good quality, has just the colour and finish we were looking for and the price was oh so right.
After Ed did an amazing install – and wrote a comprehensive post of tips for professional-looking luxury vinyl tile installation – we moved onto the stairs.
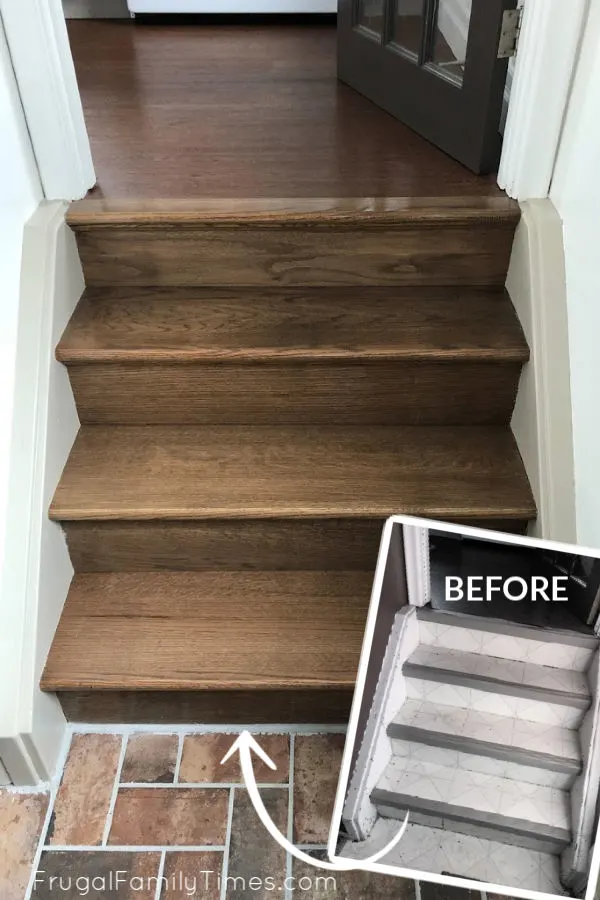
And that’s where we were left with; an ugly problem. You can clearly see it in the photo at the top and the one below: ugly stairs that don’t match.

We had a few problems to consider as we compared the stair flooring options:
Some options to consider when choosing the best flooring for stairs:
a) Cover the old stairs with matching luxury vinyl nosing or treads:
- The LVP floor we got such a good deal on? The matching stair nosing couldn’t be sourced in Canada. Why? I have no clue. And the US companies I reached out to never even responded. And even if they had – shipping would have been insanely costly.
- We could have tried to find similar vinyl stair treads – but we were seeing the cost as about $75 to $100 each! And the match would never have been quite right.
- Our dog finds the Luxury Vinyl incredibly slippery. (Think Bambi on ice – legs splayed everywhere – but only if he’s not kept his speed in check.) We added a fabulous washable runner to our kitchen (which we love!) so that he could make it to the back door without skidding – even when he’s feeling hyper. I don’t think having the same slippery flooring on the stairs to his primary door would go over at all. (And we aren’t carrying 90lbs of neurotic dog over the threshold 10 times a day.)
b) Cover the old stairs in sheet vinyl:
- It’s a good option as far as cost – sheet vinyl is very affordable – and you can often find remnants if you’re covering a small area.
- You can see in our before photos – this is what we had before. It was installed almost 20 years ago – and was showing it’s age. But, maybe a fresh install of a new product would be better?
- We decided against this. We wanted an upgrade and this would have been a lateral move. It also would have required rubber, vinyl or metal stair edging, which is not attractive.
c) Cover the old stairs in carpet:
- We let the manager of our local flooring store have a vote – and his pick was carpet. Specifically commercial grade carpeting. He showed me some pretty good options – with varied colours and textures. Some of the carpets I could actually visualize looking pretty good.
- Commercial quality carpet is really hardwearing and could handle the beating this back hall gets.
- This wouldn’t be an install we’d tackle – but the cost to have it installed wouldn’t be outrageous.
- What kept me from choosing this option was the time it takes to dry. Carpet soaks up water – and takes longer to dry – so that people heading to our basement media room in sock feet will feel it.
d) Cover the old stairs with hardwood:
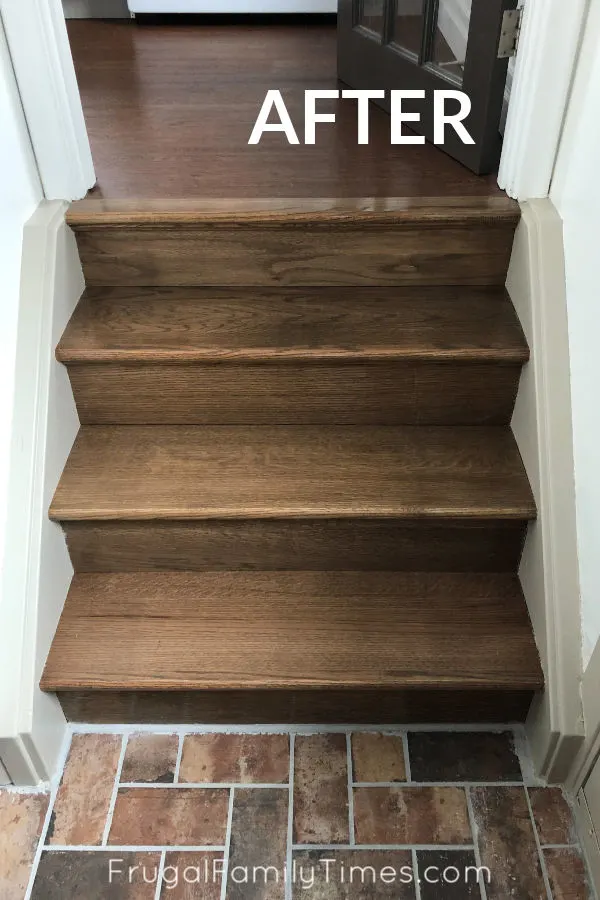
- This is the choice we ultimately made. We retrofitted our steps with oak treads and risers. It’s the higher-end look we wanted and can you believe that covering the old stairs with hardwood is actually cheaper than vinyl treads?!
- We bought our oak stair treads and riser on sale at Lowes for about $25 a set.
- But what about the water issue? This I struggled with and the beautiful compromise we came up with was to tile the landing (where the bulk of the water sits) with an affordable brick tile. Then the stairs themselves, which get very little water in contrast, we sealed with an amazing matte floor polyurethane.
- And here’s how it turned out…
Materials for Finishing and Staining Wood Stair Treads:
- Stair treads and risers (We used this one) USA source
- Stains – we used Jacobean and Special Walnut from Minwax (The small 1/2 pint container was enough for these stairs and 6 more all the way to the basement.)
- Table saw
- OR circular saw with a cutting guide like this one
- This matte polyurethane finish (The sheen is beautiful!)
- Foam brushes
- Sandpaper
- Tack Cloth
How to
Staining Stair Treads: How to stain stair treads to match floor
Step 1: Cut Stair Treads to Size

By cutting them first we were left with off-cut pieces to test the stains on. This is ideal – using the exact same wood will ensure your finish is exactly right.
Step 2: Using Tread Cut-offs Test Stain Mixes

We made our sample mixtures in old glass jars and labelled them with the test recipe.
Be sure to also apply your polyurethane finish on top of your tests before making your final choice. The finish can alter the appearance of the colours. Water-based polyurethane tends to do this less than other finish coats though.
Step 3: When you have the stain mix right, mix enough for your whole project

2 parts Special Walnut and 1 part Jacobean.
** What we WISH we did: Be sure to compare your samples in the exact space your floor will be. We matched our samples perfectly in our backyard shop, but when in the light of our back hallway the match didn’t appear quite as perfect. It’s still really good – and we love it – but perfectionists may not agree.
Step 4. Lightly Sand and Stain your treads

Give the treads a light sanding and wipe down with tack cloth to remove any wood dust.
Wipe on your stain with a clean rag following the manufacturer’s instructions as to how long it soaks and when to wipe it off.
We did three coats of stain to achieve the rich colour we were after.
Step 5: Carefully Apply Finish Coat (Before Installing!)

Our product recommended four coats. We chose to finish them all before install so that our stairs weren’t out of commission for days while the finish cured. So glad we did this! We couldn’t keep kids or pets off them that long.
** Important tip: Don’t shake your polyurethane! It will get filled with bubbles and those bubbles will get brushed onto your surface and dry strangely. Gently stirring is the way to go.
Step 6: Lightly Sand again after the first coat. Poly makes the wood fibres stand up
Step 7: Use a tack cloth to remove dust and debris
Step 8: Apply at least three coats (we did four) and Let your finish cure

We’re also big believers in letting paints and finishes cure.
That means letting them dry even longer than the manufacturer recommends after the final coat.
This ensures the finish is completely dried and bonded.
Attach your new wood treads and risers (full tutorial for that step here) and Admire your handiwork:

In the next post, we cover how to install these new stair treads on plywood stairs like ours. This is a great solution if you have plywood stairs – for example if you want hardwood in place of carpet or vinyl.


Carol Burrell
Sunday 13th of September 2020
Wow! Very helpful. We’re facing a similar challenge with hardwood in our foyer and one step (bottom) also hardwood and tile in kitchen and dinette. We want to install LVP and needed a solution to cover the one hardwood step. Will definitely look into staining the step to match the LVP.
frugalfamilytimes
Sunday 13th of September 2020
We're so very happy to be helpful to you, Carol! That's why we do this. :)
Mary
Saturday 21st of March 2020
Wow...it looks great, good job and I really love the research you did to get the best look! Wonderful post. Keep up the good work.
Sandi
Wednesday 19th of February 2020
Absolutely gorgeous. As a DIYer who doesn't know the words "hired help" lol, this project fits the bill perfectly. Thanks
frugalfamilytimes
Wednesday 19th of February 2020
We'll do ANYTHING to not hire work out! Glad to hear we're not the only ones, Sandi! Thanks so much for your kind comment! :)