


We may earn a commission on purchases made after clicking links on this page.
by Robin
The DIY mudroom built in storage you see below? It used to be a flat blank wall.
Boring and not very useful – there was room for maybe 4 hooks and that’s it. Storing shoes? Forget about it. It’s amazing small space storage now!
This space is at our back door. There we have a 40″ by 40″ landing and with some creativity and basic DIY skills, we’ve been able to find space for a mudroom.
This mudroom has space for about a dozen coats and bags and storage for at least 8 pairs of shoes and boots.
Pretty remarkable for about 11 square feet of space!
So how did we do it? How did we carve out a mudroom in a space this small?
Well, weirdly this built-in mudroom has evolved over 40 years – with Ed and I literally building on work of my Grandpa, who was the first owner of our home.
Our hope is that after reading about our DIY mudroom built-in you too can find some space for entryway storage of your own!

DIY Mudroom Built Ins: Finding Space for Storage
Built-ins are one of our specialties. You’ve maybe seen some of our other Built-in Projects:
- Our latest DIY Entryway Mudroom Idea: Small Entryway? How to Build a DIY Coat Rack Wall with Character (Reclaimed Architectural Salvage for the Win!)
- Our DIY Media Cabinet (with special space to hide electronics)
- Our IKEA window seat hack
- Our Built-in Stair Top Bookshelf and Planter (our very first DIY built-in!)
- Wall-to-Wall Billy Bookcase Built-in
There are so many reasons to add built-ins to your home:
- You can max out storage. You can fill an entire space – wall to wall – with so much functional room.
- You don’t need advanced DIY skills. It sounds hard to believe, but built-ins require much less fine carpentry skill than building furniture. We’re proof! Fine carpentry is not in our DIY skillset, but that hasn’t stopped us from building some fabulous built-ins.
- Built-ins add value to your home. Built-ins stay with the home when you sell and -when done well- are a charming addition to marketing any home.
This project is a great example of using an otherwise wasted space to create something both useful and beautiful – without spending a ton of money.
Where could you use some more storage? It’s my hope that our mudroom story will inspire you to seek out unused space to solve your storage problems.
First, our DIY Mudroom Built-in Shoe Storage

I remember carefully putting my little girl shoes on the shelves and thinking how neat it was that there was a special place.
Without this shoe storage there would be zero room for shoes. This back door landing is just big enough for the door to swing open.
So where did he find this extra space?

And this photo makes my beginner DIY skillset point perfectly – see what an unsightly mess this box is? It’s old plywood and two by fours on this side. But it’s in a storage room, so who cares?!
Does your entryway have a space you could borrow from? What’s behind it?

Ed modified the shoe storage box so that the bottom shelf is at the same level as the floor. If you build similar shoe storage I’d suggest you do this too, here’s why:
– It makes the landing seem so much bigger! The new floor extends another foot, which is a lot when you’re space is this tiny.
– Without a shelf you can store taller boots – those extra couple of inches make such a difference. We can even slide those giant rubber boots from the “Progress” photo most of the way underneath now.
– The bottom shelf always looked dirty because it was! Soiled shoes would slide along it and leave a mess. Now there’s no painted surface to show so much dirt.
Because it’s a built-in, Ed was able to hack it in an afternoon. And you can see the hack job he did in the “back of box” photo above. More plywood, more two by fours and no concern for attractiveness required!

Here’s of the tutorial of our DIY mudroom flooring!
On the top shoe shelf, we cut some leftover driftwood vinyl plank flooring to line the shelf (It’s the same look as the flooring we installed throughout our basement makeover and I love how it ties the brick tile and basement floor together.)
As far as finishing the front of the shelves – it’s another pretty easy DIY. Basically, we covered the box with MDF trim and painted it. (The paint is Loggia from Sherwin-Williams.)
Next, DIY Mudroom Built-in Storage for Coats

At the bottom, you can see the dimensions of the shoe storage.
At the top is the space we carved out for storing coats and bags and such. This space we added a few decades after my Grandpa’s spot. When we added a second story to our home we added more stairs (well, duh!).
These stairs are right behind this wall in our back landing.
Underneath these stairs was wasted space, so we borrowed about a foot to make the upper part of this built-in. It gave us room for eight double hooks!

They’d read books under there, pretend they were Harry Potter, hide and imagine it was a hundred different places.
(Now that they’re teenagers it’s not magical at all, just boring old storage. Sniff!)
But when it was a play space, and we were building this coat area, we took the time to add a translucent window to let in light from our back door. You likely won’t need to do this! And it was the hardest part of this built-in.
We made this before we blogged, so we don’t have process photos – sorry! But the steps were these:
Cut a hole in the wall through to the space under the stairs.
Build a frame for the hole with 2x4s.
Build a frame for the built-in with 2x4s.
Attach beadboard panelling to the 2x4s.
Fill holes and caulk.
Paint.
Attach hooks.

We added these to the sides of the built-in.
At the back, you can see we used a standard rack of four hooks – I think it was from Home Depot. We bought this 12+ years ago. (I’m thinking of replacing it with this one, but probably won’t. Painting out the wooden back with the trim colour seems to tie it all together enough for me.)

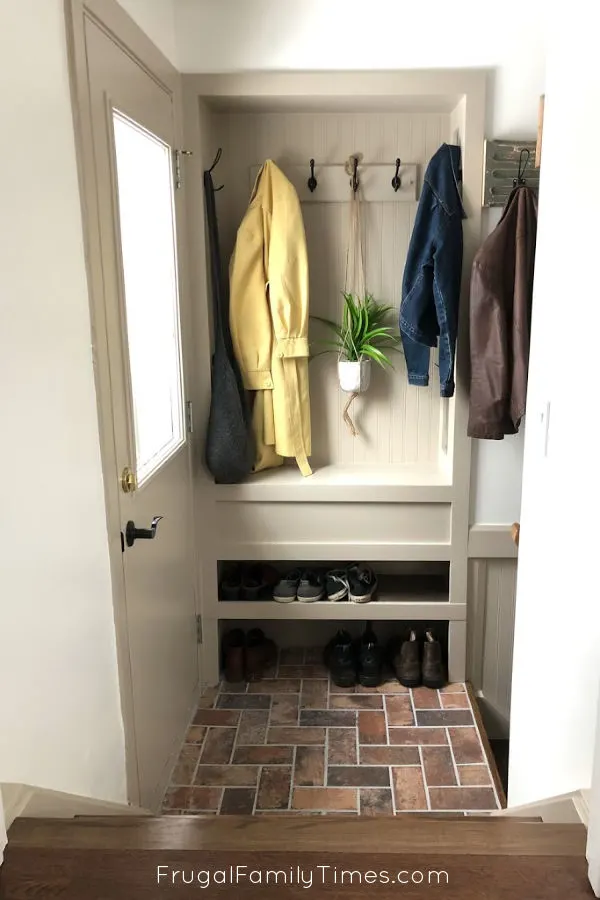
To finish off the face of the built-in we just used the same in-stock MDF trim to run all the way around the whole unit.
At the far right of this photo, you can catch a glimpse of how we added even more storage to this space. We took a reclaimed box moulding from a local theatre and created two beautiful reclaimed wood coat racks of hooks. Here’s how we made them (for about $20 each!) and hung them invisibly!
How to find space for built-ins in your home:
So I encourage you to take a close look at your entrances and look for places you could carve out a mudroom. Think about what’s behind the walls where you need storage:
- maybe there’s an underused closet behind that you could borrow space from?
- maybe there’s a section of a garage that could be framed in?
- perhaps there’s a crawl space you could tuck storage into?
Of course, there may be limitations. Have a look at, above and below the wall for plumbing, electrical or ductwork evidence. If it is a major wall that runs continuously through your house, there is a chance it is load-bearing too. If that’s the case, this likely won’t be a DIY project – but may be worth it to hire out!
But even with those caveats, there is a chance that the perfect built-in storage solution is just waiting for you to bust through to find it!
More Simple Built-in Storage:
- Our DIY Media Cabinet
- Our IKEA window seat hack
- Our Built-in Stair Top Bookshelf and Planter (our very first DIY built-in!)
- Wall-to-Wall Billy Bookcase Built in
Back Hall Stairs Makeover:
- Our Vinyl to Wood Stair Tread Makeover
- Our Mudroom flooring: DIY Brick Tile Floor in Herringbone Pattern (coming soon!)
- $20 Easy DIY Reclaimed Wood Coat Rack (and how to hang it invisibly!)


Robin and Ed are a DIY-loving couple with over 25 years of design and build experience. Also, Robin is a Nutritionist and former Registered Dietitian and Ed is an award-winning Business Educator. We share strategies for living a rich life on a DIY budget: creative money-savvy ideas for a stylish home, healthy meals and family fun. Our work has been published in the pages of Do It Yourself, Farmhouse Style and Better Homes & Gardens magazines.
Kevin
Thursday 26th of January 2023
This looks great! Would you be so kind as to share the depth of the built-in? That's the one dimension I don't see in the "technical drawing" :).
frugalfamilytimes
Friday 27th of January 2023
Thanks for your helpful question, Kevin - I need to fix the missing info! It's 12 inches deep. :)
Mary
Thursday 12th of March 2020
Very cute and very practical! Well done, keep up the good work!
frugalfamilytimes
Tuesday 5th of May 2020
Oh thank you so much, Mary! I'm sorry I missed your kind comment until now. :)