


We may earn a commission on purchases made after clicking links on this page.
by Robin
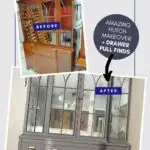
I’m VERY excited about our DIY Apothecary Cabinet Inspired old hutch makeover! It has given us so much more storage in our dining room and it looks so good.
And it was cheap to make – we spent about $160 for this makeover – including the old hutch AND the apothecary drawer pulls!
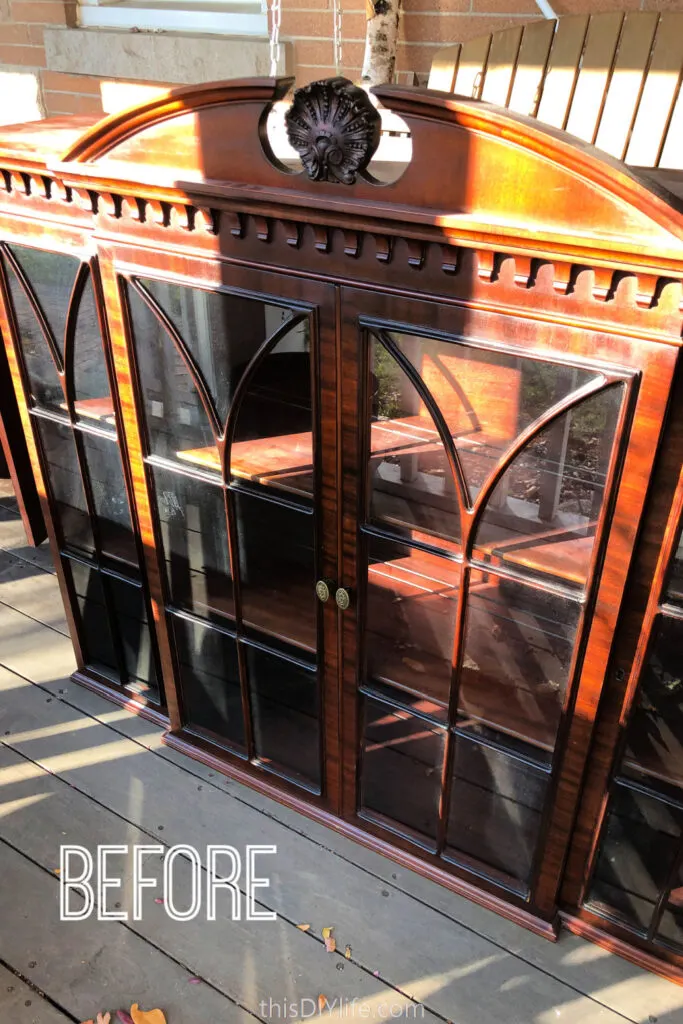
I first spied the antique hutch on my go-to place for decor deals: FB Marketplace. I’m no Zuckerberg fan – but I can never quit Facebook as long as Marketplace keeps helping me find such great things. (Should I write a post with tips for how to score fabulous things on Facebook Marketplace? I’m at boss level skills.)


And that included delivery from another city right to my front porch.
Like I said in my project inspiration post of ideas for painting an old hutch, people are practically giving these old pieces away. And with a few tweaks, you can modernize them into something fabulous – like this DIY faux apothecary cabinet!
How do you modernize a hutch?
There are three main things that will help you revive an old hutch:
- Paint
- New Hardware
- Removing Dated Parts
We did all three!

Without it our old hutch’s lines are clean. With it, it’s just way too over the top (pun! sorry…).
It couldn’t have been easier – a couple of screws held it on.


And next, I went searching for the perfect new hardware…
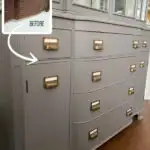
A DIY Apothecary Cabinet Needs Apothecary Drawer Pulls!
Apothecary cabinet hardware is essential for the look I was going for. It’s kind of the essence of the whole thing really.
But, finding apothecary drawer pulls was tricker than I thought! I did not expect that. Every company seems to label them something different.
So, to help you on your quest, should you be on one, I’ve gathered some great apothecary hardware finds below:


2. These are quite similar to our aged brass pulls (and ship from the US)
3. These bronze look pulls are insanely affordable – and get great reviews.
4. These pulls come in four finishes: unlacquered brass, oil rubbed bronze, polished chrome and brushed nickel.
5. This one’s from Home Depot and could be easy to find near you.
6. These pulls are the cheapest and get fairly good reviews.
7. People like these black ones, but suggest you get better screws for them. Very affordable.
8. These antique bronze look pulls have reviews that are all over the place. The photo makes them look cute, but might be a risk.
9. These are so primitive and authentic looking!
10. These are so ornate and beautiful! Ship from the UK.
Ready to see our DIY Apothecary Cabinet AFTER?!


Once I get the hutch organized just so, I will write on the little labels what’s inside. (Maybe then my family will put things back where they belong? A girl can dream…)
I’ve labelled a few so far: “Silver”, “Contraband”, “Pets” (Yes, true to my style there will be some goofy ones in amongst the useful.)
BUT our Silverware has a story! It actually IS contraband. It was smuggled over from Belgium decades ago, after it was purchased at a seizure auction there. It makes me love my Silverware even more!


We desperately need more hidden storage in our small open concept main floor.
This faux Mercury Glass effect means all our junk is quietly hidden (cookbooks, liquor cabinet, extra serving dishes etc.) But the hutch feels less heavy than solid doors would have made it.
That bit of sparkle and light reflection from the mirrors gives the room more energy!


So much storage and visual impact for such a low cost.
And it took us maybe two afternoons of work start to finish.
I think my favourite part was changing the fussy old hardware with the apothecary drawer pulls. I can’t wait to fill in all the little cards! Expect jokes.
New -> See those gorgeous bentwood chairs above? You won’t believe how little I paid for them! Plus, here’s how to reupholster dining chairs yourself!)
How do you replace the cabinet hardware on an old hutch?
The easiest way to replace cabinet hardware is to determine the size of the original hardware and find replacement pulls that are the same.


They generally have just one hole and can be swapped to new hardware without much fuss.
(these are from Lee Valley).
Pulls and handles are a little more complicated to replace. But not impossible.
The easiest thing to do is replace your old hardware with pulls the exact same size.
You find the size by measuring the space between the holes. That tells you the size in inches (or millimetres).
In some respects, this isn’t the easiest though – if you’re like me you’re picky and unlucky and fall in love with hardware that is larger or smaller. The holes of the new hardware won’t line up!
What you need to do if your new pulls are a different size is:
- Remove the old hardware.
- Fill the old holes with wood filler.
- Sand the wood filler when dry.
- Repeat steps 2 and 3 until smooth.
- Drill new holes for your new hardware and install.
What adding new hardware in this way requires is a way to cover those old holes.
It’s tricky if you’re leaving the wood natural. It’s easy if you’re painting it.
We knew all along we were painting, so changing the size of the hardware was no big deal. I could have the apothecary drawer pulls of my dreams!
How much does it cost to paint a hutch?
I knew from the moment I saw it that we would paint the hutch.
It has great lines, but a mahogany finish that’s not my taste. With the right paint, it’s pretty straightforward to paint a hutch, and not that expensive at all.
We are raving fans of Fusion Mineral Paint. We’ve used it a lot and are amazed at:
- how durable it is,
- how gorgeous the matte finish is,
- how great the colours are,
- how easy it is to use AND
- It’s inexpensive!
I don’t think I’ve mentioned before how affordable Fusion paint is. This whole buffet and hutch combo took just one jar – so it cost about $25! That’s it. For an amazing transformation.
Fusion has a built-in primer and topcoat. So just that one jar did the whole job.
How do you paint an old hutch?
We will have a whole post of all the details coming soon. (We just finished painting another hutch for our Music Room/Office!)
In the meantime, here’s a video from Fusion of how to paint furniture. It’s really quite simple!
https://www.youtube.com/watch?v=MSCAUmynIKI
Supplies for Our DIY Apothecary Cabinet Inspired Old Hutch Makeover
- These brass card pulls from Lee Valley (Canada only sadly)
- In the US try these affordable antique bronze ones and these affordable antique brass ones
- Matching old brass knobs from Lee Valley
- in the US you could try these very similar old brass knobs
- Fusion TSP alternative to clean the old wax etc to prepare for painting
- This product is so much better than TSP – it does the job well and is NO RINSE! That’s a huge time and hassle saver.
- Fusion Mineral Paint in Hazelwood – compare prices here: Amazon and Etsy
- Supplies for faux DIY Mercury Glass mirrors
We did another old hutch makeover – it turned out great and is featured in our recent makeover post: Reveal Time! Our DIY Home Office Music Room (from a Playroom)
This is just one of our DIY Furniture Makeovers – check them out here – and we have more to share soon!


Robin and Ed are a DIY-loving couple with over 25 years of design and build experience. Also, Robin is a Nutritionist and former Registered Dietitian and Ed is an award-winning Business Educator. We share strategies for living a rich life on a DIY budget: creative money-savvy ideas for a stylish home, healthy meals and family fun. Our work has been published in the pages of Do It Yourself, Farmhouse Style and Better Homes & Gardens magazines.
Janet
Friday 20th of September 2024
What a beautiful conversion! What technique are you using for your paint (brush, roller, sprayer)? The finish is so flawless!
Robin & Ed Hicken
Tuesday 24th of September 2024
Thanks so much, Janet! We use a roller to get this flawless finish. The paint is incredible and makes it easy. :)
Jeanine
Friday 1st of April 2022
I love how your hutch turned out - amazing job! Do you know anything about putting glass inserts into regular cabinet doors? I've always wanted the look but don't want all my dishes to be seen. I'd love to try the faux mercury glass effect.
frugalfamilytimes
Friday 3rd of June 2022
Hi Jeanine! Personally, I've never done it before, but I think the easiest way would be to remove your door and take it to a glass shop. I'll bet it's not too expensive for them to make this cute upgrade! :)
Molly
Saturday 19th of February 2022
This turned out so good! What a steal! Please do share your FB marketplace tips.
frugalfamilytimes
Tuesday 8th of March 2022
Thanks, Molly! Yes - I'll add FB Marketplace Tips to my future blog post list! It's one of my fave things ever to do!
frugalfamilytimes
Tuesday 22nd of February 2022
Thank you so much, Molly! I’ll add posting marketplace tips to my post list. :)
sue
Friday 18th of February 2022
Thank you for the inspiration to paint, I have a beautiful hutch in my living room I've filled with books and family photos while it a lovely piece the dark wood makes it look a little too formal. Would you post how you've organized the interior of the hutch and drawers?
frugalfamilytimes
Tuesday 22nd of February 2022
Go for it, Sue! I’ll try and post the interiors - right now they aren’t very photogenic as I try and sort out the storage for our whole main floor. Once it makes sense I’ll make it pretty and shoot it! :)
Donna
Thursday 17th of February 2022
I love it! Great job!
frugalfamilytimes
Tuesday 22nd of February 2022
Thanks, Donna! :)