
We may earn a commission on purchases made after clicking links on this page.


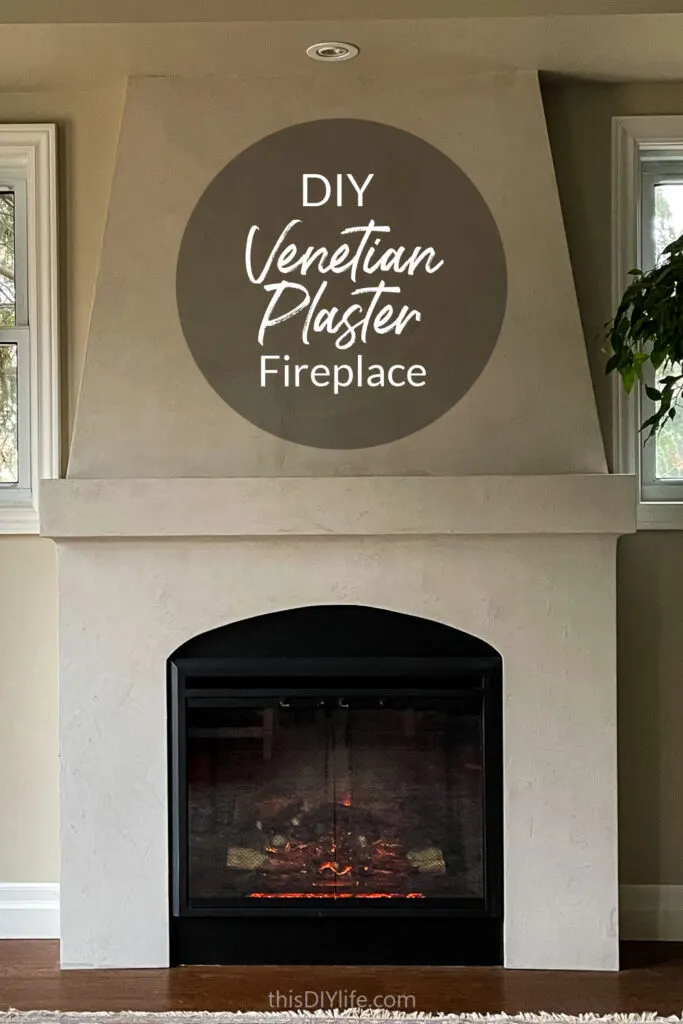
We’re finally sharing our Venetian Plaster Fireplace DIY! It is beautiful and functional and solves a bunch of problems with our living room. Today we’re sharing why and how we built the DIY electric fireplace wall of our dreams. (Do we need more exciting dreams?)
Intro/Design by Robin Steps/Build by Ed
We’ve wanted to add a fireplace to our living room since we created the room on paper. When we added a second storey to our house we combined two bedrooms on the main floor to create our living room.


For reasons that primarily involve budget, of course, our fireplace never got built. Until now!
Along with the budget barrier, we were stalled by how small the room is. A traditional gas fireplace would stick out so far into the room that we couldn’t have all the seating we need.
Once we found this fabulous electric fireplace insert we were sold on the DIY electric fireplace wall idea. It’s so good in person! We knew we could make something gorgeous with it. But what?
If you’re looking to make a DIY electric fireplace, wall inserts have so many benefits!
- Electric fireplaces can go on any wall, as long as you have an outlet.
- You aren’t limited to exterior walls. If you can dream it, you can do it.
- You can make an electric fireplace that isn’t as deep as gas or woodburning
- This was a big factor for us. Our living room is not huge. By choosing electric, the depth of our fireplace could be less than 11 inches! Gas would have been double, which would have cut down on our seating options in the room
- Electric fireplace inserts are affordable.
- At the most, a very high-quality electric fireplace will cost you a couple hundred dollars. A gas insert is a few thousand.
- You can enjoy the ambiance of (faux) flames, with or without heat.
- This was a major decision-maker for us. We enjoyed a gas fireplace in a cabin we rented in the winter – however, the flames were only visible when the heat was needed.
- If we had a fireplace with lots of heat in our living room, it would affect our entire house. Our furnace would turn off and our rooms upstairs would be much less comfortable.
- You can make your own DIY electric fireplace
- You can make it exactly how you want without having to hire gas technicians to install or make changes.
How we chose to build a Venetian Plaster Fireplace…
I scrolled for many an hour on Pinterest and Google Images trying to find just the right idea for us.
I pulled together this post from my search: How to Put a Fireplace Anywhere! 20+ DIY Electric Fireplace Ideas.) This collection of DIY electric fireplace ideas was helpful in narrowing the ideas down.
I wanted it to be unique and beautiful, but I wanted it to feel quiet. In a small room, a lot of contrasting colours and materials can make it feel smaller.
I finally settled on this beauty…

Our fireplace was HEAVILY inspired by this project from one of my favourite DIY blogs, Jenna Sue Designs. It’s so good! Which is no surprise – they are supremely talented at design and DIY – be sure to follow!
After we chose the design we proceeded to figure out how to make it more simply.
Their build uses a lot of drywall – including making drywall curves. Drywall is a material we try to avoid – it’s a hassle to work with – so much sanding and dust! And don’t get me started on how tricky drywall curves are.
We set out to make a very similar DIY faux Venetian plaster fireplace wall similar to Jenna Sue’s beautiful design – but using simpler materials that we thought would be easier.
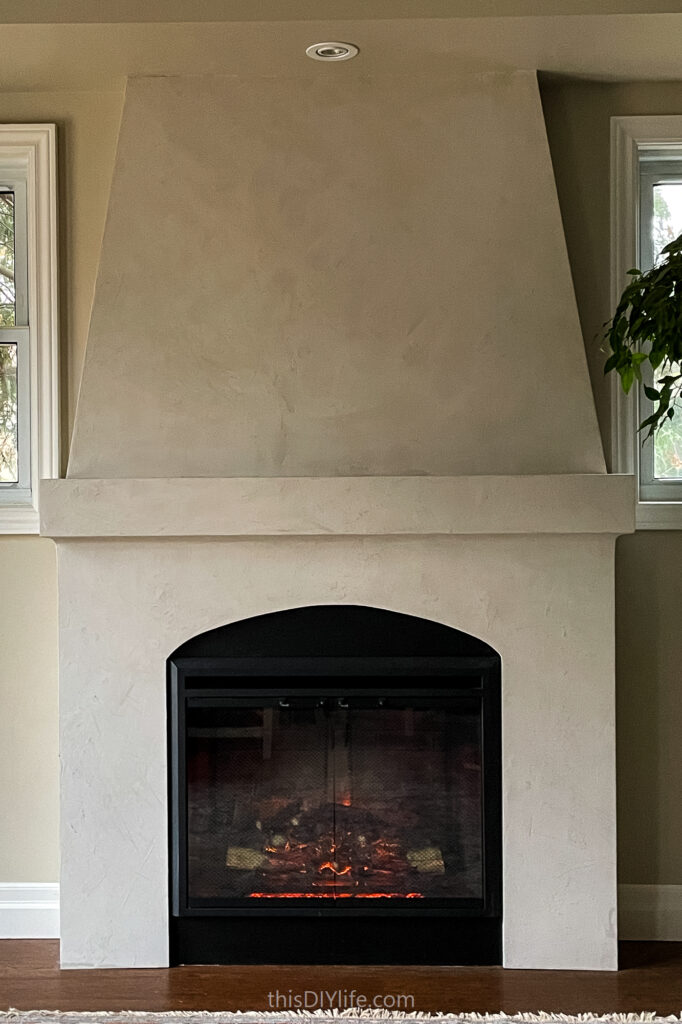
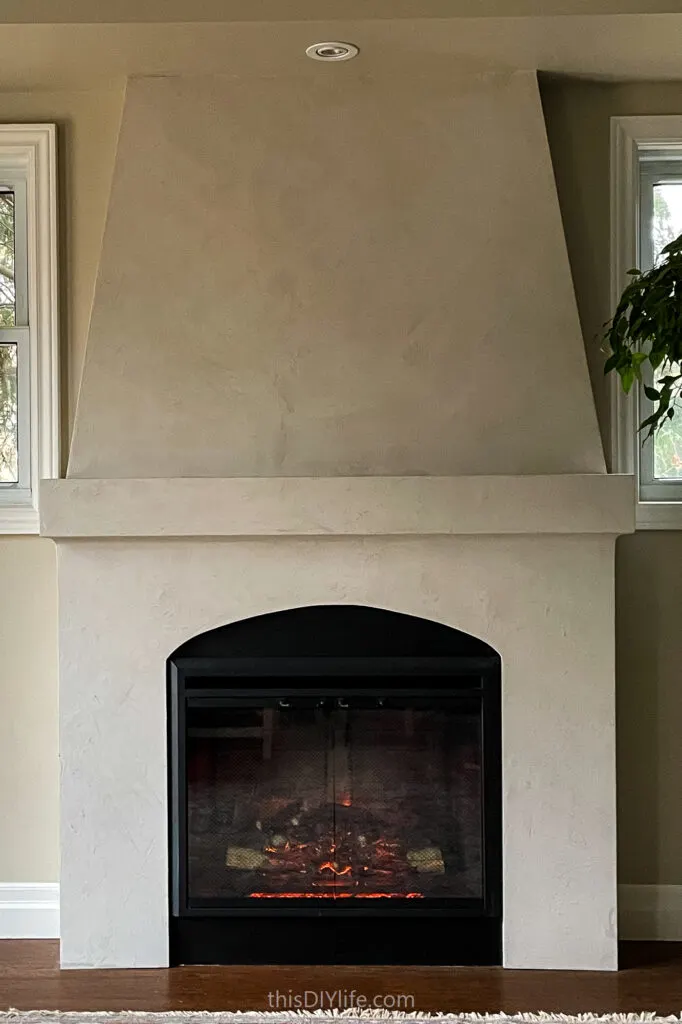
Sigh…we love it so much. It gives a quiet impact to the room.
It sure doesn’t look like it only comes out 11 inches from the wall! No gas fireplace can be that slim.


In person it feels sophisticated and old world; two attributes our little 1960 bungalow benefits from.
It looks like it was handmade by a master craftsman. (Ha! Nope. It was DIY’d by a couple of dorks.)
Our DIY Venetian Plaster Fireplace Tutorial

DIY Electric Fireplace Wall Supplies:
- This gorgeous electric fireplace insert
- Painter’s tape to mock up the design
- 2-by-4’s to build the base and frame
- MDF hardboard for surround
- Black paint (we love this one – perfect colour and sheen)
- 3/4″ MDF to finish front, sides and mantle
- nails and screws
- Our favourite nailer
- Jigsaw
- Drywall for top
- Utility knife
- Metal Drywall Inside corner bead to make the curved portion under the mantle
- Tin snips
- drywall compound
- Venetian plaster product (Details below)
How we Designed our Venetian Plaster DIY Electric Fireplace Wall:


We love to mock things up with paper and painter’s tape. No commitment and so much cheaper and easier to make mistakes while making decisions


We decided to line the bottom of the insert up with the top of our baseboard.


This is a great example of why doing this step with tape is a great idea – as you can see it helped us figure out that the bottom box needed to be smaller to allow for the mantel and the curve. We might have missed this if we just jumped into the build.
We decided to build the mantel at the same height as the bottom of the window trim and the top of the window vinyl frame. Fewer visual lines mean a more graceful, quiet design.
Steps to Build this Venetian Plaster DIY Electric Fireplace Wall
1. How to make the electric fireplace look built-in


Most of this will be hidden either by the insert edges or the fireplace face.
You can also see that it is mostly built from scrap material I had laying around – It needs to be solid enough to hold the insert and give you something to screw it into, but since it will also screw into the floor and wall, it doesn’t need much structure.


This is to create the look of a deep insert and Fusion mineral paint is incredibly tough when dry/cured so you won’t need to worry about scratches in the future that reveal your faux fireplace secrets.


Make sure your electrical box is inside the frame of your fireplace. If the cord isn’t hidden your fireplace will look super fake.
I moved one electrical outlet a couple of inches in from where the outside edge of the fireplace will land so we could plug the insert in.
This involved zero wiring, just cutting drywall and moving the outlet box (while the breaker was switched off) and filling in the. It didn’t need to be pretty because it will be hidden.


Notice how it is inset 3/4″ so that the thick MDF will land at the finished thickness.
Again, this all gets screwed to the floor and walls so, despite the appearance, it turns out really solid.


It has the benefit of making the whole structure beefier and finished looking, so this was a super-rewarding step. And – no drywall dust!


You will take it in and out a few times while getting things perfect, so it is nice that it can be done fairly easily. This is a step where you’ll want it in place.


2. How to build the mantel:


It is a simple, MDF box made out of the same 3/4″ material.


Sand any seams as flush as possible to reduce the drywall compound filling later.
3. How to design and make the decorative arch:


She cut a rectangle of paper to length and width, folded it in half and cut a curve. She made a few to put in place and help us decide. (And yes, she’s DIYing in her pyjamas.)


I was disappointed that mine didn’t look as uniform as Robin’s paper one, but as she pointed out – this would be a hand-crafted, plaster arch and if it was too perfect, then it wouldn’t look right.
I think she was maybe just telling me that for my ego, but whatever, after the final finish is applied, I don’t even notice the curve imperfections anymore.


Robin took over again here to decide on the angle of the decorative top. The chimney, we guess? Again with painter’s tape.
4. How to frame and finish the decorative top:


Drywall is going to cover it all, so, again, you’re just providing enough structure to screw to.


Again, this didn’t require wiring, just turning a breaker off while I moved it and patched things.
But if electrical isn’t your skill yet, get a pro to move anything you need to be moved for your fireplace.


If you didn’t have lighting for art or, let’s say, cabling for a TV, you could easily get that done now, before the drywall.
You are now ready to close it in, so begin by adding drywall strips to the tapered sides.


If you plan on finishing the top with shiplap or some other material that doesn’t rely on a smooth finish, you can skip this step.
6. How to make the curve trim below the mantel:


We did our usual thing of wandering around big box DIY stores looking at various materials. Most wood coves were too small or too big.
Then we found metal drywall inside corner bead and our prayers were answered. It is metal so tin snips to cut to length.


Notice we had to trim some of the paper off the top edge of the bead to make it fit.
Also notice that we didn’t do a perfect job. This is all going to get pretty covered (front and back) with drywall compound, so you have a margin of error in your prettiness.


I was using a new material (inside corner bead) in an unconventional way AND it was a finish that would be seen by everyone who looked at our mantel in the future.
It went shockingly well and I loved that making this cove made me feel like an old-world plaster artisan. Please don’t burst my bubble by telling me that there is much more to real plastering than this.


You want your fireplace to look like it is a single, continuous plaster job and any MDF seams showing definitely ruin that illusion.


The Venetian plaster fireplace DIY technique
1. Choosing the custom colours for Venetian plaster and the best product:


We purchased our product in early 2022. If you remember that time, it was the middle of the “supply chain issues” problem. We couldn’t get this more affordable Venetian plaster product for many many months, and we just couldn’t wait. At the time of writing, this Venetian plaster product became available too. It looks worthy of a try.
That being said, we absolutely loved how the Pure and Original Marrakech Walls turned out. And the range of colours and being able to choose the colour from chips of the actual paint was very helpful to get it just right.
2. How to Apply Venetian Plaster product – the first layer:


Until we got the hang of the technique, we practiced with some sample boards.


It’s a slightly different colour than the top coat to show the texture you will be applying in step two.
Don’t panic if it looks different than you imagined when you apply it.
Be sure and cover everything well. While you’re at it, check any area there is a seam to make sure it was filled well enough.
Nothing will ruin your faux finish illusion like an MDF seam edge clearly poking its face out.


While you wait, we have a little baby DIY trowel project below to keep you busy.
3. Venetian Plaster Trowel Hack:


It was sturdy and beautiful and looked like you could sculpt Italy with it. It also was over $70.
The trowel pictured above is not that trowel. This one was from a big box hardware store and cost less than $20…


4. When the base coat is dry, apply the top coat:


The top layer of Pure and Original faux Venetian Plaster finish goes on like paint, but with the consistency of if paint and pudding had a baby.
You can see in this photo how both the material on the roller and in the tray are very thick. Rolling this on is basically like painting, but it does take a little more time to learn the quirks, so go slowly at first.


This is where the real work on this finish happens.


The more you work it, the more texture and variation you will get in your final finish.


Look at it from different angles too to see how the light shows the texture.
There is a good working time, so you can go back and touch up parts too.
Just try and be consistent over the whole surface and at some point, know when to stop.


Notice the tape we did on the inset area to prevent the plaster from going on it. We forgot to mention that earlier, so I hope you read this all the way through before starting. Sorry – our bad.


If you sand too much and want to bring back the shine, you can take a dry, clean trowel and go over the area again (it will take on a more concrete appearance then).
Because this step allows you to go back and forth a bit between finish looks, it is forgiving and you can experiment a little bit before deciding when to stop.


This photo captures it sort of well – it’s a bit more exaggerated here and you can’t really see the softness or the lovely patina.
Lynn
Friday 20th of January 2023
I always get so excited when you guys have a new project! So much awe and inspiration. I'd love to hang out with you guys during one of your many projects...I'd learn so much. This one is a doozie! What a dramatic difference.
frugalfamilytimes
Friday 20th of January 2023
Oh, Lynn - I think you're our biggest supporter. Thank you so so much for all your encouragement - it means a lot! :)
Vicki Baumer
Thursday 12th of January 2023
This is beautiful and you two have done a fabulous job! Well done! I'd love to do this in my basement!
frugalfamilytimes
Thursday 12th of January 2023
Thank you so much, Vicki! Don't let the length of the post intimidate you - it took longer to explain than it did to build!😂
Keith
Thursday 12th of January 2023
Hi Frugals; Really nice project; looks fantastic. Had to smile at the post on 70 vs 20 dollar trowel...I'd have to buy a machine to grind that down so no saving this side:)
You seem to have a few tools that seem very handy;(including your husband/wife). Just wondering if you could post something about tools;learning how to use them and small machines that are worth the investment in the long run.
Keep up the good work
frugalfamilytimes
Thursday 12th of January 2023
Hi Keith! Thanks for your idea about sharing tool recommendations - how have we not done that yet?! Will start now. You're right about the cost of a grinder - that would NOT make that trowel cheaper if you had to buy one! Does your area have a tool library? Maybe there would be potential to borrow one? Our city has one, but maybe that's rare? :)
Giselle
Thursday 12th of January 2023
The fireplace looks great! I am really impressed with the electric insert, so many look so fake but yours is quite realistic. I have a wood burning fireplace that I’d like to switch to gas but I am afraid it is going to be cost prohibitive. This insert might be the trick! Great job, from one “dork” to another! Lol!
frugalfamilytimes
Thursday 12th of January 2023
This insert might do the trick, Giselle! It comes in a few different sizes too. It's the most realistic one we've ever seen - we love the metal screen that pulls across and, while we thought it would be cheesy, we actually really love the crackle sounds it makes. Thanks for commenting! :)