
We may earn a commission on purchases made after clicking links on this page.


Intro by Robin Steps by Ed
We have some awesome wooden dog crate plans for you today! In fact, what we’ve devised here is much easier and cheaper than making your own wooden dog crate from scratch: it’s an IKEA dog crate hack! We’ve designed a way to turn a crib into a dog crate. It looks stylish, it was very affordable and we built it in an afternoon.
A crib to DIY dog crate can be simple because the crate parts are most of the way done for you. There’s very little joining parts and cuts. Every single part of this indoor dog kennel is from a wooden crib – even the cute dog crate door!
I think we can all agree that our dog Indy’s crate is an eyesore.


We had never intended to use a dog crate for so long. Our plan was to use it for puppy training and then put it away. But Indy had decidedly different ideas – he LOVES it. He quite happily goes in his crate when he wants yet another place to nap or when he’s hyper and we tell him to go in there to chill.
But the best feature is that we’ve trained him to go in here during meal times. When your dogs’ head is at the same level as your dining table, you don’t need him looming around while you try and enjoy your meal. It’s distracting and annoying.
But dang! Dog crates are ugly.
I had resigned myself to just trying to ignore the crate. Ugly crates are the price of loving your dog, right?
But as we worked away at our dining room makeover, I got more bothered by the crate. Surely there are stylish dog crates out there?! The answer is yes…and no. They are hundreds to thousands of dollars – especially if you have a large dog like ours. But…
How do you build a large dog crate? And on a budget?
As I scowled at the crate and tried to make it invisible or figure out how to solve this problem, I couldn’t help but notice that a dog crate looks an awful lot like an upside-down baby crib. So I did what I always do – I cruised through Facebook Marketplace (the only reason I’m ever on FB these days).
Within a day or two, I found the perfect crib! We got a very lightly used IKEA Sniglar crib for $50! ($80 with a mattress – that we’re using as a dog bed in our daughter’s room – this is where Indy sleeps at night. A dog bed with a waterproof cover and easy-to-source washable sheets – yes please!)


Also, don’t be turned off that the crib is too large for your dog. As is, a standard crib is way too large for our smaller home.
We show you below how to customize the crib to the dog crate size you need!
This project is right in our wheelhouse. We’re no strangers to Ikea Hacks! Here’s just a sampling:
- Our $30 DIY Floating Wood Vanity
- Our Simple Built-in DIY Window Seat IKEA hack
- Our Wall-to-wall DIY Built-in Bookcases IKEA hack
- Our DIY Media Cabinet Built-in wasn’t IKEA – but IKEA cupboards would be perfect for this hack, too!
So, if you’ve ever wondered:
How can I make a cheap dog crate? An IKEA hack dog crate!
You’re in the right place! We’ve got all the details on how we upcycled a crib into a stylish and sturdy dog crate. Including how to make the dog crate door – which is really the only tricky bit.


DIY Wooden Dog Crate Plans, a Simple IKEA Dog Crate Hack
DIY Dog Crate Materials:
- One IKEA crib – if you can – thrift this! I think people sell more used cribs than buy them.
- We used the SNIGLAR from IKEA (It retails for about $99 USD – if you’re close to an IKEA that’s great – if not maybe one of these will do?
- This one is very similar – and comes in many different finishes!
- This crib is similar too!
- Be sure to choose one with a simple square top – many have arches and sleigh ends which makes this project much more tricky.
- We used the SNIGLAR from IKEA (It retails for about $99 USD – if you’re close to an IKEA that’s great – if not maybe one of these will do?
- Wood glue, nails, screws
- hinges
- latch
- washable faux sheepskin rug (solid grey) this one is white with grey tips similar to what we bought
IKEA Dog Crate Hack: How to Turn a Crib into a Dog Crate
Steps by Ed
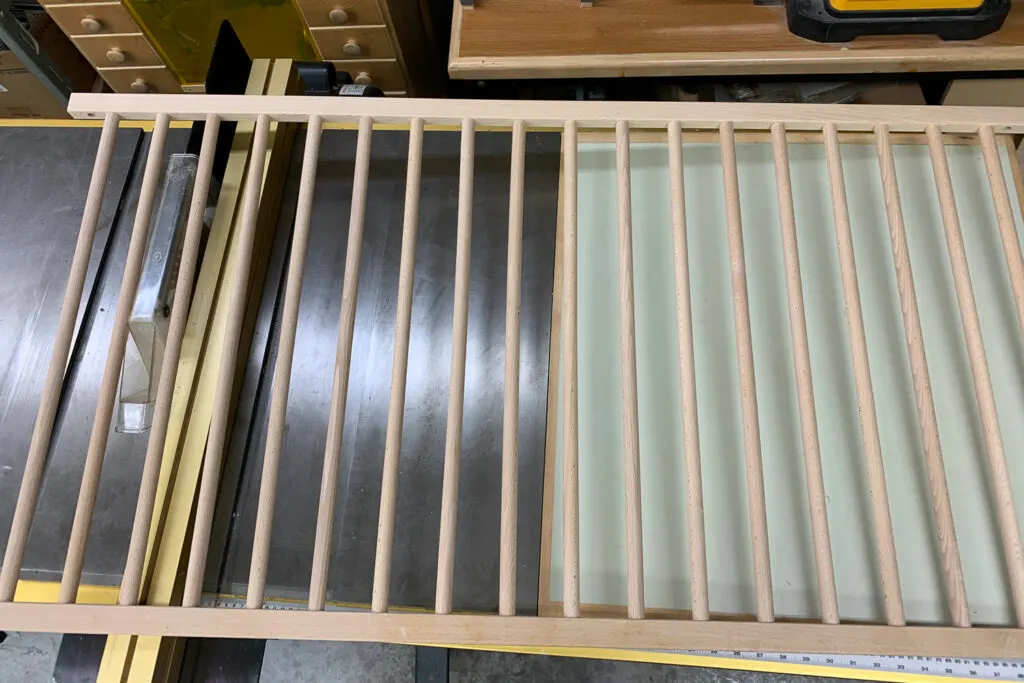
1. Measure and cut your dog crate parts


Ours came this way, so if yours did too, take note of how it will go back together again as I found being able to reuse some of the IKEA assembly hardware was a great way to add strength.
You can also remove/sand off any safety warning stickers at this point. Dogs don’t need safety guidelines on their crates. 😉


I’m only going to be showing one end in any given photo, but assume everything you see below gets done to both end pieces of the crib.


Our old metal one was 20″ and we wanted this one to be about the same size.
I measured 20″, then moved up to the next closest spindle to mark my cut. That way the spindle gaps will all stay the same.


You are basically shortening the end sections of the crib, but you need the good, pre-drilled ends, so reattach it now.
2. DIY dog crate assembly


Assume that if you don’t see it in a photo, the glue is still there, I just forgot to snap a shot of it.


I used our beloved Ryobi Electric Nailer, but whatever you use, keep in mind how hard this wood is and be careful not to accidentally nail through the predrilled holes (we need those).
I needed 2″ nails for some sections, but when they wouldn’t drive without causing issues, I used 1.5″


As before, our previous crate is 36″ long, so I measured, then rounded it up to the next spindle to make my cut.


Notice that one end will have the pre-drilled IKEA assembly holes and the other will be cut off. We are going to use the pre-drilled holes to attach the end that isn’t going to have the gate on it. In fact, we’re going to do that right now!


Tighten them up and you’ll likely find like I did, that the thing is actually very sturdy already. Turns out IKEA knows how to make things solid.


3. How to make the crib to dog crate door


It is a gorgeous piece of material and you’re going to cut it up now to make a solid end to secure the gate door to.


Basically, everything so far in this tutorial could be done with a chop saw or circ saw, but this step definitely needs a table saw.


I tried to nail it together, but the wood is so dense and it was really important that it was strong to hold hinges that I also added some screws.


This time, predrill and screw on the back of the frame where you will attach it to the crate and the screws won’t be visible.


Failure to pre-drill your countersink will mean the wood will split.


This adds the last bit of structure to your crate AND the gate will hinge on it, so take your time and work carefully.


I put them 4″ from the top and bottom of the side.


As mentioned above, I attached the hinges 4″ from each end of the door. I made the bottom hinge 4-1/16″ up to create clearance off the floor for the door to swing.


4. How to make the wood dog crate top


Now cut off the ends so you have a bunch of spindles. Don’t try to cut them to the correct length yet, just get them as long as possible – we are going to be putting a ‘roof’ on our crate.


I had 4 more leftovers than I actually needed, but depending on how big you make your crate you might have more or less.
My pen had a slightly wider end, so this meant that the spindles needed to get longer as I moved down the crate.
Don’t cut them all at once. Start at the widest end, cut a couple, try them in place and then work down, cutting shorter ones as needed.


Then I put dobs of glue on the side, lining up with the side spindles. Then I…


I found I could only fit 3-4 at a time before I had to nail and secure them.


It had the added benefit of making the spindles fit tightly as I inserted them.
This also meant that if they weren’t lined up perfectly, I needed to ‘adjust’ their alignment with a mallet. Gently.


Again, I only used 1.5″ nails here, and really was careful to fire it straight into the middle of the spindle.


You are almost done! Good work.


We went with a simple hook and eye, but you could do whatever fancy closure system you feel your dog needs.


He especially enjoys the washable faux sheepskin rug we put in there for him – he’s in here more than ever now. And when he isn’t, Beanie or Pippi (our kitties) are happily hanging out in here.
Jessica Vandergriff
Thursday 20th of October 2022
That dog is so squished in that crate. They should be able to stand up fully and turn around in a circle. Way to small all for “looks” is sad.
frugalfamilytimes
Friday 21st of October 2022
Cool your jets, lady. If you took the time to read you'd have learned he goes in there just during our meal times - and WILLINGLY when he wants a place to relax. Commenting before understanding is sad.