

We may earn a commission on purchases made after clicking links on this page.
by Robin (with Steps by Ed)
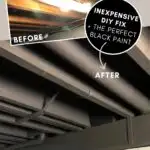
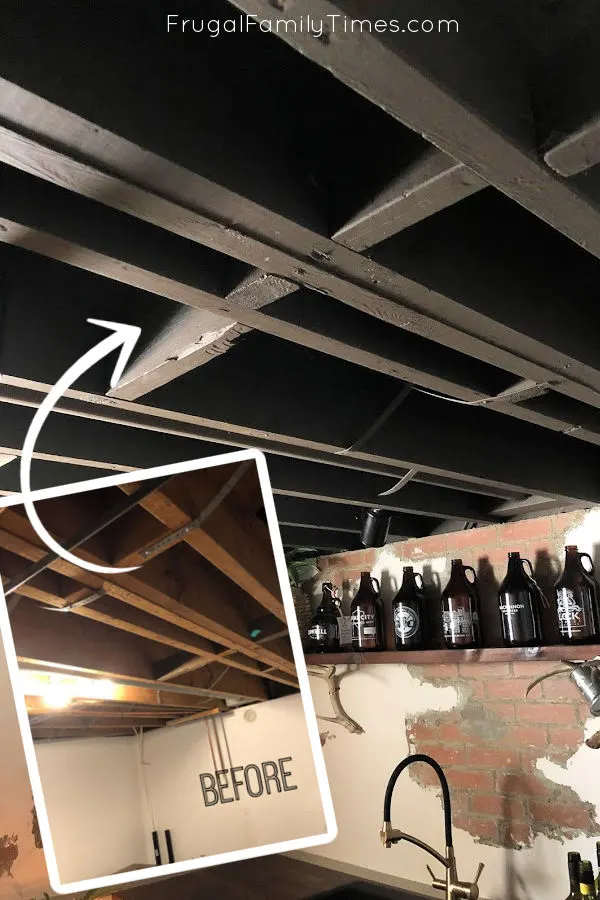
I knew a painted basement ceiling was the right solution for our basement pub and hobby room. It ticked a lot of kinda-boring practical boxes. (I share all the benefits of a black basement ceiling below – there are LOTS.)
Despite knowing all those boring positives – and suspecting our black painted ceiling was going to look great – I was BLOWN AWAY by how much taller the room looks too!


I was a little nervous that such a strong dark colour would make our painted basement ceiling feel like heavy and low. It does the exact opposite! It helps that I chose the Perfect Black Ceiling Paint Color! I really think so! Keep reading for all the details…
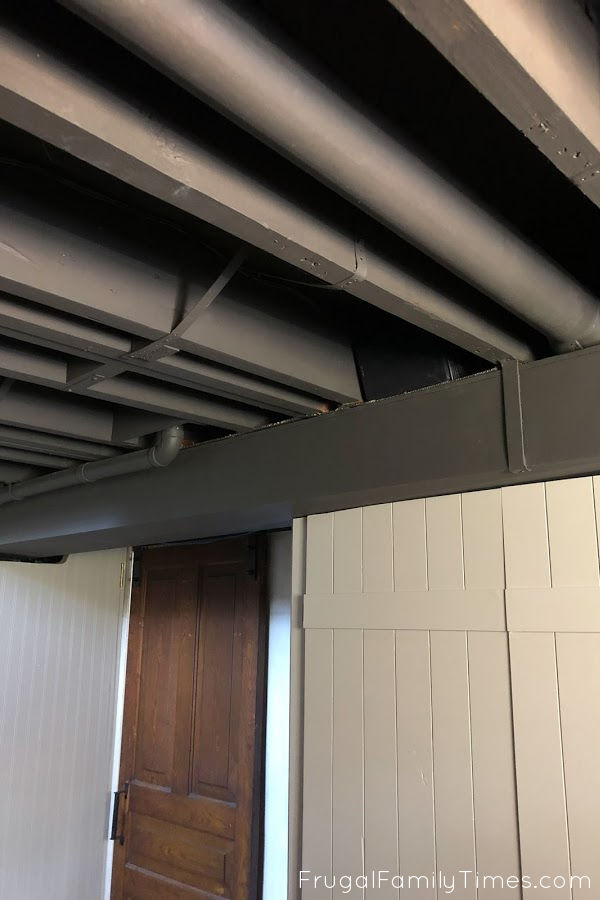
You can tuck a speaker up there and (in-person) you can’t see it at all! (Photo lighting gives it away – as you can see.)

Ever since discovering PEX plumbing and Shark Bite fittings – he is eager to move pipes and plumb things. No more soldering for us, thank goodness (the. worst.)
Benefits of a Black Basement Ceiling
- easy access to plumbing and wiring
- the modern, industrial vibe we were aiming for
- a super affordable way to finish a ceiling
- an easy DIY ceiling treatment
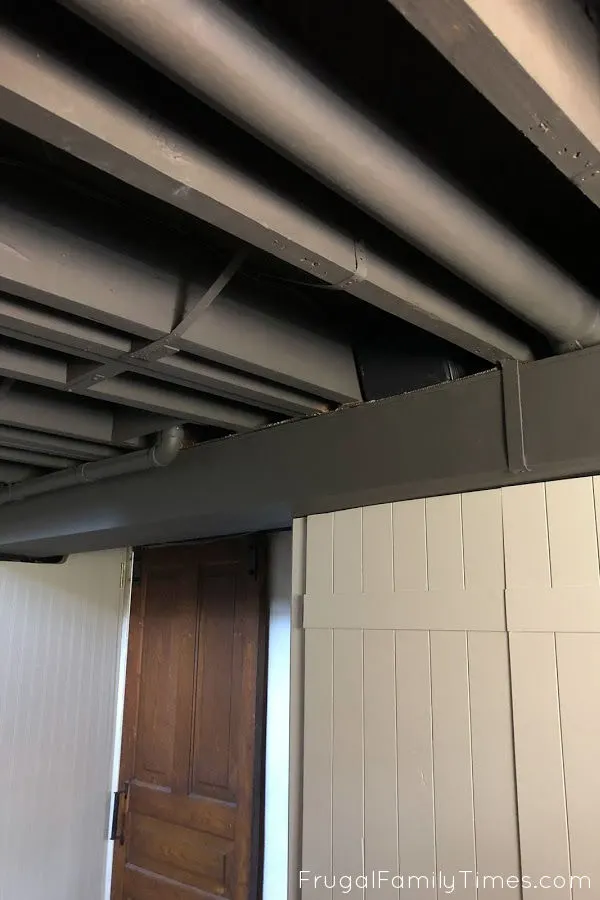
- a way to visually disguise a whole lot of ugly basement ceiling stuff (pipes, wires, shut-offs, etc.)
The Perfect Black Ceiling Paint Color
I am certain I picked the perfect black ceiling paint color! It’s warm and visually recedes in the best way.
I chose the color in my usual way. Here are the steps:
- Grab a handful of paint chips.
- Stick them up on the wall in a cluster.
- Pull down any that right away don’t feel right.
- Ignore the chips and walk by the area as you go about your day. Pull down any that don’t look good.
- When you have two or three left – move them to another area of the room. Repeat.
I like to spend a couple of days minimum choosing a paint colour. Then you can see them at different times of day and with different light (natural vs. lightbulbs).
Then I get down to two and hem and haw and ask Ed a bunch of times which one he thinks is best. He humours me and doesn’t get mad when 50% of the time I pick the one he didn’t. (He trusts me and has very little skin in this particular game. *Ed Note: Plus – the other 50% of the time, she picks the colour I did choose, so: ego placated!)

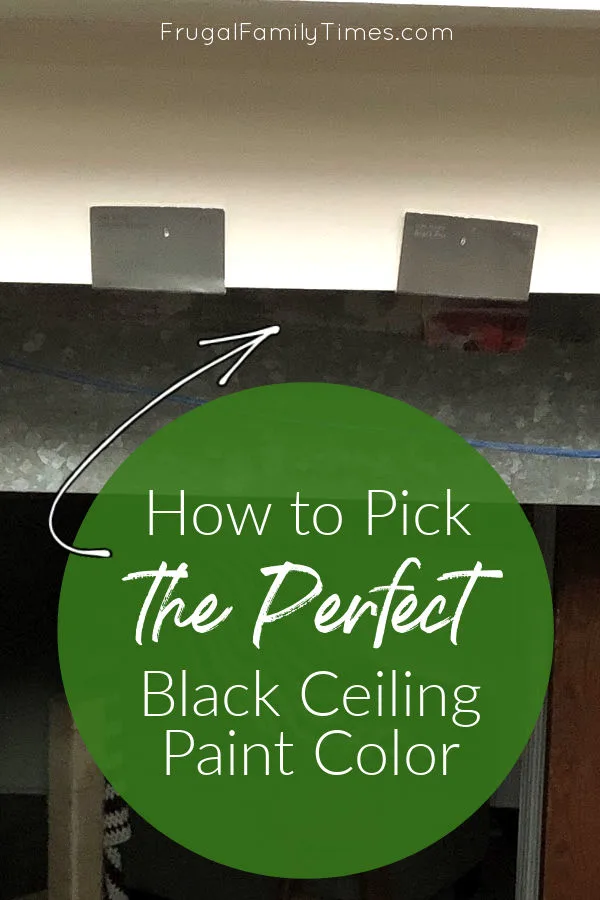
Urbane Bronze vs. Black Fox (both from Sherwin Williams).
The winner?
Black Fox! It’s so rich and warm with no blue undertones! I find the blue undertones distracting and not terribly natural looking. Wood rarely ages to a blue tone, if ever?
When you get your paint mixed be sure to choose a FLAT finish. This is essential.
Any shine will reflect light and draw attention to any flaws. Hiding flaws is a major reason to choose this basement ceiling treatment.
How to Paint Basement Ceiling Without a Sprayer
We didn’t have a paint sprayer when we did this project. We were willing to invest in one – we paint ALL THE TIME, but we didn’t want to spray paint this ceiling for one major reason:
Using a paint sprayer in a room requires PERFECT prep.
You need to tape and tarp everything you don’t want to be covered in paint.
Which means time and money. Painters tape and plastic sheeting aren’t free.
And the time to put all this protection in place is an important investment, but dull and perfectionistic and not our favourite way to work.
Ideally, you paint your ceiling first – before you’ve done anything else in the room, then you don’t need to be quite so meticulous. This includes wall treatments and floor coverings.
(Of course, we did the opposite with our faux brick plaster walls and LVP floors installed, plus our buffet to DIY wet bar was already in place.)

Painted Basement Ceiling Materials (when you don’t have a paint sprayer)
- latex paint with primer – flat is best
- painters tape – we’ve tried them all and this one is the best
- paint rollers
- big
- small
- paint brushes
- sash brush – important for clean edges where needed
- big & little
- a beat up, old junky one to mash into gaps and tough to reach spots
Steps to Paint Basement Ceiling Without a Sprayer
(this part is written by Ed)
1. Decide what stays and what can move (and move what you can)
For us, this meant a lot of ugly electrical could go:
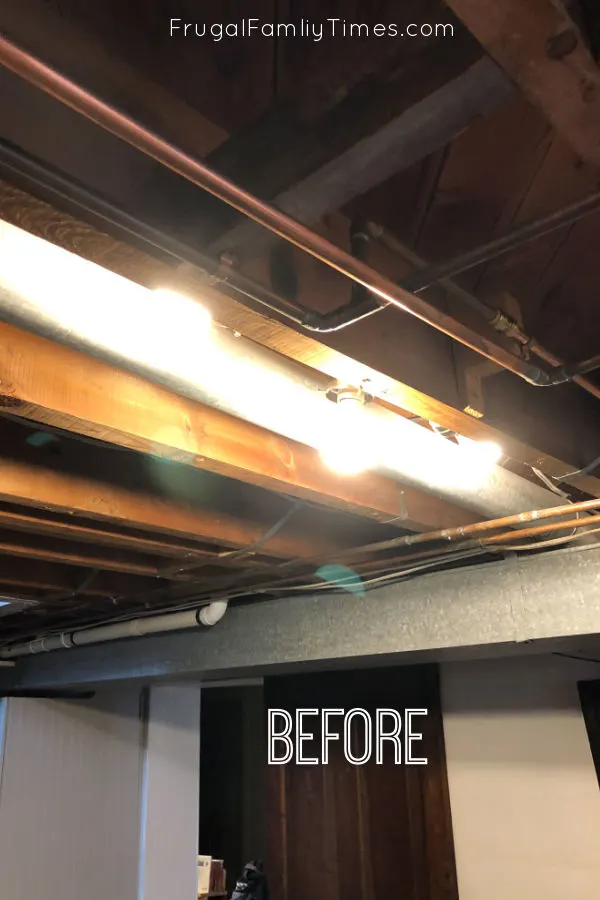
The room had a previous life as a laundry room and wiring for the electric dryer was no longer needed.
There were several other pieces of ‘just-okay’ electrical that got ripped out and replaced with clean, new runs (for the lights, for example), scrapped entirely or hidden behind a Faux beam (post coming on this) or behind the ducts.
If you don’t feel comfortable shutting down breakers and re-running wires, call a pro!
Same for plumbing:
As Robin alluded to above, we have become much more willing to try plumbing new things (see our basement closet to powder room transformation or our reclaimed buffet to DIY wet bar).
This room had a series of copper pieces cobbled into place for various runs (water filter, kitchen supply, outdoor hose supply, laundry sink + washing machine supply) that worked well under its old life, but not so much in the new.
We streamlined everything we could, then hid the plumbing under the brick panels and that Faux beam I mentioned above (and will again promise in writing here to write about).
Again, if any of this is scary, bring in a pro.
Lastly, a central vac run and some HVAC ducts/returns had to stay put too, along with some blocking and supports between the joists themselves. We just made sure any nails or screws that were at potential head height were removed.
2. Dust/wipe/clean everthing
Funny thing: basements have a way of becoming more basementy than other rooms. Dust from above filters down, spiders web freely and ‘cleaning day’ occasionally skips rooms that are mostly utilitarian in nature.
We vacuumed everything to start with, then wiped pipes and ducts with a dry cloth to break up more dust, then vacuumed again, then used a wet cloth for a final wipe.
It’s a pain, but you will reap the rewards with you don’t have a spiderweb balled up on your paint roller.
3. Painting: Details and Rolling
Tape any areas (clean transition lines, stuff that can’t get paint on it) with good quality painter’s tape. We only use this one – it’s the best by far.
Put a drop cloth down on the floor and move anything you can out of the room completely.
Keep a wet cloth handy to clean up drips – if you work smart, there actually will be very few, but a good DIY Scout still remembers to Be Prepared.
We used a small, microfibre paint roller (that can sometimes double as a detail brush) and a couple of brushes (a ‘good’ sash brush for edges and detail work and a narrow, ‘beater’ paintbrush for getting into knotholes, around wire staples and any other tough to reach spots that can end up destroying a paintbrush).
We worked a few different ways but found that since the small roller could reach most spots and covered really well, we led with it, and followed up with the touch-up or details brushes in any areas the roller couldn’t do.
All the angles and weird stuff mean lots of hard-on-the-shoulders overhead work, but the added benefit is that (combined with picking a flat paint colour) you won’t actually see a lot of the edges/transitions that stick out like sore thumbs when painting a big, flat wall.
Don’t load the rollers or brushes up too much until you know the viscosity of the paint. Otherwise: drips.
Our Sherwin-Williams paint was pretty thick and didn’t run/spray/dribble very much at all, but until you know what you are working with, err on the side of caution.
Working slowly might mean that one coat (+ touch-ups) is all you have to do!
Paint EVERYTHING – ducts, central vac pipe, wires, plumbing. Move your head and look from new angles. See that missed spot? Paint it too!
We did two coats. With the last one being light and fast to finish.
4. Keep a Touch-Up brush handy
Lastly, don’t put all the brushes and paint away as soon as you finish.
I kept the paint can and a clean brush handy for at least a week after we thought we were done, as smalll edges, angles, nooks and crannies kept revealing their unpainted selves to me as I wandered around and admired our work.
This made it easy to pop the top of the can, dip the corner of a brush in and cover the missed spot.
Consider Your Lighting
We used these adjustable spotlights and they are so perfect! They even come in a plug-in version if hardwiring isn’t possible for you.
Because the ceiling is black these versatile lights blend in – you can use them just like potlights – only cheaper and easier to install!
Or you anchor them lower on purpose like we did to use as a spotlight for our personalized custom bar sign.

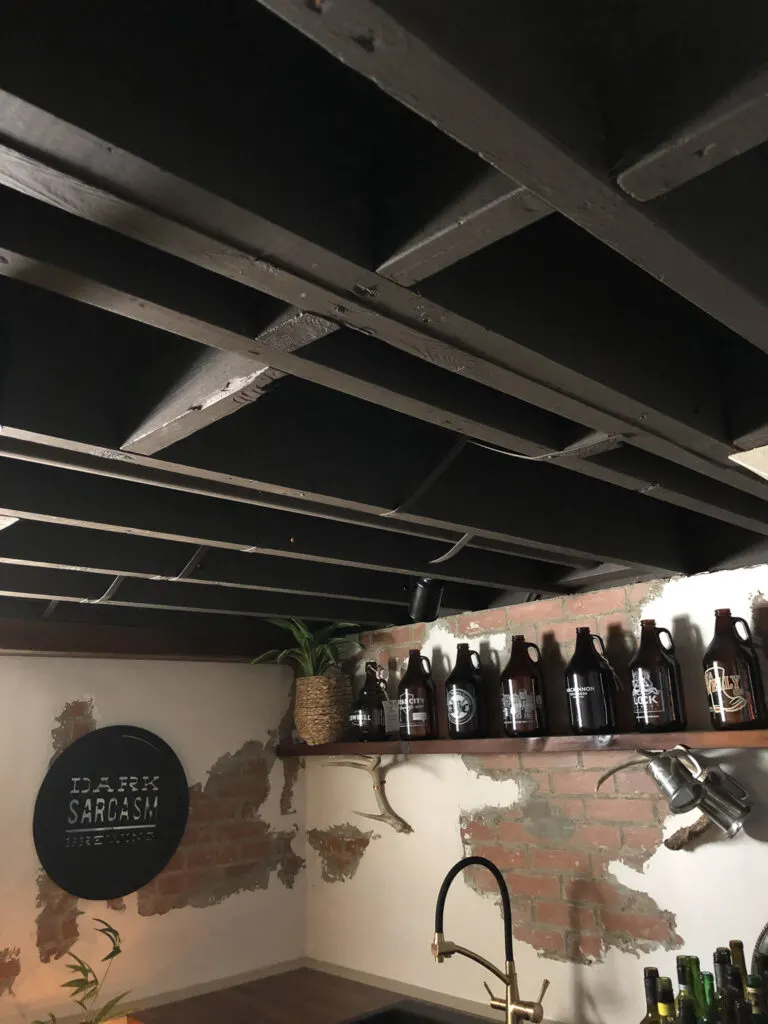
We have one pointing at the brewery sign, and then two pointing down at our bar table. They blend in, but still look cool.
Cost to Paint Basement Ceiling Black
We used paint rollers and brushes we already own, so our only cost to paint the basement ceiling black was the paint.
I bought the cheapest flat paint that Sherwin Williams carries. (I announced, “I’ll take a gallon of your cheapest paint, please.” Like the opposite of someone ordering fancy wine in a restaurant – which makes me laugh and makes clerks laugh uncomfortable.)
This is a time when you can definitely use cheap paint. It’s a ceiling – it’s not going to be getting fingerprints that need scrubbing or anything rubbing up against it ever.
So in the end this painted basement ceiling cost us just one can of paint – so less than $50. The room is about 10’x10′.
This is just one of our DIY low basement ceiling ideas! Check them all out here.

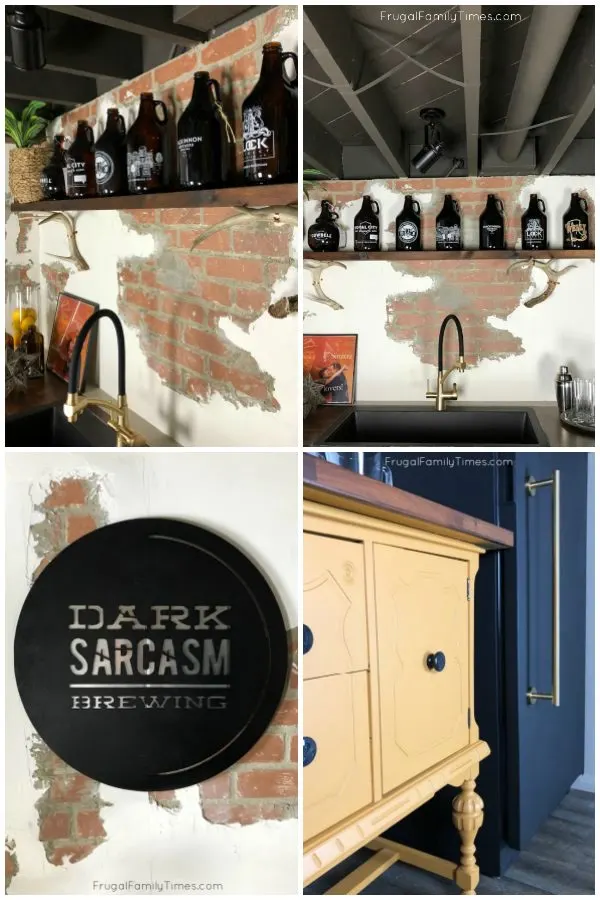
This is just one project in our Basement Pub & Hobby Room. You can see all the projects here.
If you’re renovating a basement and need ideas we have LOTS – we’ve been working on dozens of projects to make our Basement Makeover more functional and beautiful!


Robin and Ed are a DIY-loving couple with over 25 years of design and build experience. Also, Robin is a Nutritionist and former Registered Dietitian and Ed is an award-winning Business Educator. We share strategies for living a rich life on a DIY budget: creative money-savvy ideas for a stylish home, healthy meals and family fun. Our work has been published in the pages of Do It Yourself, Farmhouse Style and Better Homes & Gardens magazines.
Carolyn
Saturday 11th of November 2023
How long did it take for the two of you to paint the ceiling once you had it prepped and cleaned?
Robin & Ed Hicken
Monday 13th of November 2023
Hi Carolyn! After the prepping and cleaning it took us less than 2 hours for the first coat and then less than an hour for the second. About an afternoon to do an approximately 10' by 10' room. :) Robin
Kelly
Sunday 6th of August 2023
Did you have to deal with any exposed insulation?
Robin & Ed Hicken
Monday 7th of August 2023
No we didn't, Kelly. I think you'll need to cover it with plywood before painting.
Christina B
Wednesday 8th of March 2023
What was the name of the color you used? I can’t seem to find it.
frugalfamilytimes
Thursday 9th of March 2023
Hi Christina - it's Black Fox from Sherwin Williams. :)
Lisa
Monday 27th of February 2023
The paint sticks to the pipes and metal ducks? Without a problem?
frugalfamilytimes
Monday 27th of February 2023
No problems, Lisa! Just make sure they are very clean. :)
Bethany
Wednesday 8th of February 2023
With the darker color choice, would you say dust shows up easily?
frugalfamilytimes
Wednesday 8th of February 2023
Not that we've noticed, Bethany. :)