
We may earn a commission on purchases made after clicking links on this page.


Intro by Robin
In today’s post, we’re showing you how to make DIY floating shelves solid wood – including the brackets!
We didn’t need to buy expensive extra brackets to hang our custom shelf – we made DIY floating shelf brackets ourselves – with our kids in fact! And it’s more simple to do than you might think.
It’s no secret that Ed loves beer. He loves to make it himself (here’s his whole DIY Beer tutorial series.) And a big part of the design of this room was to celebrate his passion for beer.
For years he’s been collecting growlers from craft breweries – local ones of course, but he’s also started picking them up when we travel.
Until now, he didn’t have a way to truly celebrate his collection.
From the start I knew we needed a shelf to display his growler stash – and what more perfect place than our modern rustic DIY basement wet bar?


And while we were making the shelf, Ed came up with the genius idea to make deer antler ‘brackets’ for underneath! They don’t hold the weight of the shelf – it’s still a floating shelf – they are purely for the purpose of looking rustic and cool.
Plus there’s a bit more: the antlers are a loving nod to Ed’s late father, who spent years roaming their country property collecting discarded antlers. The man loved beer too – so it’s a pretty perfect tribute.
The other unique thing about our floating shelf is that we made it all from wood. We didn’t need to buy expensive metal floating shelf brackets! We simply used a couple of dollars worth of wood dowel instead.
Total cost of this shelf was less than $20!
Keep reading for Ed’s how -to!


- DIY Floating Shelf (Solid Wood) Materials:
- Step 1: Cut your dowel supports
- Step 2: Mark your support "bracket" holes and drill them
- Step 3: Cut back off of the shelf to create mounting bracket
- Step 4: Insert dowels into mounting bracket
- Step 5: Dry fit shelf together and sand
- Step 7: Nail any loose dowels in place
- Step 8: Apply finish to your shelf
- Step 9: Mount shelf to wall
- Optional: How to Make Antler Shelf Brackets:
- You can see all of our Modern Rustic Basement Wet Bar Projects here:
Steps by Ed
After Robin came up with the idea for this floating shelf – I got started figuring out how to build it.
Full props to Glen Scott and his DIY Creators channel/site for the awesome how-to video that inspired our project. We knew that someone out there would have ideas about how to do this and he was the guy. If you are looking for someone to follow (other than us, of course), he is a great choice.
DIY Floating Shelf (Solid Wood) Materials:
- 2″x 6″x 8′ stock for the shelf (we used clear pine, but cedar or other lighter wood would work too)
- 1/2″ dowel – 2-3′ length
- wood glue
- Wood Screws (at least 2-1/2 – 3″ long to secure shelf to the wall)
- Stain or wood finish of your choice (here’s our DIY Wood Stain how-to)
- Optional – Deer antlers and 1/2″-3/4″ plumbing copper strapping
Steps: DIY Floating Shelves Solid Wood
Step 1: Cut your dowel supports

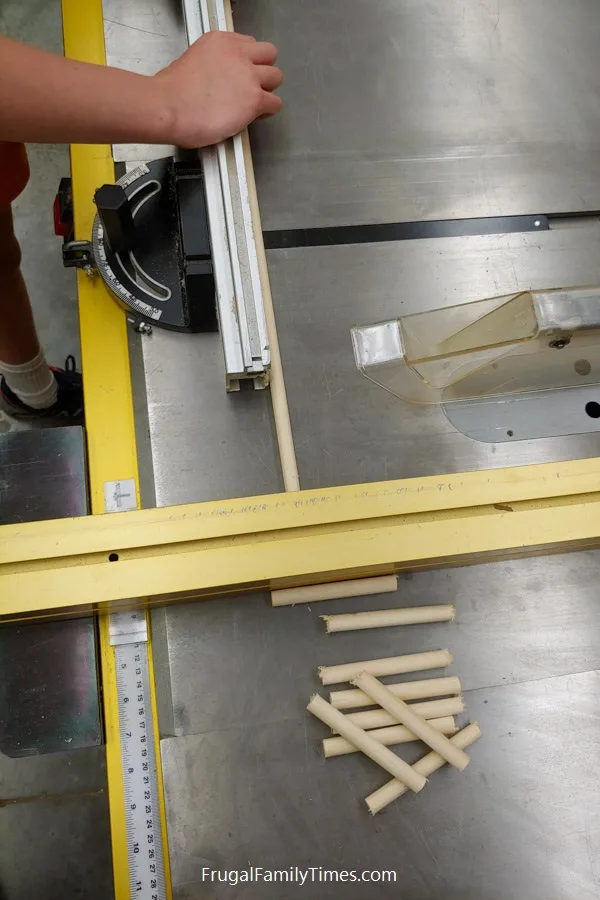
Our shelf is 6’6″ long, so we ended up using 6 pieces for our supports.
Step 2: Mark your support “bracket” holes and drill them


This is the side that will be against the wall, so pick the ugliest face.
Mark where you will drill the support peg holes


If you have a drill press, this is a great use for it – if your holes wobble too much, the pegs will be crooked and the shelf won’t slide on cleanly.
Step 3: Cut back off of the shelf to create mounting bracket


This will become your mounting bracket.
Step 4: Insert dowels into mounting bracket


One end of the dowel can remain unsanded, as it will stay glued in the narrow strip you just cut off above.


If not – sand some more.
Will the other end fit into the narrow ‘mounting plate’?
Again, if not, sand it, if it is loose, mark that you will need to glue it.


The first bit should slide in easily, as it has been sanded.
The last end bit may require a mallet or hammer. Add some wood glue to the last half inch before you drive it in.
Step 5: Dry fit shelf together and sand


You can sand all of the surfaces that will be finished while you wait for the glue to set up.


Step 7: Nail any loose dowels in place


Step 8: Apply finish to your shelf


It doesn’t have to go on and off dozens of times, but you should be able to line up everything and get it together fairly easily.


Step 9: Mount shelf to wall


If you can’t find studs or your shelf is short, use decent hollow wall anchors.
All of these screws will be hidden when you slide the shelf on, so be thorough, and use the longest screws you have.


Of course, you can stop there, but…
Optional: How to Make Antler Shelf Brackets:


We had some antlers that my dad had found while walking the property (deer shed them every year, if you know where to look).
We decided to make them appear to support the shelves. They truly do nothing – as you will see, the shelves are holding the antlers, not vice versa.
If you have something you want to mount like this, begin by getting some copper plumbing strapping and bending it into a custom mounting hanger.
(This was the perfect rustic industrial hanger for our theme – you could definitely use something different. Leather could be a good look.)


Affix it to the wall using the same process.


If you are working with a more difficult material/weirder bracket/more oddball angle, you may want to pre-drill your hole. And now, you’re really done. Put some awesome stuff on your shelf, stand back and admire your craftspersonship.


You can see all of our Modern Rustic Basement Wet Bar Projects here:
- Our Black Smeg Knock-off Fridge
- Our faux brick and plaster wall treatment!
- Our Custom Bar Sign! (with easy tips to design your own logo for personalized wall art.)
- Our DIY wet bar from a repurposed sideboard!
- Our DIY Built in Cabinet – How We Out Basement Storage in a Beautiful Custom Way
- Our painted black basement ceiling – without a sprayer
Connor
Thursday 23rd of March 2023
I'm pretty sure you used 1/2 inch dowels as I cannot for the life of me find a 3/4th inch drill bit long enough for this and you can't physically put a 3/4 inch dowel into a drill to sand it.
Robin & Ed Hicken
Saturday 25th of March 2023
Apologies for the typo. We've corrected it now - 1/2" dowels were used.
Heather Taylor
Wednesday 17th of March 2021
That is brilliant!
frugalfamilytimes
Wednesday 17th of March 2021
Thanks so much, Heather! :)