


We may earn a commission on purchases made after clicking links on this page.
Intro by Robin; Steps by Ed
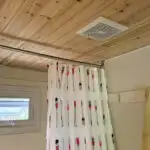
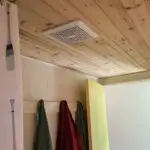
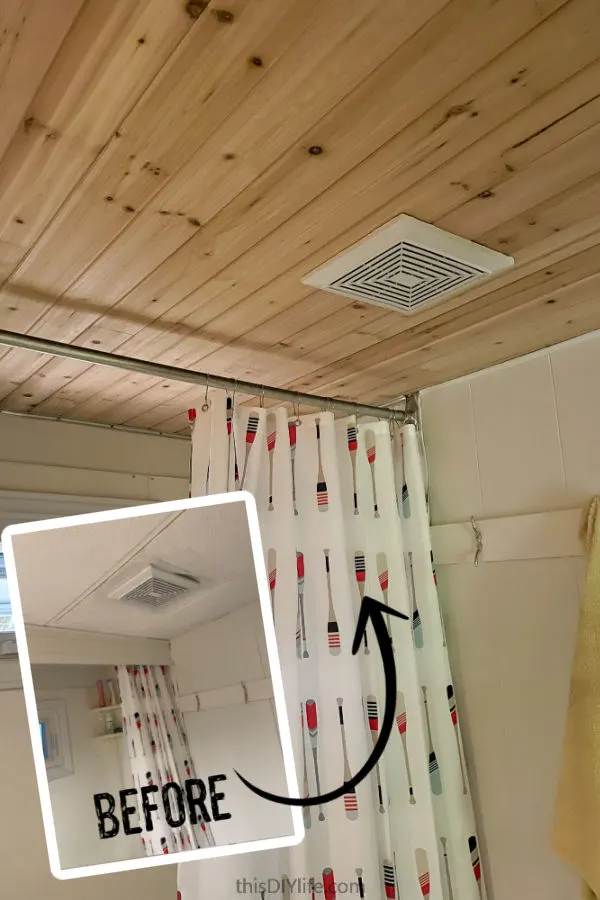
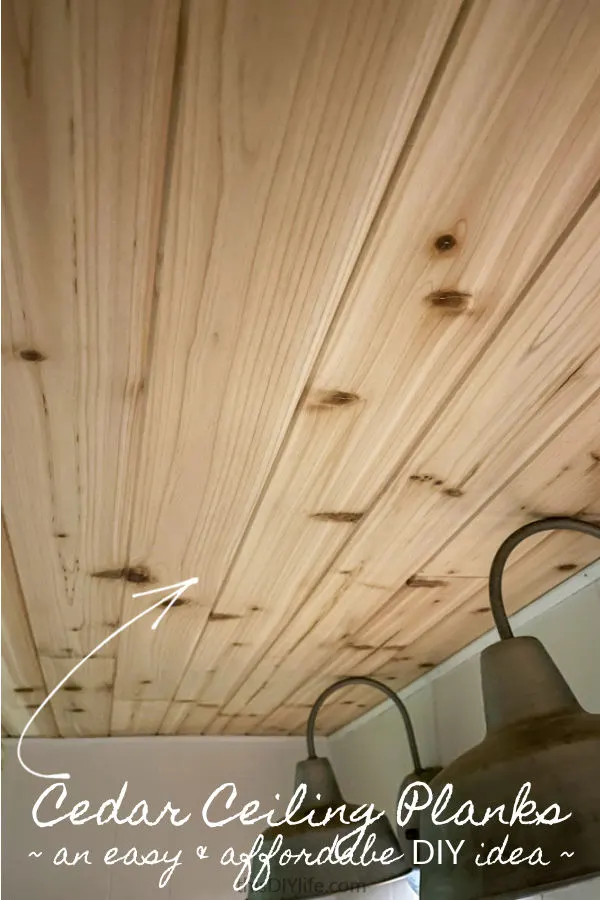
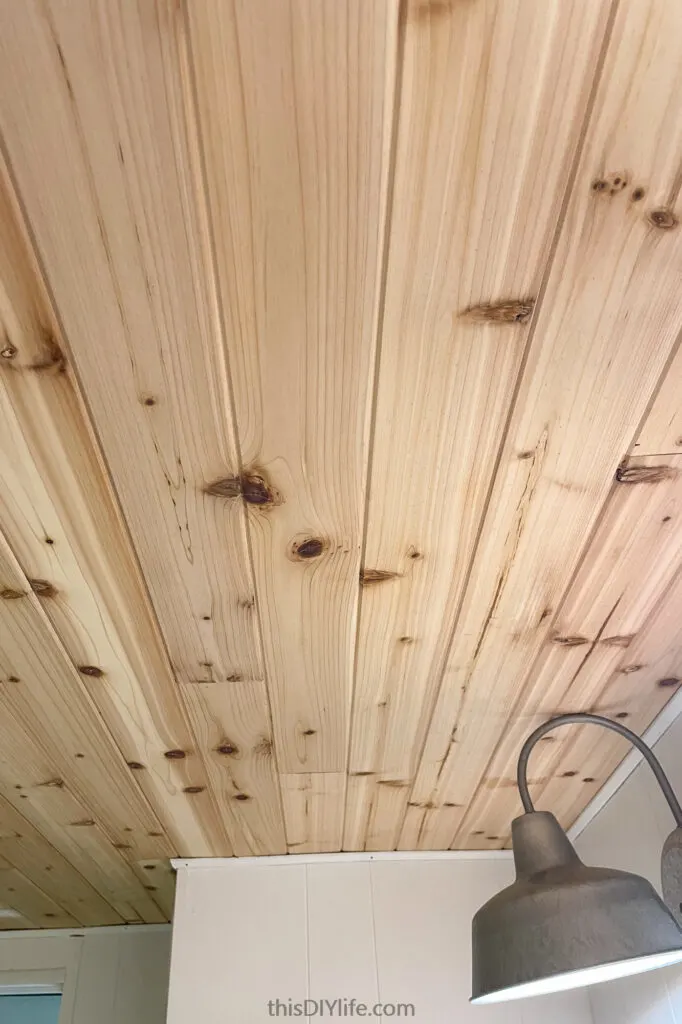
Our tongue and groove cedar ceiling plank project turned out even better than I hoped! We went from wondering “Can you use cedar planks for ceiling?” to a finished beautiful wood bathroom ceiling in less than a day!

I had big hopes for our bathroom cedar tongue and groove ceiling, maybe too many? NOPE – it delivered on all my hopes! Our DIY cedar ceiling had to solve a bunch of problems in the bathroom of our weekend place (aka our Mobile Home Makeover).


Why tongue and groove cedar ceiling planks are a great bathroom ceiling idea:
- It looks so good!
- It gave our bathroom a natural, minimal, Scandi spa vibe. The wood on the ceiling was just what the room needed.
- A cedar plank ceiling covers problems.
- This ceiling idea would be great to cover a popcorn ceiling!
- It would also be a great basement ceiling – you could just nail it to the ceiling joists. (We’ve added it to our collection of basement ceiling ideas!)
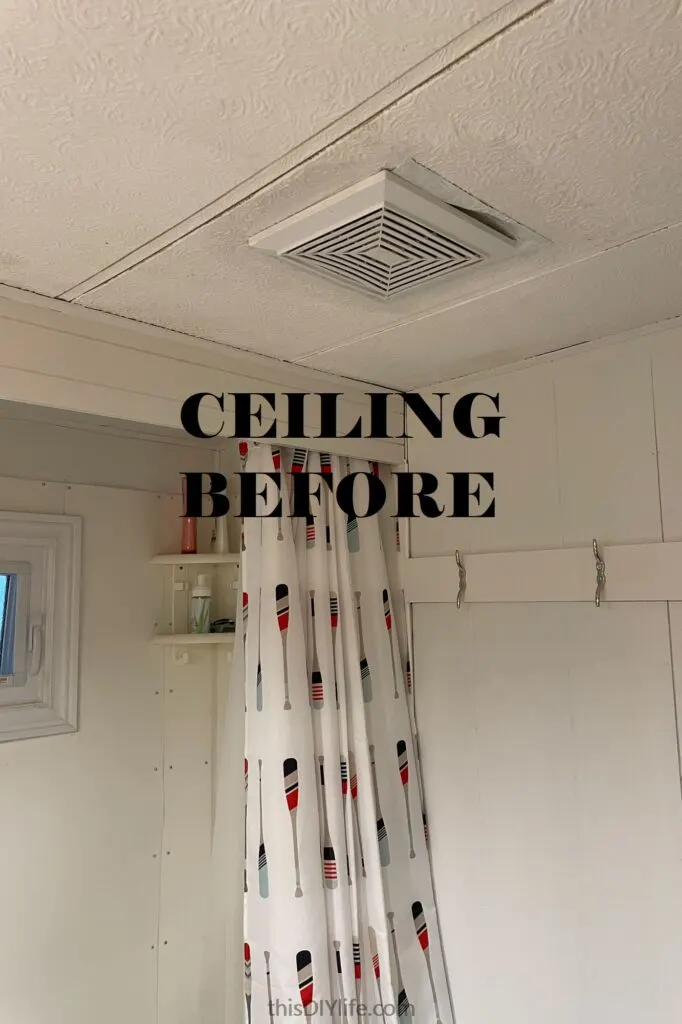
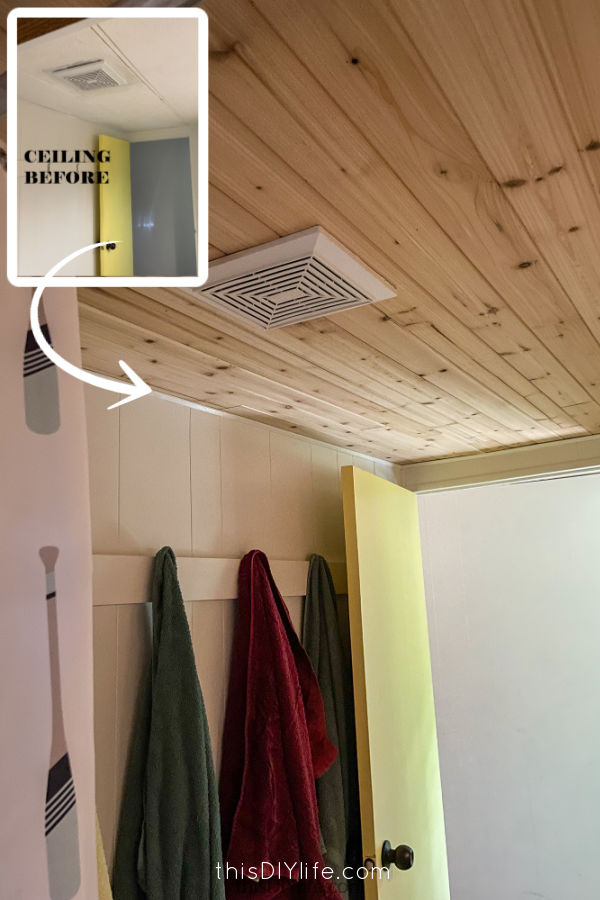
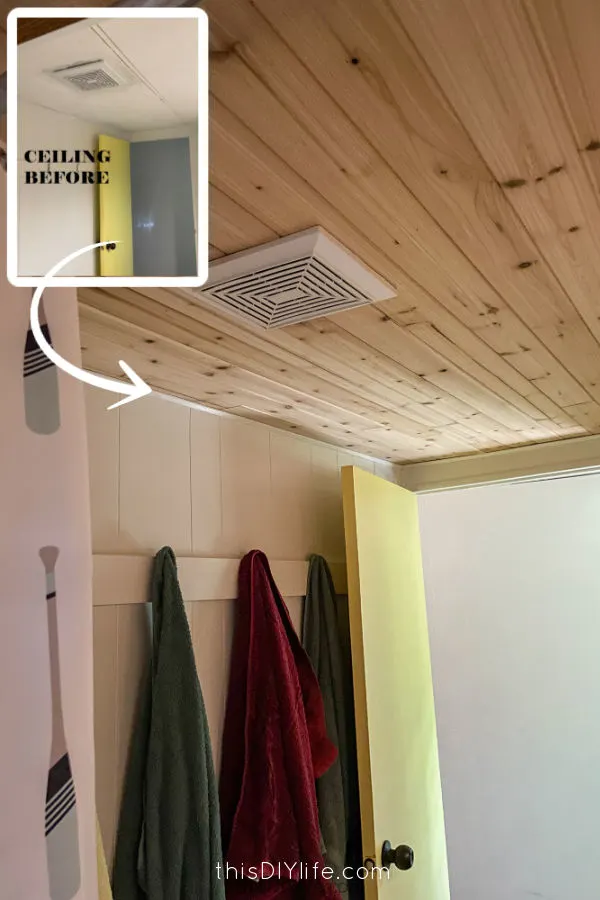
- That wasn’t our problem though. Our ceiling had nothing going for it. It was a 70’s mobile home special made of textured cardboard-like panels with plastic ribs running along it. We painted it a fresh white, which helped it- to a point.
- The previous owners let water come down the exhaust venting. So the ceiling around it was damaged, as you can see below.
- It’s a pretty easy DIY project.
- It can be rare for a project to go smoothly from start to finish, and take less time than we expect. This one did!
- It doesn’t need a finish. Less work!
- It’s pretty affordable.
- It’s not one of our most cheap ceiling ideas, but it’s not our most expensive either. This one cost less than $200 for the whole room. (And that’s in Canadian dollars – it would be even cheaper in the US. 😒)
- It smells great!
- There’s a reason so many grandmas have cedar chests to keep their treasures – cedar is great for preventing bad smells (and protecting from moths).
- This feature is great for us in the mobile home – we’re always looking for how to get rid of musty smells – because old closed-up places like cabins and cottages can get musty. (Solutions to musty smells here!)

(You might notice we removed the board that covered the shower curtain rod. It was a great change! Now the room seems bigger and brighter.)
Do you need to seal cedar ceiling?
No! In fact, it’s best if you don’t. Cedar is water and rot resistant – that’s why you can use it to build decks and other outdoor projects (like our DIY giant outdoor Jenga game!)
By NOT sealing or painting the cedar ceiling planks, you let it give off its gorgeous natural smell! It gets better with every steamy shower.
If your plan is to paint your ceiling, save yourself some money and do it with pine instead: we have a whole tutorial on installing tongue and groove ceiling (also a pretty easy DIY!)

(shhh – don’t tell anyone, but these are just super cheap outdoor fixtures!)
What cedar tongue and groove ceiling cost:
It depends of course on a lot of factors, including the size of your room and where you’re located.
Our ceiling took three bundles of tongue and groove cedar ceiling planks and each bundle was about $52 (Canadian dollars). A bundle covers 15 square feet. Add on the other needed supplies (see below) and our total for this cedar bathroom ceiling was about $170.
Now, were we to be in the US, similar bundles are less than $38 – so the US total would be closer to $130.
Cedar tongue and groove ceiling supplies:
- tongue and groove cedar wainscotting planks
- tub surround adhesive (we used two tubes)
- nails
- black permanent marker
- trim (or reuse old trim, like we did)


If you have a regular drywall/plaster/popcorn ceiling, you could definitely use thicker material if you wanted.
And we opted for Tub Surround construction adhesive over the regular stuff because we wanted the bathroom moisture-friendly features that the tub surround adhesive would offer.
How do you hang tongue and groove cedar on a ceiling?


Measure and cut your first board. We started at the difficult-to-fit end near our sink where the lights would make ending here difficult. Save your easiest end of the room for your last strip.
Before nailing, measure the distance from the opposite wall to both ends of the plank and adjust to get it even. This might mean there is a slight gap at the wall on your starting end, but this will get covered in trim.
Checking your measure now ensures that your starting run is as straight as possible and should mean that everything else lines up squarely.


Try to pick spots that will be hidden with trim if possible and also try and hit solid material to support your panel.
We didn’t use adhesive on this one because it was such a tight fit and had lots of other spots we could nail it inconspicuously.
Every other panel after this one got adhesive on it.


Carefully (the tongues and grooves can be delicate) dry fit each one to ensure they fit.
Then apply adhesive, fit and press into place and add a couple of nails in key spots to hold it.
Measure your next length, cut and repeat across the room.
We tried to avoid having any end joints above the shower itself and obviously try and stagger your cuts, but there isn’t really much planning you need to do.


Once the panel is fitted, tilt it down slightly and run a bead of adhesive along the back.
This reduced the chance of getting messy adhesive everywhere while doing the fiddly step (trying to get the tongue in the groove all the way along the board).
If you have two people doing this task, this is the method we would suggest.


For things like these, cut the cedar panel to length, and dry fit as usual.
Mark any spots that need to get cut and use a jigsaw or multi-tool to carefully cut out anything needed for the fit.


In our case, the vent fan cover needed some minor tweaking with the wire springs to fit again, but as you can see here, the depth is pretty close to what it was before.
(And yes, we cleaned the fan before we put the cover back on.)


If you have unlimited cedar resources, you might just opt to pick another board, but as I mentioned above: Expensive! So, we tried to use everything; even the holey bits.
Before nailing in place, we marked where the hole would be and used a black marker to colour the ceiling so that the background behind the hole would be dark and show up less.
When done correctly, small gaps or missing knots are basically invisible.


We measured it for depth, adding about 1/8″ extra off to make popping it in place easier.
I then scribed the length of the board with a square and pencil to give me a line to run my circular saw down.
If you have a table saw at your disposal, then just set your fence at the proper depth and rip away.
Glue and nail your last board and you’re basically done.

Once it was back in place, some minor touch-up painting and caulking were all that was needed.
DONE!
This is just one of our DIY ceiling ideas! Check them all out here.
- Our DIY Panelled Plywood Ceiling
- Our DIY Herringbone Ceiling
- Our Tongue and Groove Ceiling
- Our Exposed Basement Ceiling Painted Black
- Our DIY Shiplap Ceiling


Robin and Ed are a DIY-loving couple with over 25 years of design and build experience. Also, Robin is a Nutritionist and former Registered Dietitian and Ed is an award-winning Business Educator. We share strategies for living a rich life on a DIY budget: creative money-savvy ideas for a stylish home, healthy meals and family fun. Our work has been published in the pages of Do It Yourself, Farmhouse Style and Better Homes & Gardens magazines.
Lynn
Monday 27th of March 2023
BRilliant! As usual! What a difference that cedar siding makes on the ceiling. I imagine it smells good too.
Robin & Ed Hicken
Wednesday 29th of March 2023
It's so much better isn't it, Lynn! The whole place smells better with this cedar ceiling - a great side benefit!
Mary Loveland
Monday 8th of August 2022
Wow, that really looks great! Good job you two! I think cedar is supposed to repel insects also eh?
frugalfamilytimes
Wednesday 17th of August 2022
Yes, Mary! It's another great side effect! :)